
DIY: How To Replace The Clutch Assembly on a Classic Air-Cooled Porsche 911
If you are having trouble getting into any gear on your manual transmission Porsche 911, its probably time to replace the clutch assembly.
Note: The following information is for educational use only. Before proceeding please read my disclaimer page.
Disclosure: This post contains links to Amazon products and other trusted vendors. As an Amazon Associate I earn from qualifying purchases.
If your air-cooled Porsche 911 has finally decided that its not going to go into gear anymore, and you have already serviced the easy stuff like the shifter bushings, clutch cable, pedal assembly, and replaced the gearbox oil, you may be facing a clutch replacement. While not a quick procedure, it is very similar to other clutch replacements and should look familiar. Like on other vehicles, it is a good time to do this if you have the engine and gearbox out for other repairs, or simply when it is due for a refresh. Read more to find out how it’s done.
Model Years Applicable:
All cable clutch manual transmission Porsche 911 cars through 1986. The photos and parts shown here are on a 1983 911SC but the general procedures apply to all years within this range. Consult a service manual for detailed information on your particular model year’s part numbers and torque specs.
Tools Needed:
- Jack stands
- 2 Floor jacks (if possible a motorcycle jack and 1 floor jack)
- A moving dolly or heavy duty flat cart with casters
- Wooden blocks
- Jack pad
- Rubber gloves
- Safety glasses
- Degreaser
- Paper towels
- Hex bit socket set or Allen wrench set
- 12-point 911 flywheel bolt removal tool (triple square bit set)
- Clutch alignment tool
- Flywheel lock tool (or make one with scrap angle iron)
- Penetrating oil
- Socket set
- Ratchet
- Breaker bar
- Lithium grease
- Service manual for your car’s model year
Parts Needed:
- One clutch kit containing:
- Qty 1 clutch disc
- Qty 1 pressure plate
- Qty 1 clutch release bearing
- Qty 9 pressure plate bolts
- Qty 6 pressure plate bolt lock washers (for early cars)
- Qty 1 flywheel (if yours is too worn)
- Qty 1 flywheel ring gear (if yours is damaged)
- Qty 1 pilot bearing
- Qty 3 pilot bearing bolts
- Qty 9 flywheel bolts (qty 6 for early cars)
- Qty 1 flywheel end crank seal
- Qty 1 clutch release fork (1972 and up)
- Qty 1 clutch release fork roll pin (1972 and up)
- Qty 3 clutch release fork dust seals (1972 and up)
- Because this procedure covers an extensive model year range it is recommended that you search for your car’s specific parts.
Replacement Procedure
Caution: Clutch discs can contain asbestos. Don’t breathe the dust or blow it around. Wear an appropriate respirator and protective clothing as needed.
Step 1: Raise Car on Jack Stands
Raise the entire car on jack stands using this procedure.
Step 2: Remove Engine and Gearbox
Remove the engine and gearbox using this procedure. This is fairly involved so you may as well plan other repairs “while you are in there”.
Step 3: Separate Engine and Gearbox
There are 4 nuts and studs holding the engine and gearbox together. Once the engine and gearbox are on the ground, remove the 2 nuts holding on the starter and set the starter aside. Remove the remaining 3 nuts on the gearbox bellhousing.
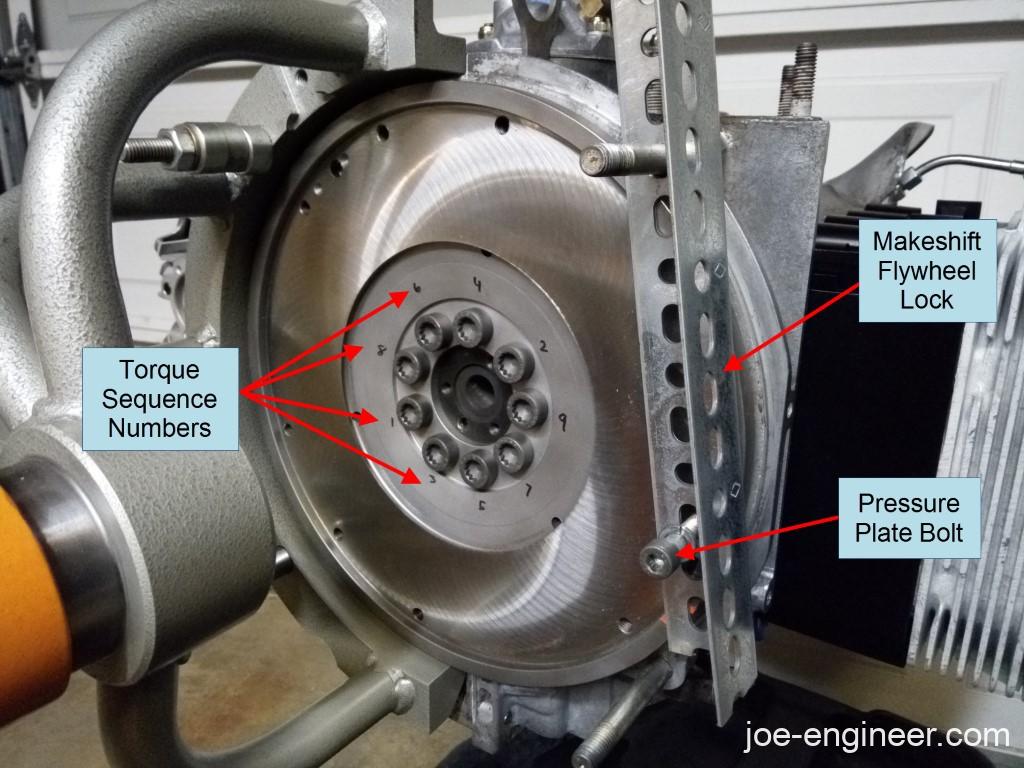
Step 4: Lock Flywheel
Note: The following photos were taken during a full engine teardown so please ignore the engine’s state of disassembly. You can perform this procedure with your engine on a dolly, motorcycle jack, or on the ground supported by wood blocks.
Use a flywheel lock tool to lock the flywheel teeth to one of the gearbox mounting studs. This will prevent the flywheel and engine from rotating while you loosen the pressure plate bolts and the flywheel bolts.
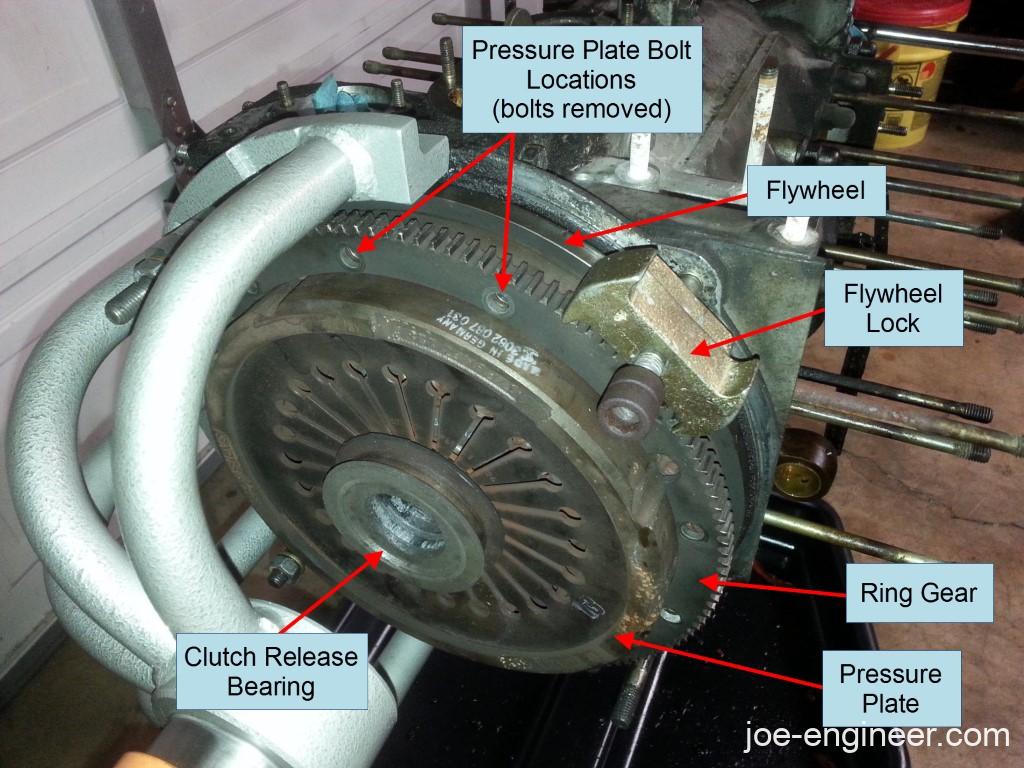
Step 5: Remove Ring Gear, Pressure Plate, and Clutch Disc
Using a hex socket remove the pressure plate bolts that go through the flywheel ring gear. On the 911SC there are a total of 9 bolts holding the ring gear and pressure plate to the flywheel. Once you remove all the bolts and the flywheel lock the ring gear should come off.
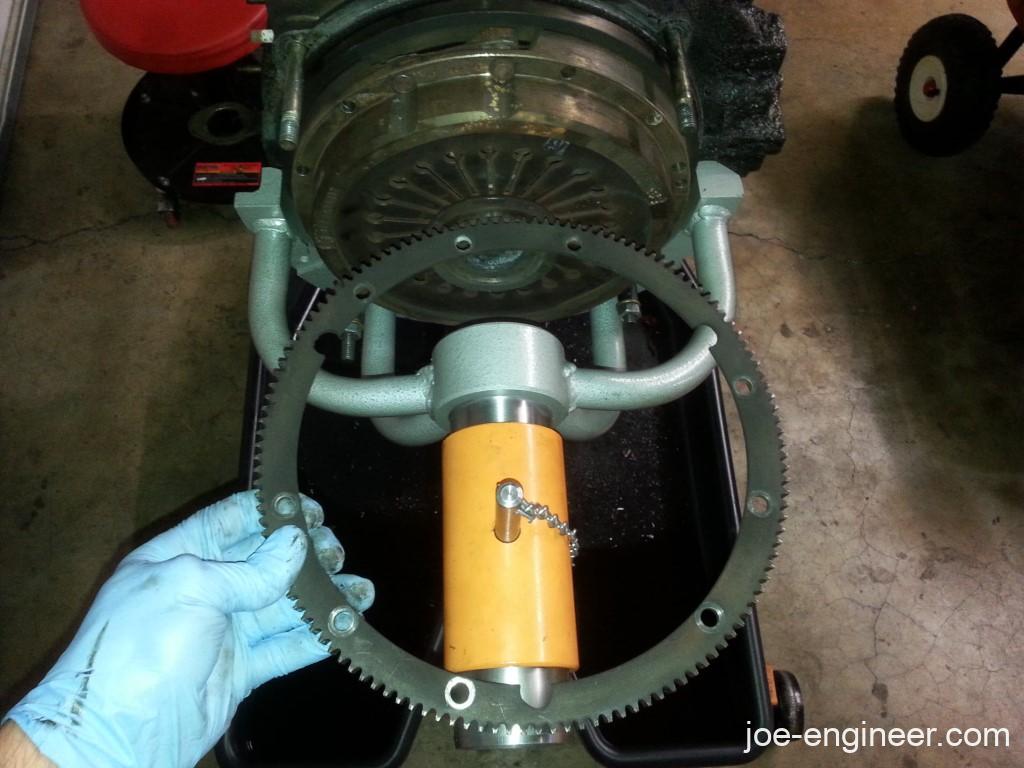
The pressure plate should also come off. If it does not, it may be stuck due to corrosion or clutch dust.
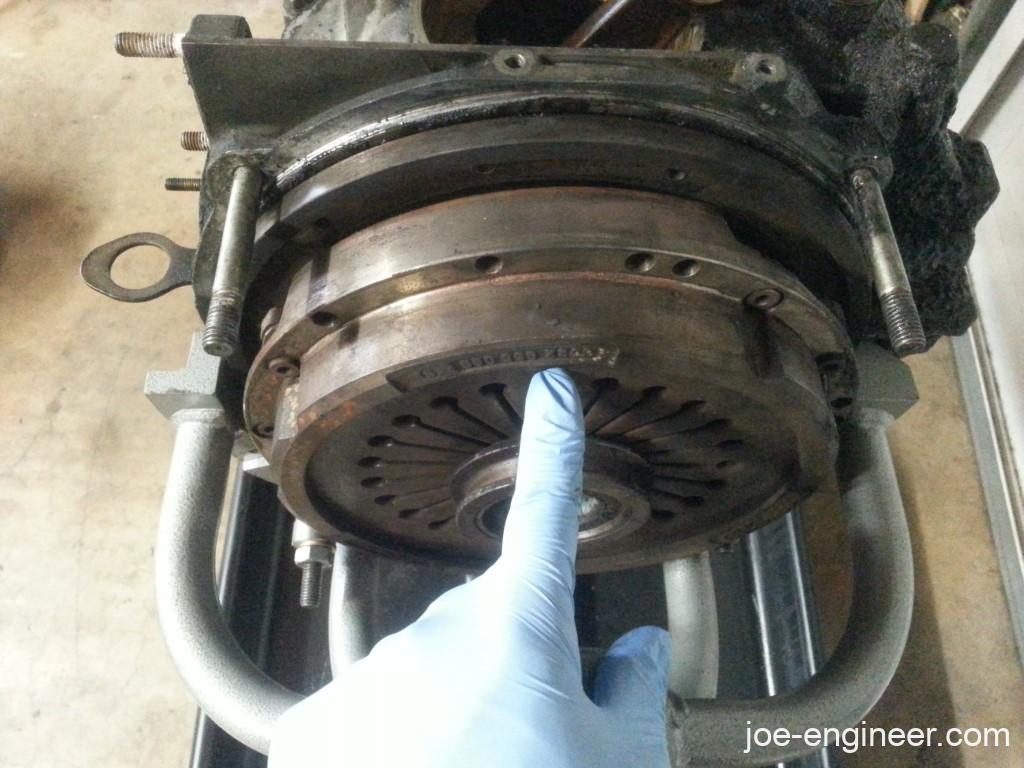
Use a rubber mallet to gently tap around the sides of the pressure plate until it releases. Once it does, you will see the clutch disc in between the pressure plate and flywheel.
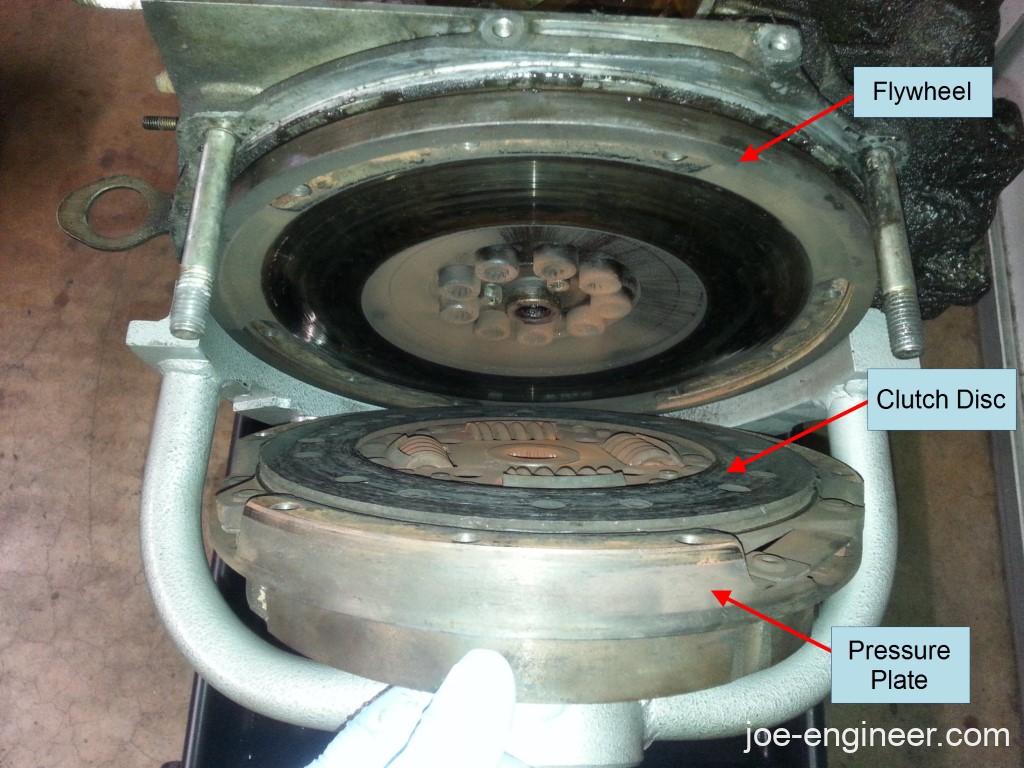
Set the pressure plate and clutch disc aside.
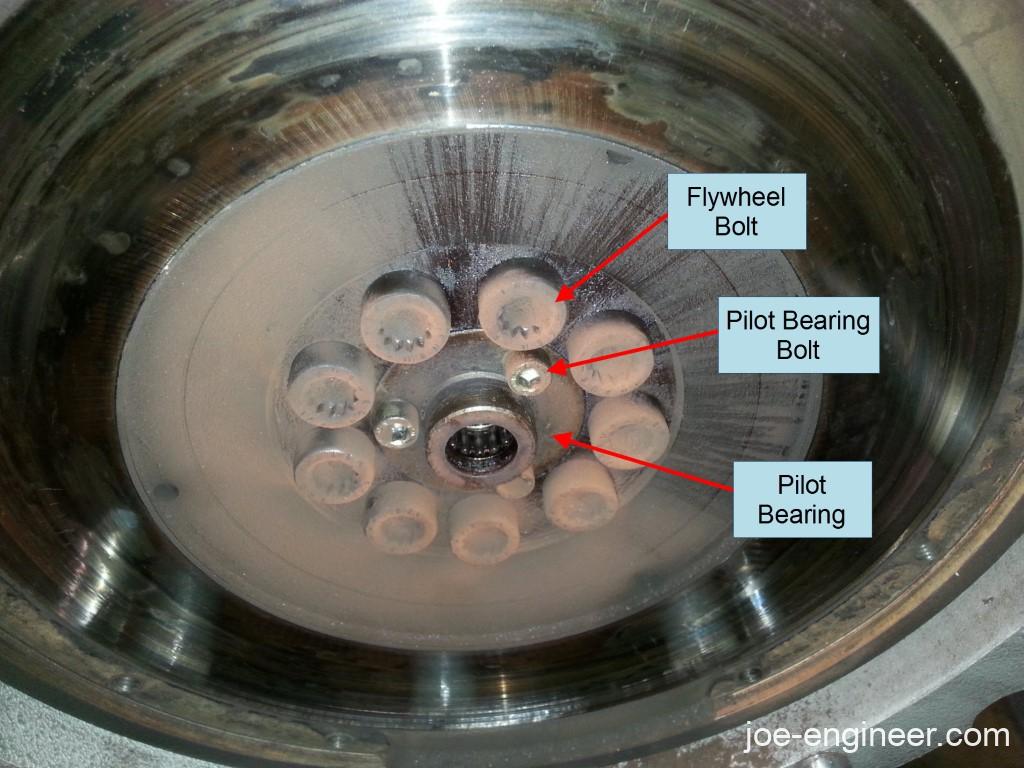
Step 6: Remove Flywheel
Re-attach the ring gear on the flywheel with 3 or 4 of the old pressure plate bolts, evenly spaced. Put the flywheel lock back on to keep the flywheel from turning and use the 12 point flywheel bolt removal tool to loosen the 9 flywheel bolts. Loosen the 3 pilot bearing screws as well.
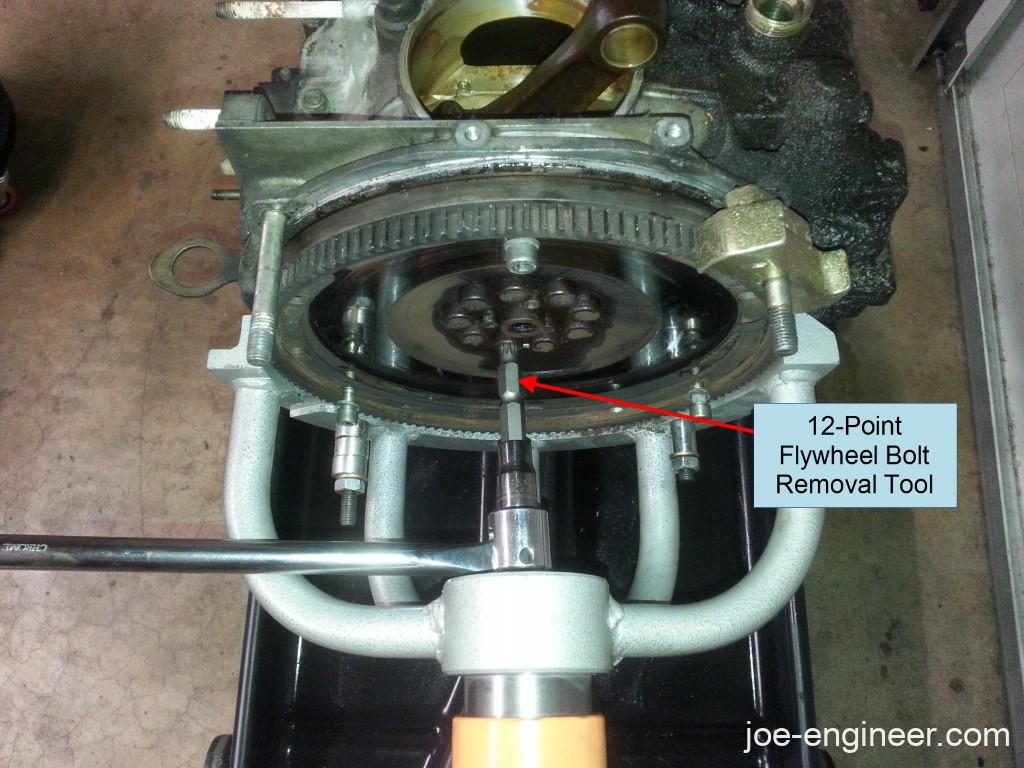
Remove the flywheel lock, the 9 flywheel bolts, and the flywheel should come off.
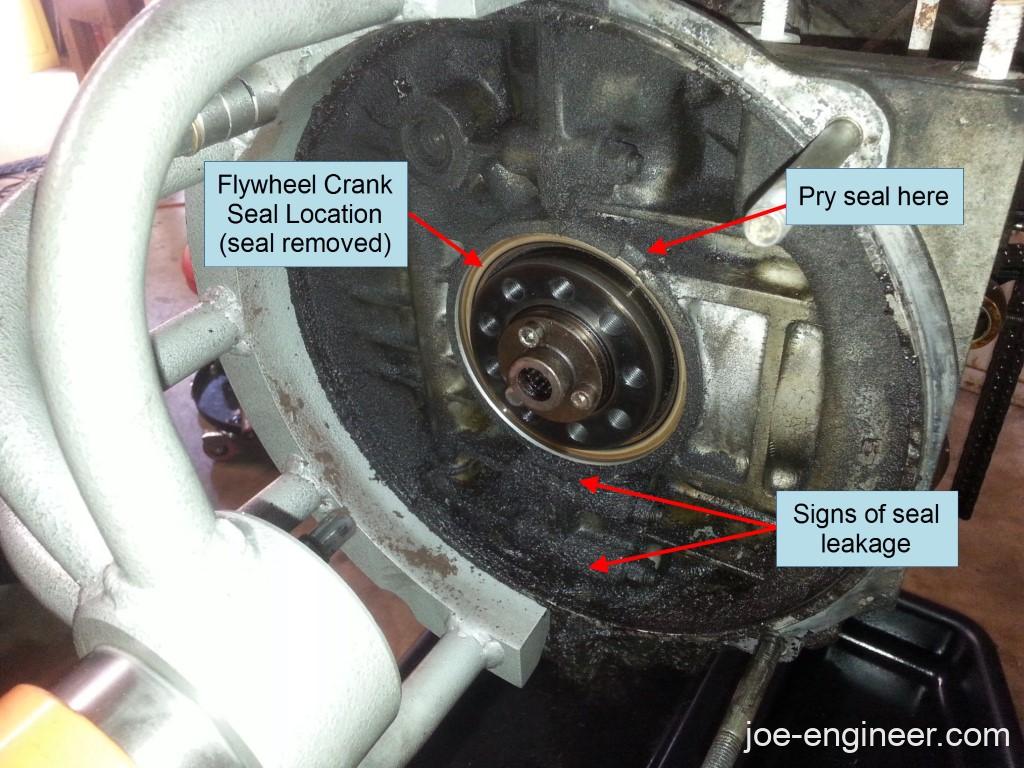
Look at the crank oil seal between the crankshaft and the case. This is the rear main seal in most cars except on a 911 this end of the engine faces forward. If you see any signs of oil leakage from that seal onto the engine case surfaces behind the flywheel then its a good idea to replace it. If that area is dry then it can be left alone but it is recommended that you replace it as long as you have done all the work to gain access to it.
Step 7: Replace Flywheel Crank Seal (if required)
If your flywheel crank seal requires replacement, first clean the surrounding area of dirt and oil. You will need to pry the seal out without damaging the sealing surfaces on either the engine case or the crankshaft. There is a slot in the case where you can start to pry out the seal with a flathead screwdriver or you can use a hooked seal extraction tool to pierce the seal, hook it from the inside and pull the seal outward. In any case be very careful with the sealing surfaces.
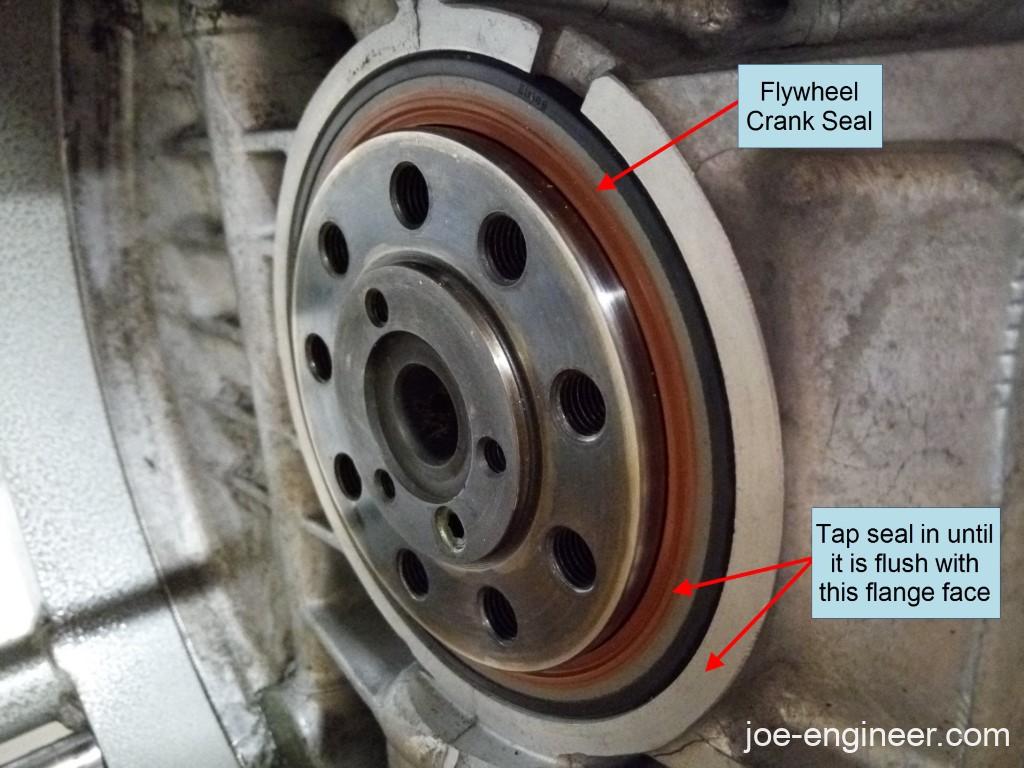
Clean the sealing surfaces on the crank and engine case of any dirt or particles. Wipe them dry then carefully press in a new seal. There is a special tool for that application but using a small block of wood and a hammer to gradually tap around the seal to slowly drive it in works as well. Drive it in flush with the surrounding flange in the case.
Step 8: Reinstall Flywheel
Your service manual will have flywheel service specifications for your particular year’s engine. If you have a machine shop nearby you can take this information and your flywheel to have it inspected and resurfaced. If you do have it resurfaced you will have to re-balance it along with your new pressure plate and ring gear as an assembly. If you would rather not go through that process, new flywheels and pressure plates should be fairly well balanced out of the box but you can send those out too just in case.
If you have a 1979 and earlier car your flywheel has the pilot bearing lightly pressed into it. Note the orientation of the bearing so you can install a new one the same way. Carefully tap out the old one and press a new one into the center of the flywheel with a press or gently tap it in with a soft mallet or a brass punch until it is flush with the surface that faces the crank.
Mount your new or reconditioned (and balanced) flywheel onto the crank and install new flywheel bolts finger tight with a drop of Loctite 271 on each bolt’s threads. Make a quick flywheel lock with a piece of steel with 2 holes in it or a piece with holes in it like the one below from your local hardware store and a pressure plate bolt. You can also temporarily attach the ring gear and flywheel lock like in Step 6. Bolts must be torqued in a star or criss-cross pattern and in about 20Nm (15 ft-lbs) increments until you reach the final installation torque. Cars through 1977 use a 6-bolt flywheel and final torque is 150 Nm (110 ft-lbs). These years use washers underneath the bolts. Cars 1978-1986 use a 9-bolt flywheel and final torque is 90 Nm (66.3 ft-lbs).
Step 9: Install New Pilot Bearing
If you have a 1979 and earlier car, you already pressed the pilot bearing into the center of the flywheel. If you have a 1980 and later car, install the new pilot bearing in the center of the flywheel with new bolts. Torque the bolts to 10 Nm (7.4 ft-lbs). For all years, apply a bit of lithium grease to the center of the bearing.
Step 10: Install New Clutch and Pressure Plate
Use a clutch centering tool to locate the new clutch disc to the pilot bearing.
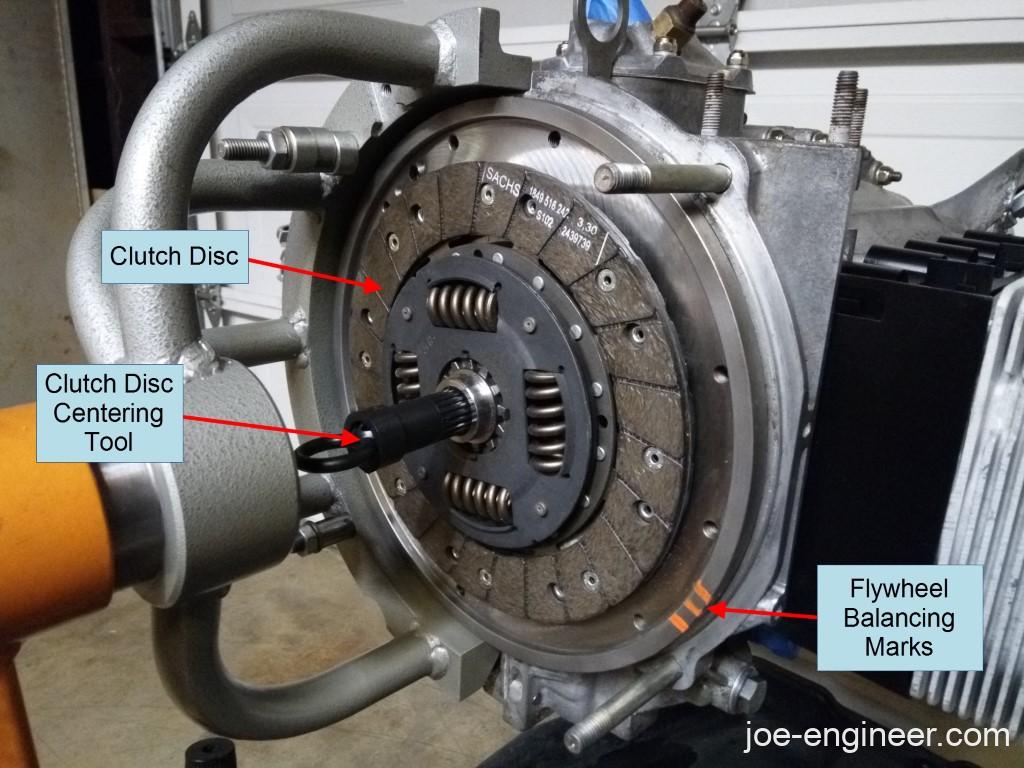
On 1969 and earlier cars, the clutch release bearing is on the gearbox. Please follow the service manual for details on the early car replacement procedure. On cars 1972-1986 install the new clutch release bearing onto the new pressure plate. The clutch release bearing has a series of circular springs and shims that lock the bearing into the center hole of the pressure plate. Follow the instructions that come with the new bearing to install all the rings correctly and lock the bearing in place. Then install the new pressure plate onto the flywheel, followed by the ring gear on top of that. If you sent the flywheel, ring gear, and pressure plate to get balanced, make sure you line up the marks the machine shop made to keep the whole assembly balanced. Install new flywheel bolts and washers finger tight then gradually tighten them all snug in a star or criss-cross pattern. Final torque them to 25 Nm (18.4 ft-lbs). At this point the clutch disc is clamped in place and you can remove the centering tool.
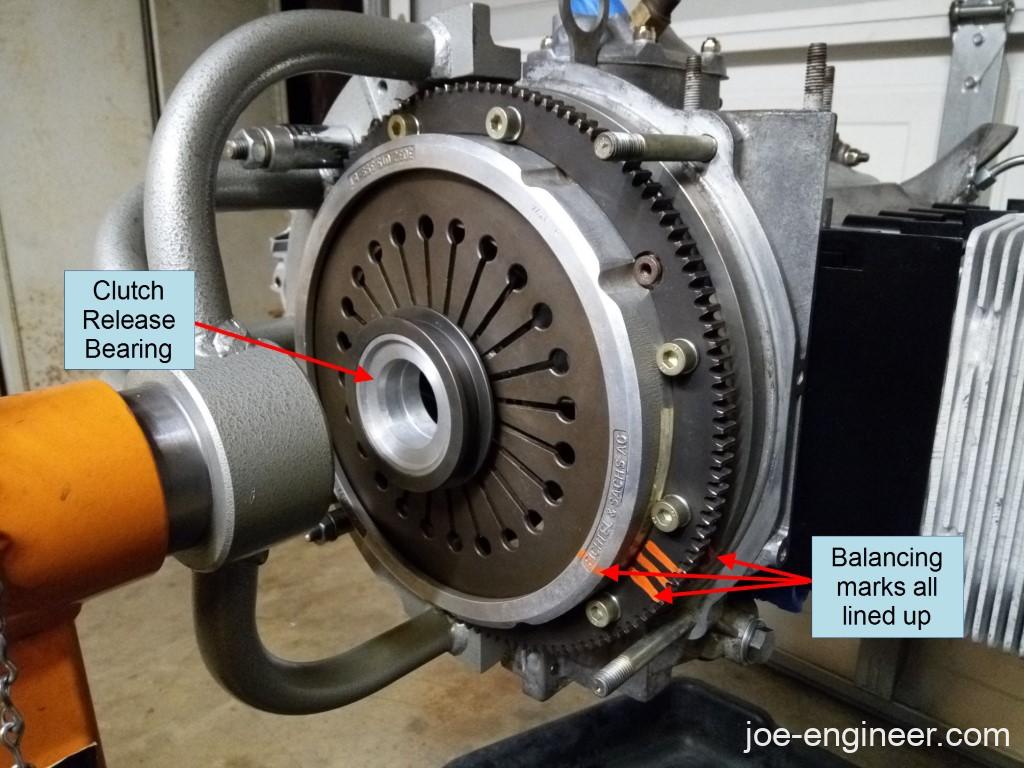
The engine side of the clutch assembly is now complete.
Step 11: Inspect and Service Gearbox Side Parts
You have done a lot of work to get to this point. As long as the engine and gearbox are apart, inspect and replace any worn clutch components on the gearbox. The guide tube around the gearbox input shaft wears along with the clutch release bearing. If its outer surface is significantly worn (or if it is leaking gearbox oil) replace it using this procedure.
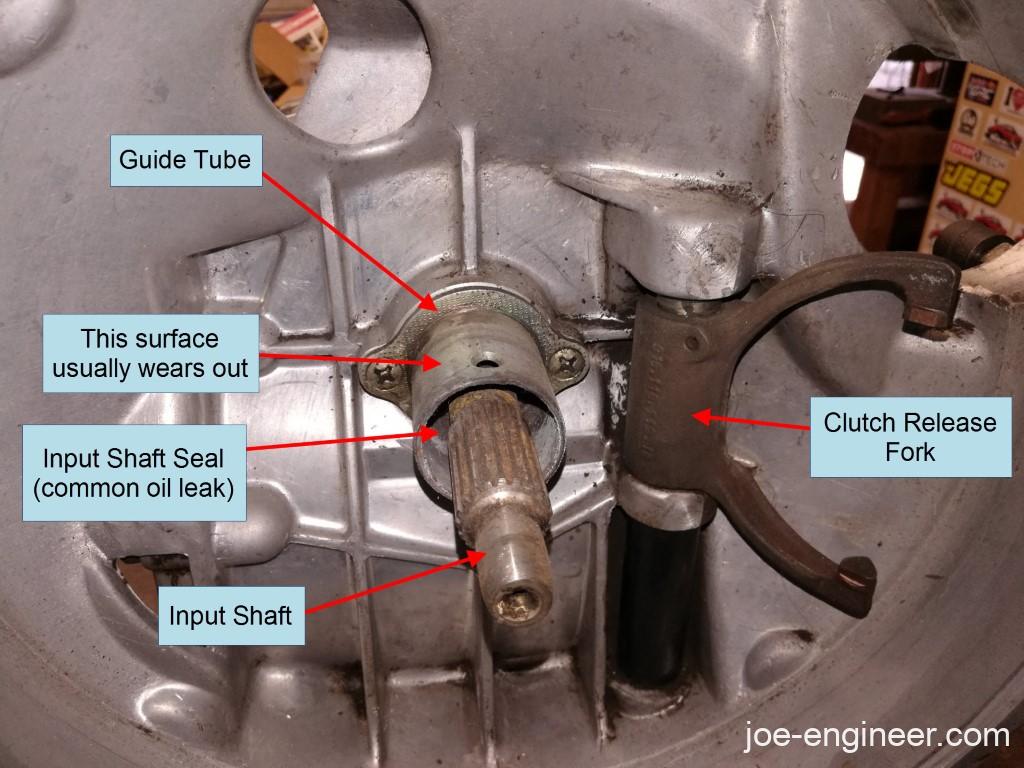
Next to the guide tube is the clutch release fork. These are on 915 gearboxes 1972 and later. It is a good idea to replace it as they commonly break rendering the clutch inoperable. Notice the orientation of the pads on the ends of the fork so the new fork can be re-installed the same way. Start by tapping out the roll pin at the top. Pull it out of the other side with pliers or vise grips.
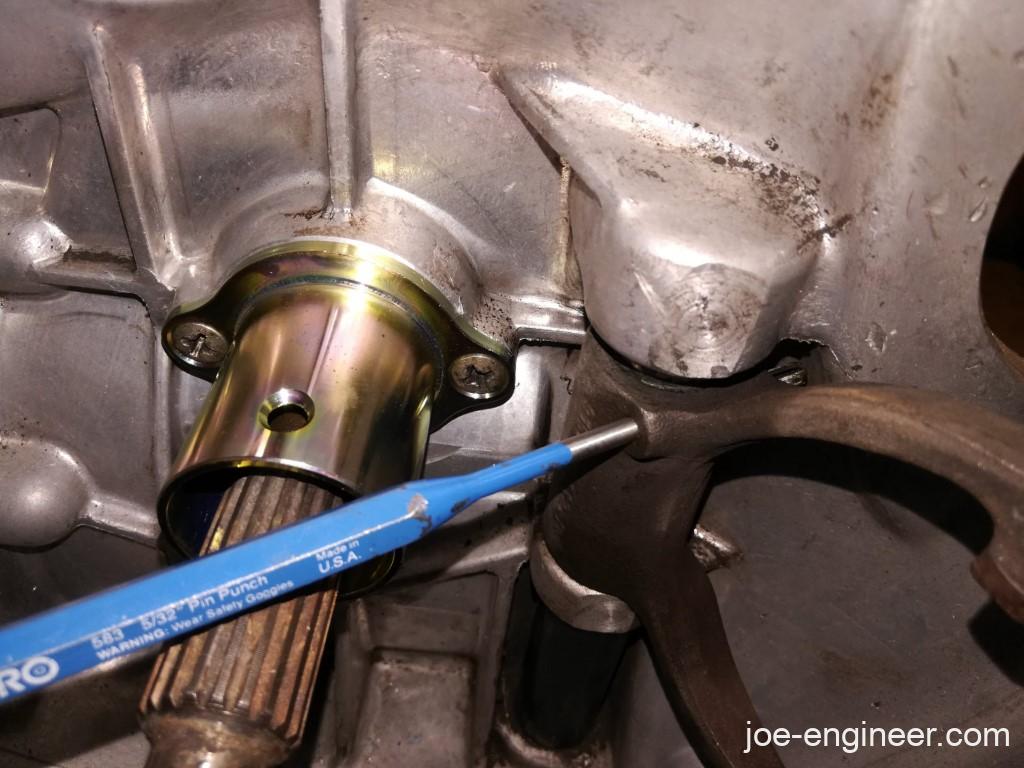
The release fork shaft should now pull straight out from below the gearbox and the release fork can be removed. Clean out the dirt and grease in the cavity where the shaft goes.

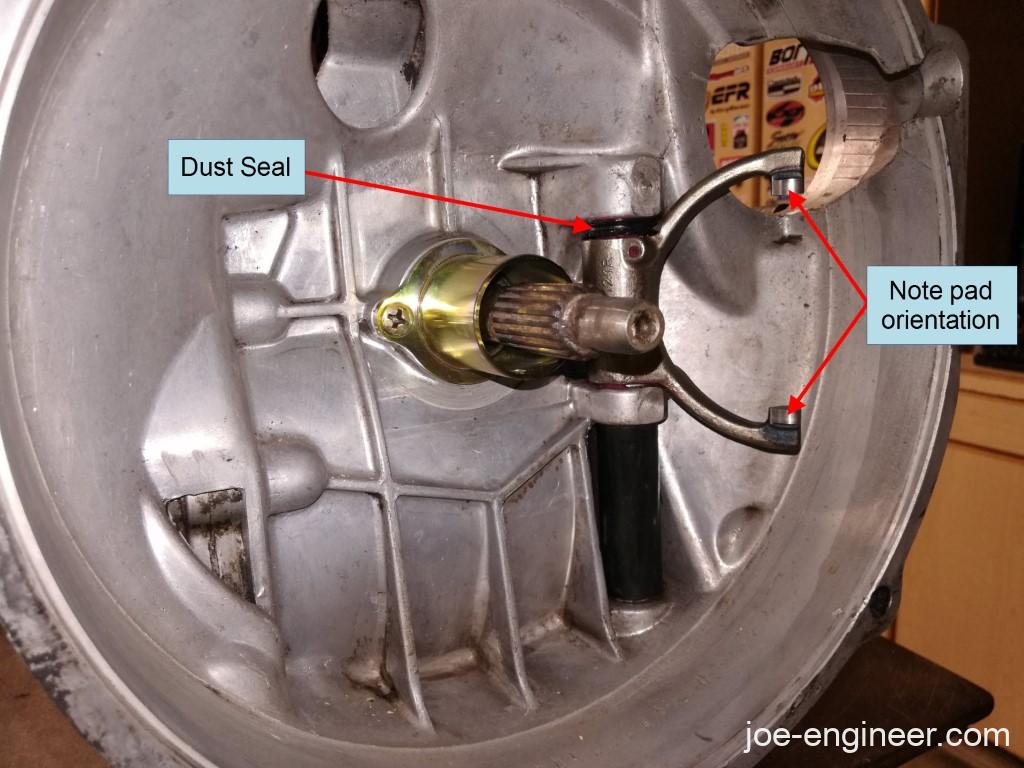
Clean the shaft and replace the fork and the dust seal that goes above the fork. The other two seals go above and below the clutch release arm once it is installed on the bottom end of the shaft (not shown).
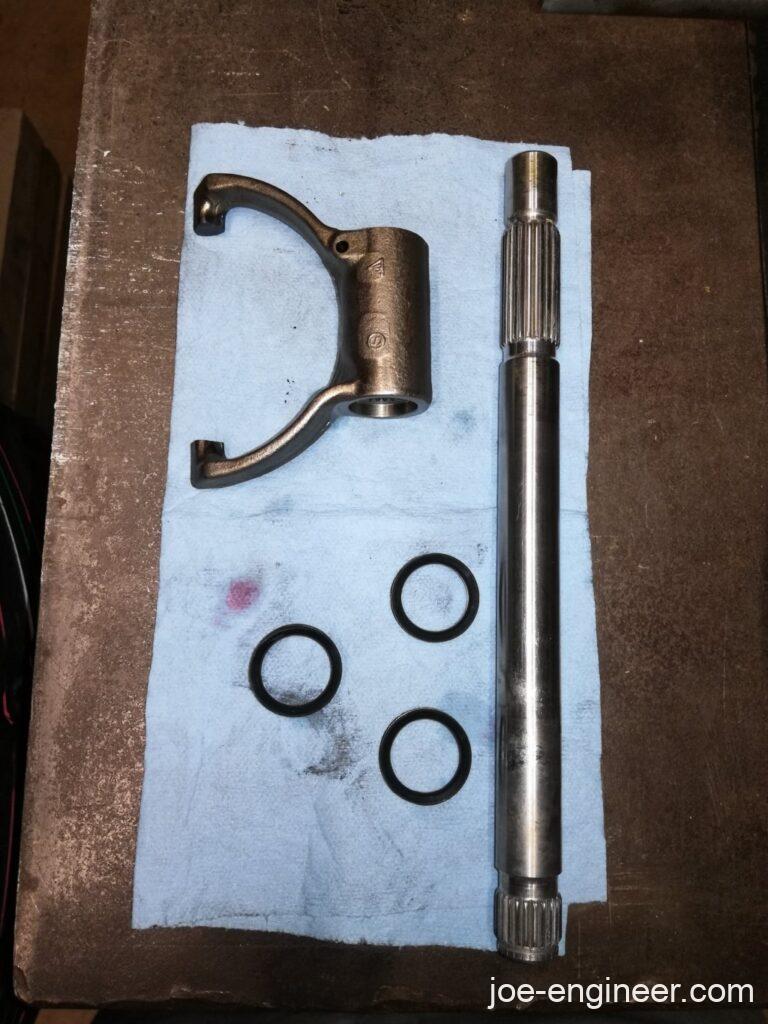
Re-grease the shaft, shaft cavity, and reassemble the fork and both dust seals in the same orientation as before. Tap a new roll pin into the fork to secure it on the shaft. Note that the roll pin sits in the top groove of the shaft and this locks the shaft and fork in place.
The gearbox side of the clutch assembly is now complete.
Step 12: Mate Engine and Gearbox
Put a little bit of grease on the outside of the guide tube and the rounded pads of the clutch release fork. Re-assemble the gearbox onto the engine while rotating the clutch release shaft so the fork ends sit in the center groove of the clutch release bearing, as shown below. There is an inspection hole in the top of the bellhousing so you can see the fork and clutch release bearing.

If you are having trouble fully seating the gearbox and engine together, try turning both gearbox stub axles in the same direction to get the input shaft to rotate a bit and match the clutch disc splines. Re-install the 3 engine/gearbox mounting nuts, the starter, and its 2 mounting nuts and torque them to spec. On the 911SC this is 45 Nm (33 ft-lbs).
Final Step: Re-install Engine and Gearbox
If you are finished working on the engine and gearbox out of the car, follow this procedure to put them back in the car. Then, if you haven’t already done so, replace the clutch cable using this procedure to make sure your newly refreshed clutch assembly is adjusted properly.
Put the car back on the ground for a test drive. You should have a dramatically lighter clutch pedal and much better shifting for many years to come.