
DIY: How to Replace the Clutch Cable on an Air-Cooled Porsche 911
If the clutch engagement on your car could use some help, a good starting point to gain improvement is to replace that old clutch cable.
Note: The following information is for educational use only. Before proceeding please read my disclaimer page.
Disclosure: This post contains links to Amazon products and other trusted vendors. As an Amazon Associate I earn from qualifying purchases.
Your 1986 and earlier air-cooled Porsche 911 has an old school cable-actuated clutch. It is very straight forward to replace and could help you quickly diagnose a faulty clutch if your cable is old and has not been replaced in some time. Follow the procedure below to learn how to change it out easily.
Model Years Applicable:
All manual transmission Porsche 911 cars 1986 and earlier. The procedure shown here is on a 1983 911SC.
Tools Needed:
- Safety glasses
- Box wrench set
- Hex wrench set
- Needle nose pliers
- Lithium grease
- Feeler gauges (for 1977 and later cars)
- 6 inch calipers or 6 inch scale (for 1977 and later cars)
- 4 Jack stands
- Floor jack
Parts Needed:
- Clutch cable
- Clutch clevis (if yours is damaged)
- Clutch clevis pin
Clutch Cable Replacement Procedure
Caution: Exercise extreme caution when working under the car.
Step 1: Raise Car on Jack Stands
Raise the rear of the car or the entire car on jack stands using this procedure.
Step 2: Disconnect Clutch Cable at Pedals
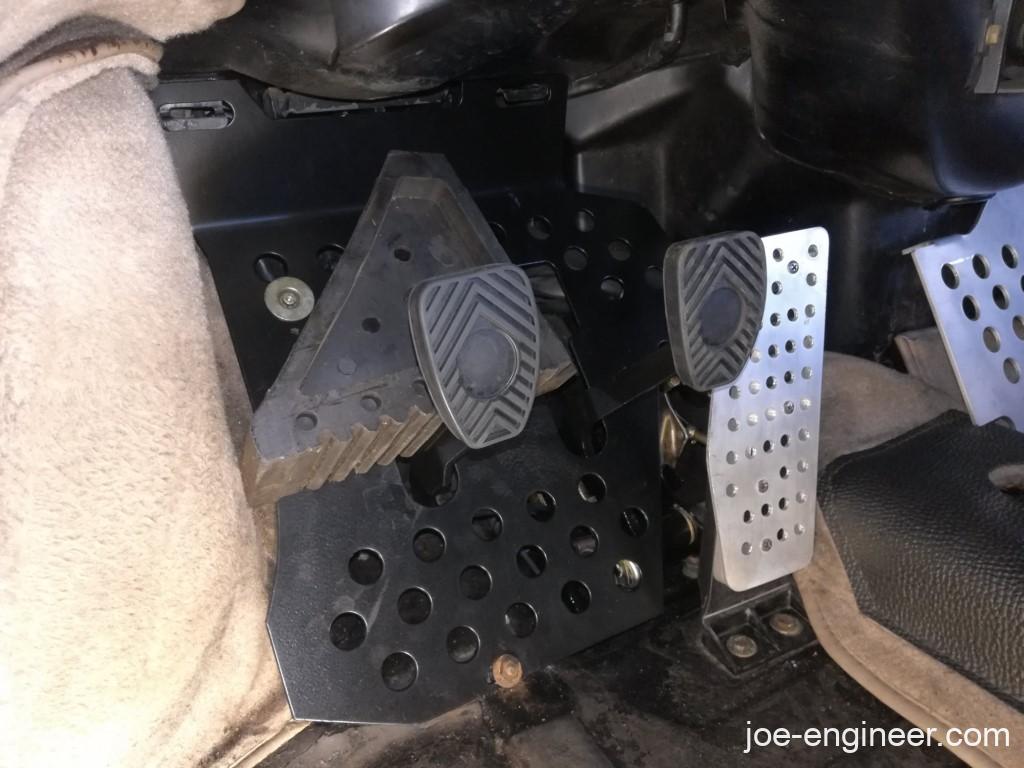
Remove the driver side floorboard and throttle pedal using step 2 of this procedure. Look at the pedal assembly and at the far right side you will see the end of the clutch cable connected to the clutch pedal arm using a clevis and pin. Move the clutch pedal with your hand to see the clutch arm moving the cable.
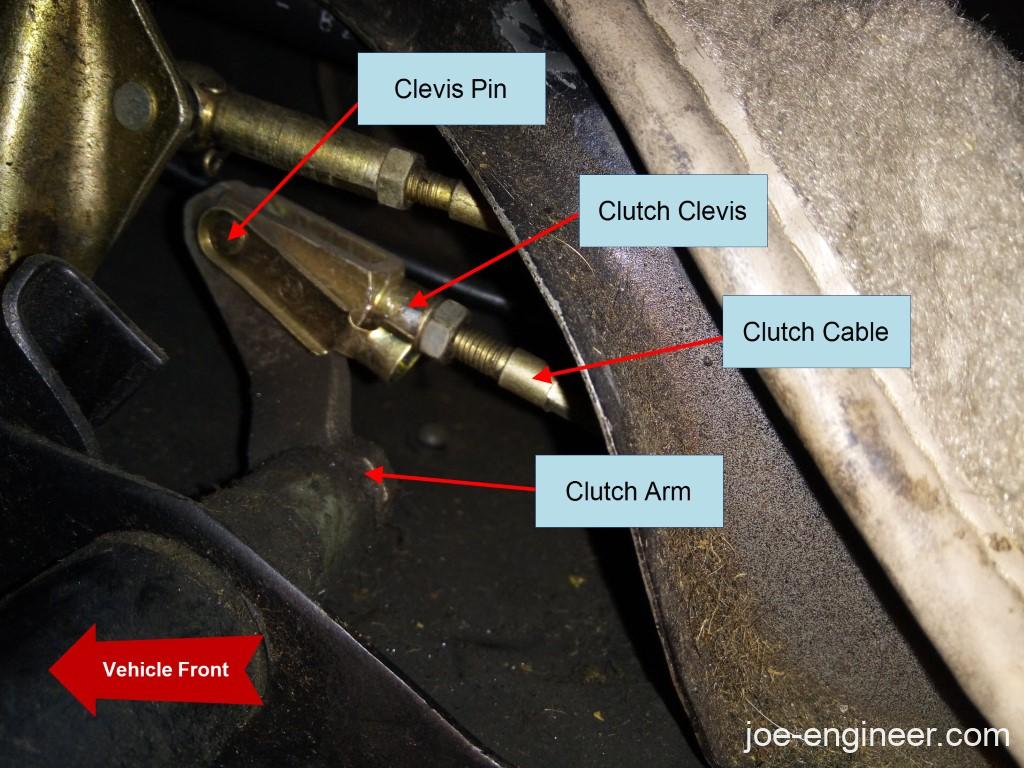
Remove the pin from the clevis and disconnect the clutch cable using step 4 of this procedure. Depending on how worn out the clevis pin is on the clutch arm it may be very challenging to remove it. If you destroy it, they are very inexpensive to replace.
Once the pin and clevis is off the clutch arm, inspect the end of the clutch arm and its bushing. If the bushing is damaged or if the clutch arm is worn through you will have to remove the entire pedal cluster and rebuild it to replace the arm or the bushing using this rebuild procedure. If your clutch arm is worn through, you are a few pedal pumps away from having no clutch actuation at all.
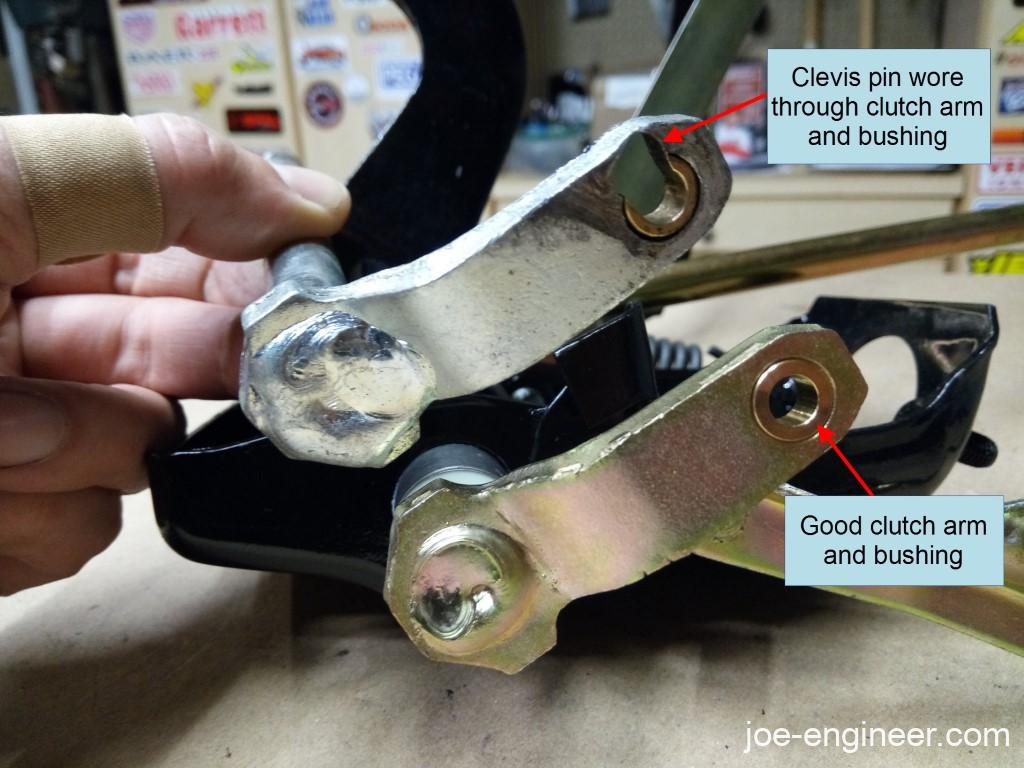
Unfortunately this is not optional. If the clutch arm or bushing is worn, not only will your clutch not operate correctly but it is likely the remainder of the pedal cluster is in similar condition and may be causing other issues with braking and throttle operation.
If the bushing and clutch arm are in good shape, you can save the pedal cluster rebuild for another day.
Unscrew the clevis and its lock nut out of the threaded end of the cable. If it is rusted or stuck in place, cutting the clutch cable is a perfectly acceptable alternative as you will be throwing the cable out anyway. Save the clevis and its lock nut for reuse if it is in good shape.
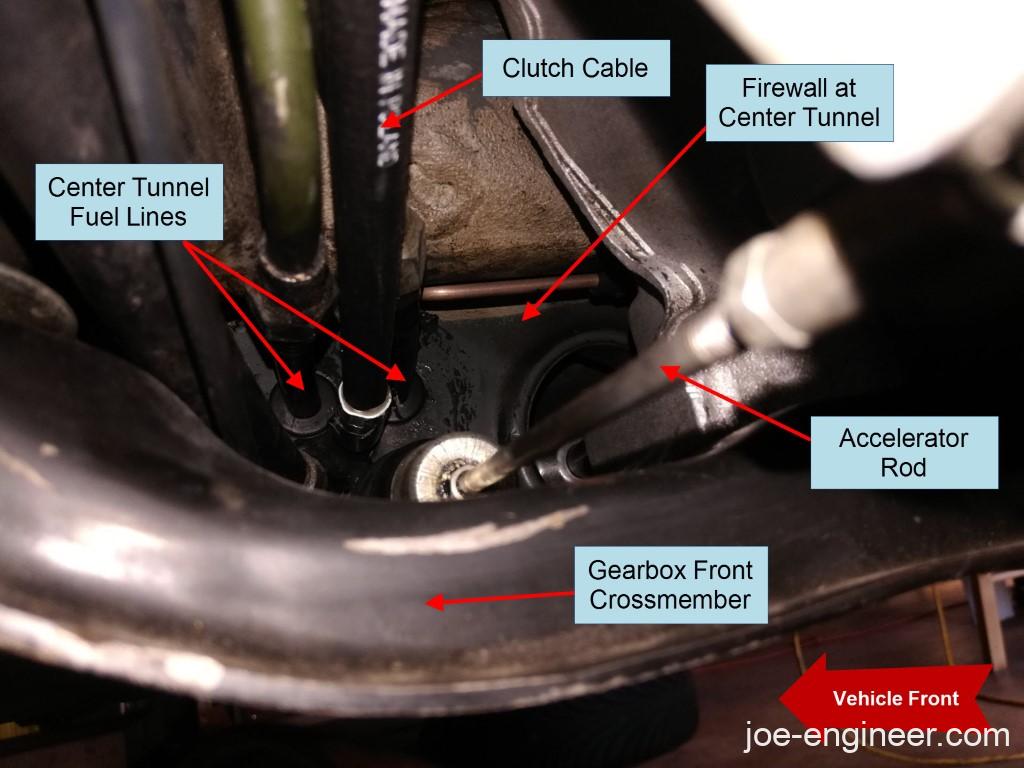
Step 3: Disconnect Clutch Cable at Gearbox
Locate the clutch cable under the car at the gearbox. Follow it from its end attached to the clutch release arm, down the side of the gearbox, and up to where it enters the body at one of the various openings of the center tunnel at the bottom of the firewall.
On 1976 and earlier cars the clutch cable feeds through a hole in a gearbox case flange and attaches to a simple throwout arm. On 1977-1986 cars the clutch cable attaches to a support mounted to the side of the gearbox case and is connected to a large clutch release arm and a large omega-shaped helper spring.
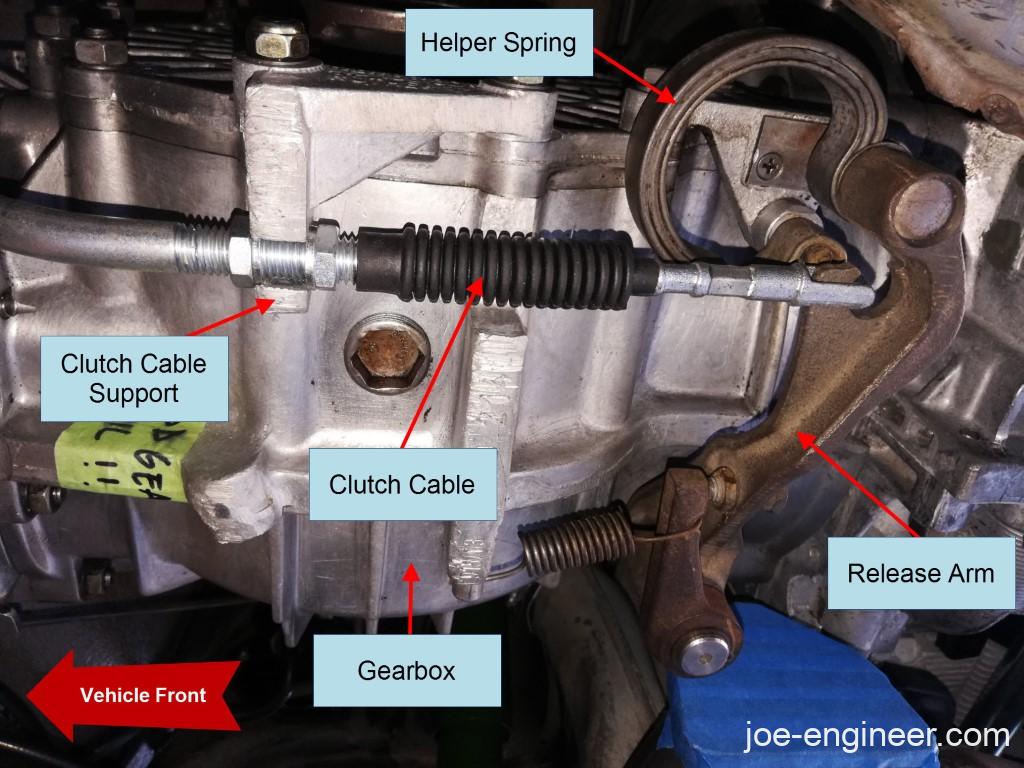
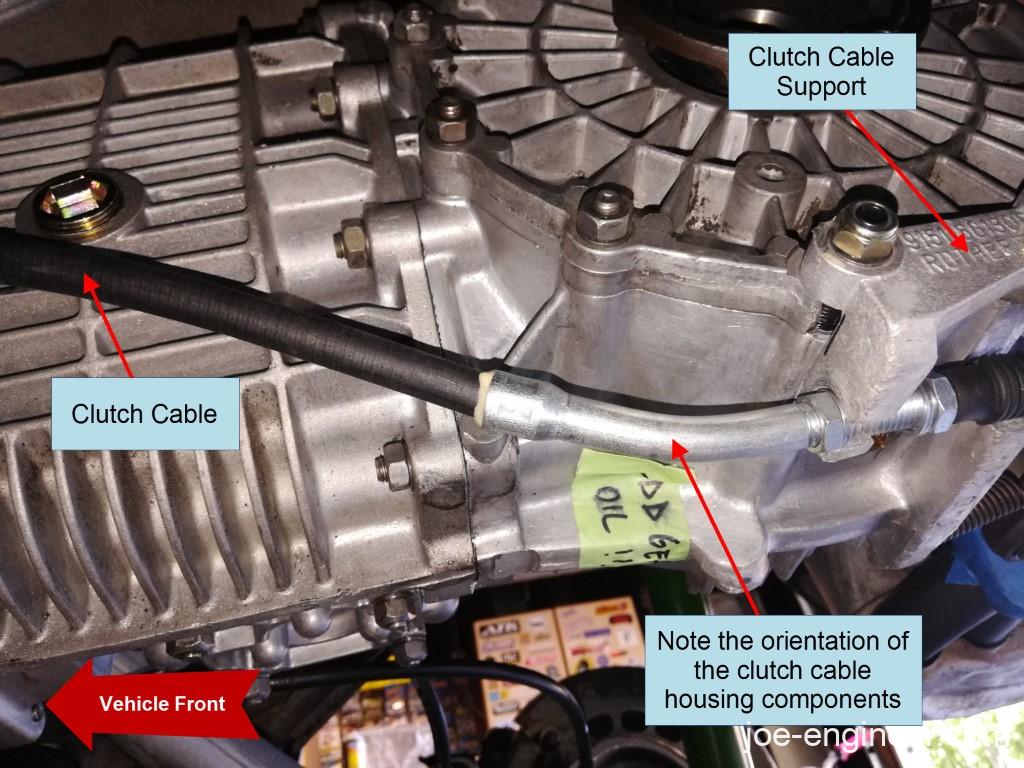
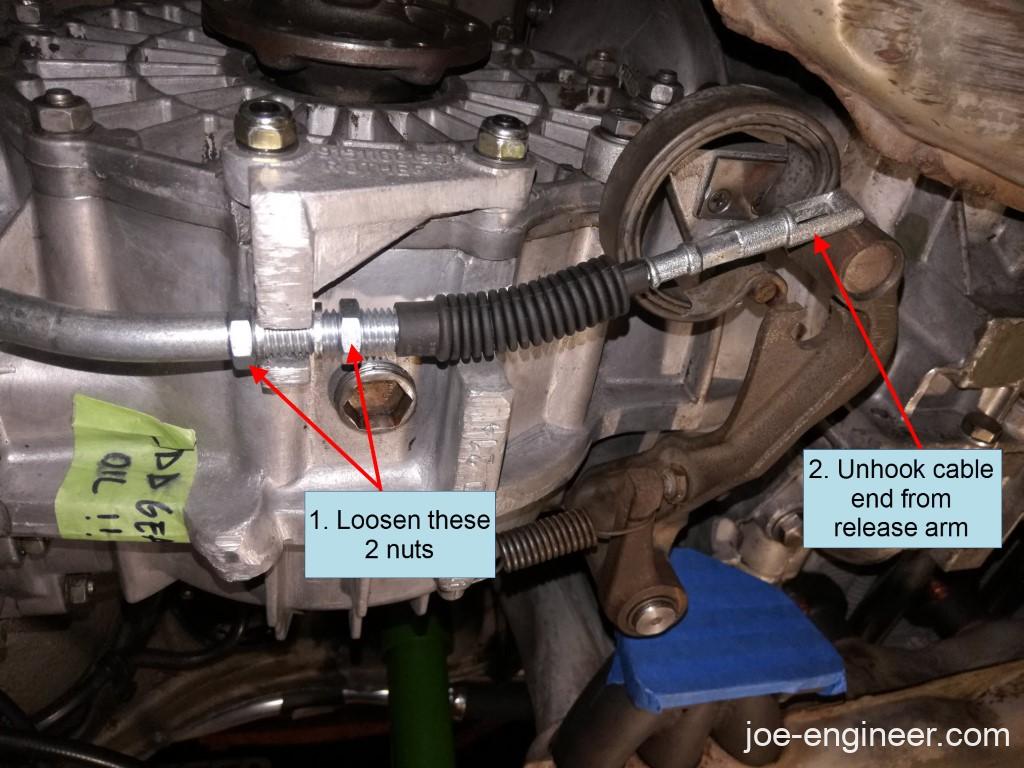
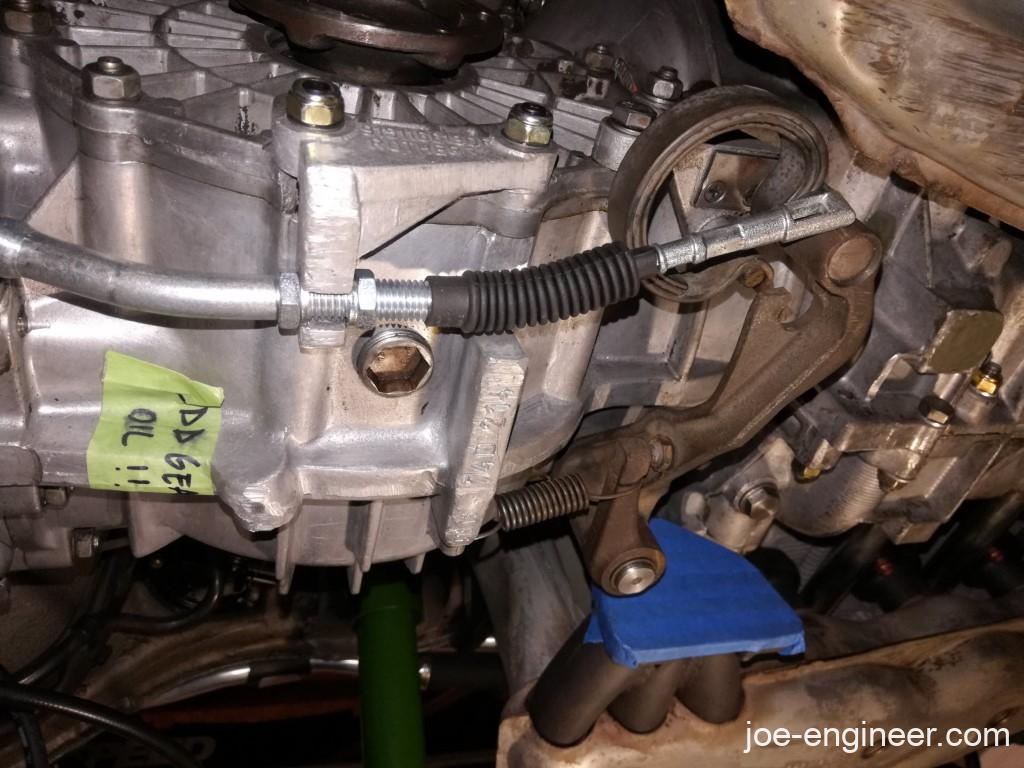
On the early cars, unscrew the nuts on the end of the cable and pull the cable out of the mounting hole. On the later cars, loosen the nuts holding the cable to the support and slide it out of the support. At this point you should be able to unhook the end of the cable from the large release arm.
Step 4: Remove Clutch Cable from Body
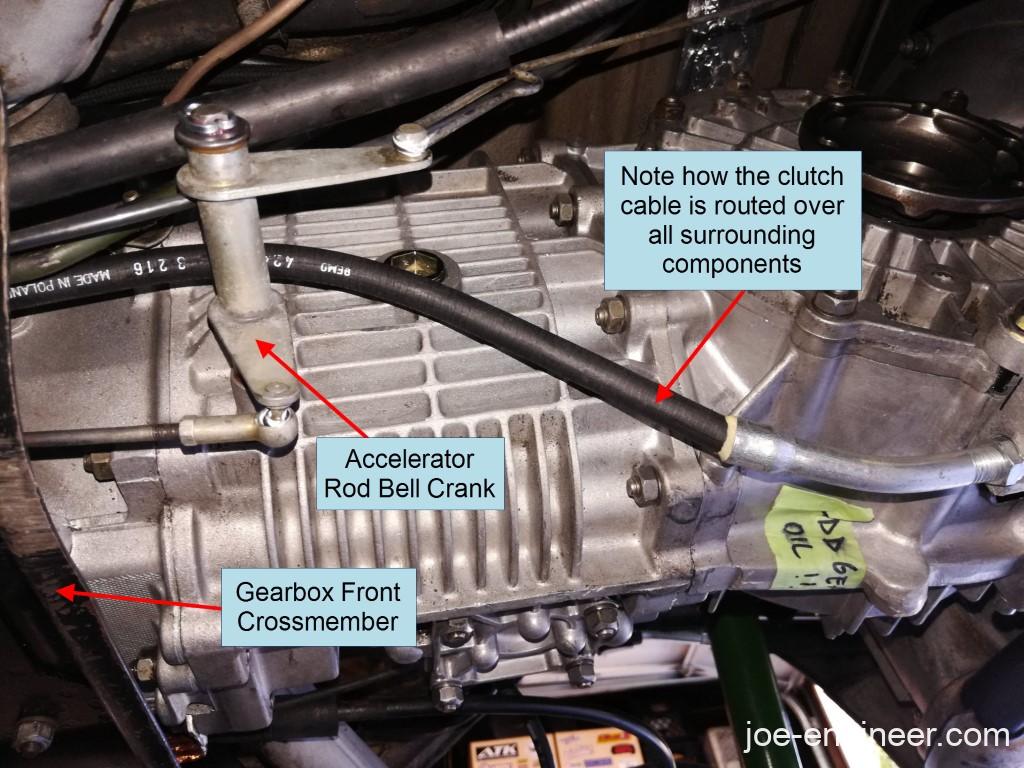
Since the clevis has been removed off the front end of the cable, you should be able to pull the clutch cable out from the back of the car. Note how the cable is routed over the transmission crossmember and around the various other lines and slowly pull the cable completely out.
Step 5: Install New Cable
Slide in the new cable into the body, routing it the same way as the old cable. There is a metal fitting on the cable that will slide over the short tube at the firewall as it seats into its final position. Make sure the cable fitting is fully seated on the short firewall tube so you don’t have trouble adjusting your clutch later.

On the early cars, make sure the cable is routed through the gearbox case flange hole.
At the pedal assembly, screw the lock nut and clevis back onto the threaded end of the cable. Measure the distance between the end of the clevis and the threaded end of the cable. Thread the clevis in so that this distance is between 17-22mm. 20mm should work for most cars. Then tighten the locknut against the clevis. If you don’t dial in this dimension at this point you will have trouble doing the remainder of your clutch adjustments afterwards.

Grease a new clevis pin with lithium grease, slide it through the clutch cable clevis and clutch arm, and snap the clevis pin onto the clevis. Install the pin from right to left and snap it over the clevis instead of the opposite side as it will make it easier to remove in the future. If it ever gets stuck, you can push it out with a screwdriver instead of fighting it from the back side.

Leave the pedal floorboard off until after you complete the final adjustments at the end.
If you have an early car, loop the rear end of the cable through the release arm and install the 2 nuts loosely. On the later cars, loosely mount the threaded cable housing to the mounting bracket on the gearbox and finger tighten. Leave the looped end of the cable hanging for now.
Step 6: Adjust Clutch Engagement
On the 1976 and earlier cars, check the clutch pedal free play by pulling back on the pedal with your hand. This should be approximately 1 inch. Adjust the nut at the end of the cable until you achieve the correct pedal free play, then tighten the lock nut.
Now you will perform the cable fine adjustment. The general procedure is to tighten the cable at the gearbox end if it grinds going into gear and loosen it if you cannot fully engage the clutch and it slips. You should end up with a release fork that travels approximately 15mm if the clutch is in good condition. Start by turning on the car and letting it idle. Then press in the clutch, hold for a few seconds, and shift into reverse. If it grinds, the clutch is not fully disengaging when you press the pedal and must be tightened. If the clutch slips or doesn’t engage after you release the pedal in gear it must be loosened.
Re-install the pedal floorboard, put the car back on the ground, drive it to confirm clutch adjustment, and fine tune it as needed once on the ground.
On 1977-1986 cars, the clutch release mechanism is a bit more complex and should be adjusted while the car is in the air.
With the looped end of the cable disconnected, loosen the stop bolt lock nut and turn the bolt until the gap between the end of the bolt and the small clutch positioning arm is 1.2mm (.047 inches). Use feeler gauges to measure this gap and tighten the lock nut once the gap is set.
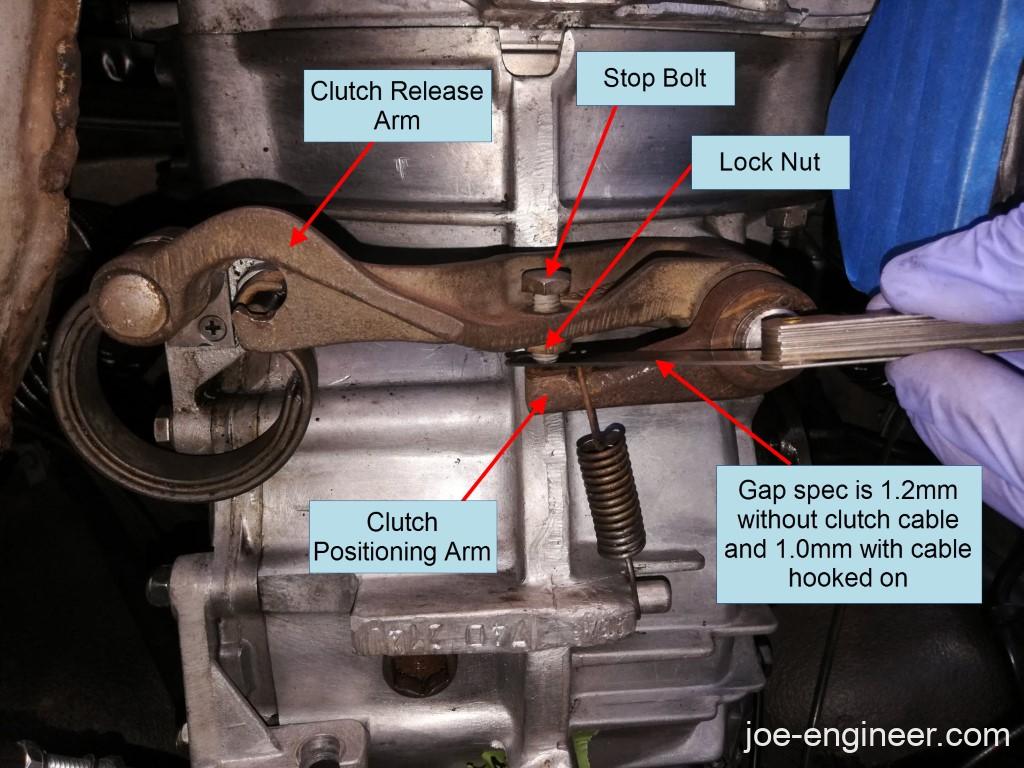
Now hook the end of the cable onto the large release arm. If you can’t quite pull the end of the cable over the release arm hook, install the pedal floorboard and throw a wheel chock behind the clutch pedal to pull it as far back as possible, giving you extra slack in the cable.
Remove the chock after attaching the end of the cable. Turn the nuts on the mounting bracket to pull the cable and reduce the 1.2mm gap you previously set, down to 1.0mm (.04 inches). This sets the cable preload. If you can’t set this new gap, re-check your clevis measurement at the pedal assembly to make sure it is within spec. Tighten the cable housing nuts when finished.
Lastly, grab a helper to push the clutch pedal all the way down while you measure the total travel of the clutch cable. The easiest way to do this is measure from a spot on the end of the cable to the mounting bracket. Take this same measurement with the clutch pedal fully released and fully depressed and subtract the larger distance from the smaller one. Total cable travel should be 25 +/- 0.5mm (0.98 +/- 0.02 inches).
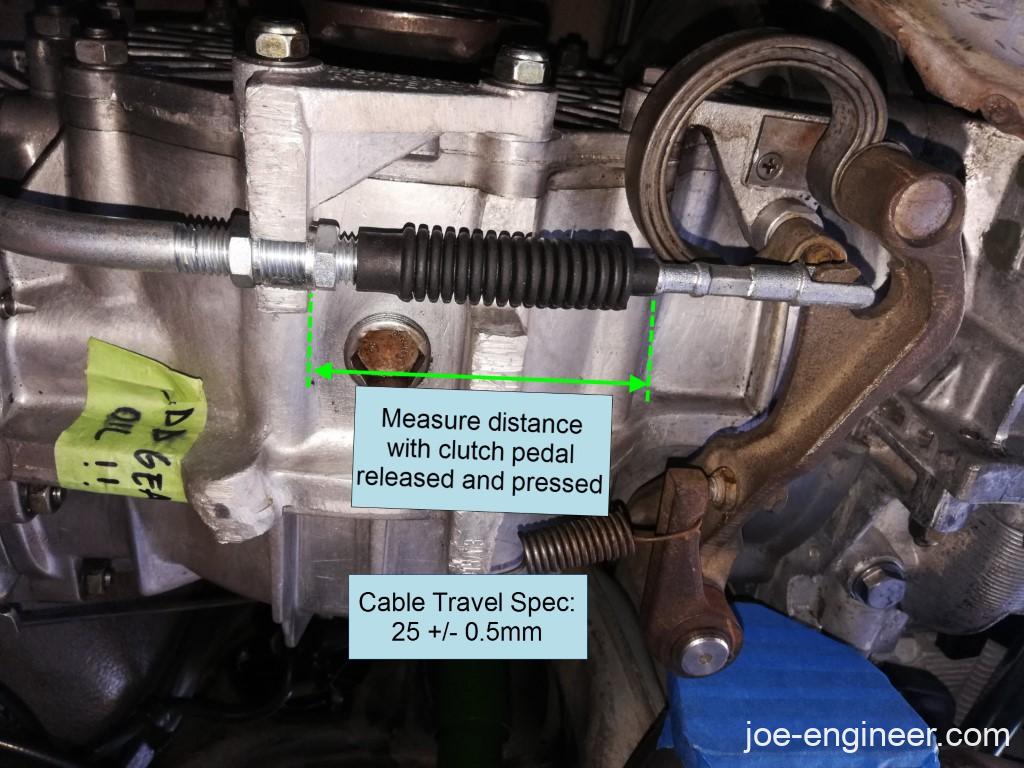
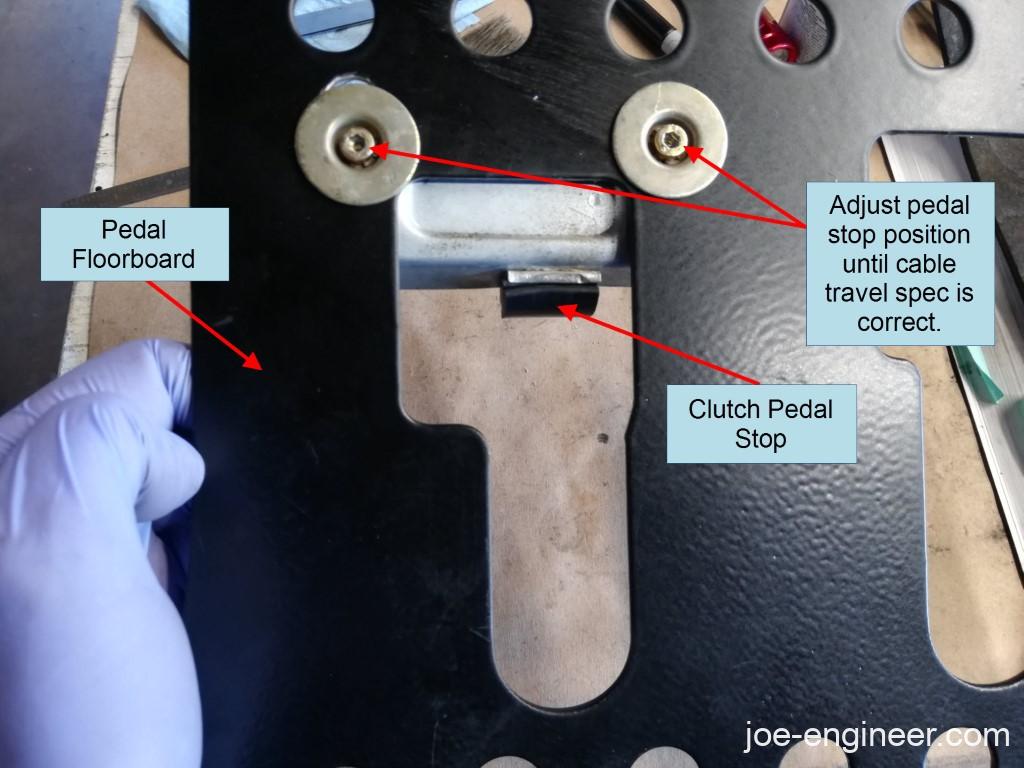
If this measurement is not within spec, adjust the clutch pedal stop on the pedal board until you get the correct measurement.
Lower the car back on the ground and go for a test drive.
Your clutch cable is now ready for many years of spirited three-pedal driving.