
DIY: Air-Cooled Porsche 911 Engine and Gearbox Removal
If you find yourself having to service a difficult-to-access item on your engine, never fear as the engine and gearbox are very easy to remove from the car on your own.
Note: The following information is for educational use only. Before proceeding please read my disclaimer page.
Disclosure: This post contains links to Amazon products and other trusted vendors. As an Amazon Associate I earn from qualifying purchases.
Your air-cooled Porsche 911 has a flat six engine that sits very low in the small engine compartment. As the years went on the fuel systems got progressively more complicated, bulkier, and eventually added heater blowers and air conditioning. As a result, it gradually became more difficult to access and service external engine components from inside the engine compartment. Fortunately the engine and gearbox assembly is bolted in from below the body, so it is very easy to lower it out of the car using a floor jack or motorcycle jack and roll it over to an engine stand. Follow this DIY to learn how to remove your engine and gearbox to gain service access to almost anything on the car.
Model Years Applicable:
All Porsche 911 cars 1989 and earlier.
Tools Needed:
- Paper towels for oil spill cleanup
- Oil drain pans or bucket
- Rubber gloves
- Safety glasses
- Fire extinguisher
- Screwdrivers (Phillips and flathead)
- Socket set
- Hex wrench set
- Circlip pliers
- 4 Jack stands (the bigger the better)
- 2 floor jacks (if possible a motorcycle jack and 1 floor jack)
- A moving dolly or heavy duty flat cart with casters
- Wooden blocks
- 6-point or 12-point removal tool (for early 911 CV axle bolts)
Parts Needed:
- None.
Caution:
- Oil is carcinogenic so wear rubber gloves, long sleeves, and safety glasses to protect your skin.
- Use heavy duty jack stands with as wide a base as possible.
- Exercise extreme caution when working under the car.
Some Key Notes to Keep in Mind Before Starting
- The focus of this DIY will be the overall physical engine and transmission drop procedure. It basically consists of disconnecting numerous external components, unbolting the engine and gearbox, lowering it, as well as how to re-install them.
- Wiring, plumbing, fuel systems, and mechanical linkages varied over the course of the years. If you need detailed sub-procedures for your particular year you will need a service manual for your specific car or reference some of the prior Porsche 911 DIYs already covered here. The vehicle used in this procedure is a 1983 911SC with the stock fuel system and manual gearbox.
- There are many ways to complete engine and gearbox removal, using a professional shop lift, portable lifts such as Quick Jacks, a motorcycle jack, floor jacks, and different sizes of jack stands. This is only one example of how to complete this procedure and you are encouraged to apply it using the equipment accessible to you, in as safe a manner as possible.
- It is possible to remove only the engine or only the gearbox from the car, but it takes less effort to remove both at once so we will cover the removal of both simultaneously.
Engine and Gearbox Removal Procedure
Step 1: Raise Car on Jack Stands
Plan very carefully where you will set your car on jack stands. Depending on the extent of your repairs it could end up in that spot for a very long time! Pick a spot in the garage where you will still have access all around the car and leave at least 3 feet of room behind the car to roll the removed engine and transmission out from underneath. Raise the entire car on jack stands using this procedure.
I used 12 ton jack stands at the rear because they have a very wide base and raise the back end 32 inches off the ground to the bottom of the rear reflector. This is high enough to just clear the tallest part of the CIS injection system when used in conjunction with a low profile motorcycle jack.
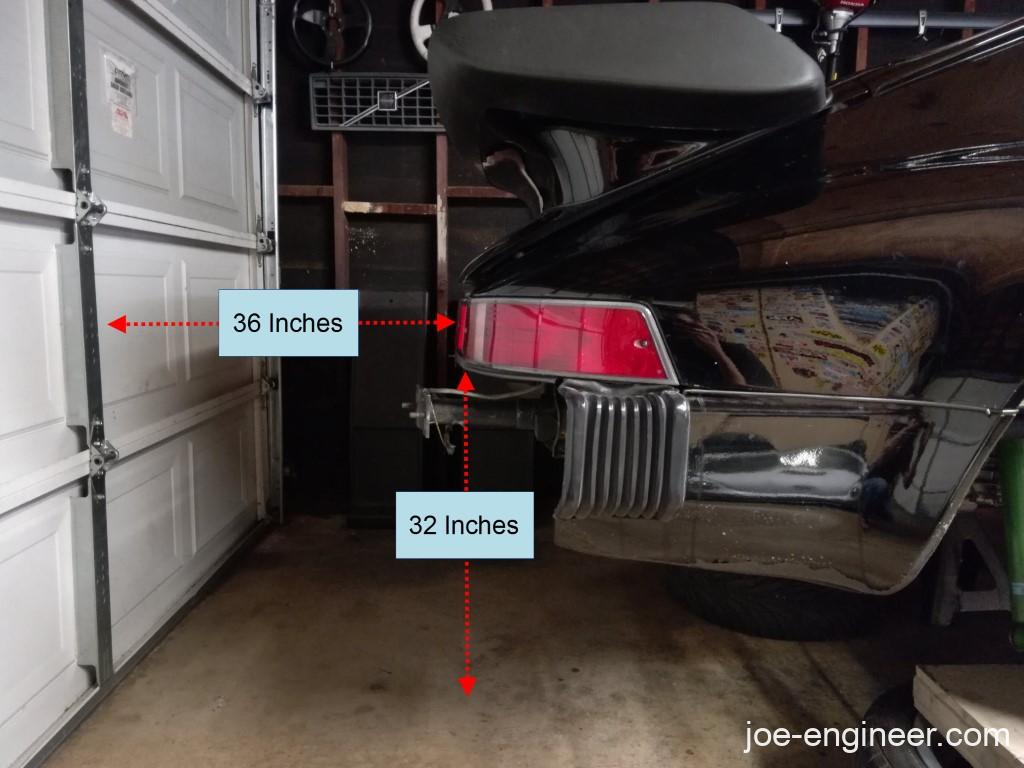
It is recommended that you keep the car as horizontal as possible when it is raised on jack stands. This way it is as stable as possible, fluids can drain easily, and you have plenty of clearance all around the car for additional repairs. As a bonus you will be able to work comfortably inside the cabin if needed.
Step 2: Drain Fluids and Disconnect Battery & Fuel Pump Relay
Drain the oil from the engine case and oil tank using steps 1 to 3 of this procedure. If possible warm up the car first so the external thermostat opens and allows the front oil cooler and hard lines to drain as well. Then let the car cool down overnight.
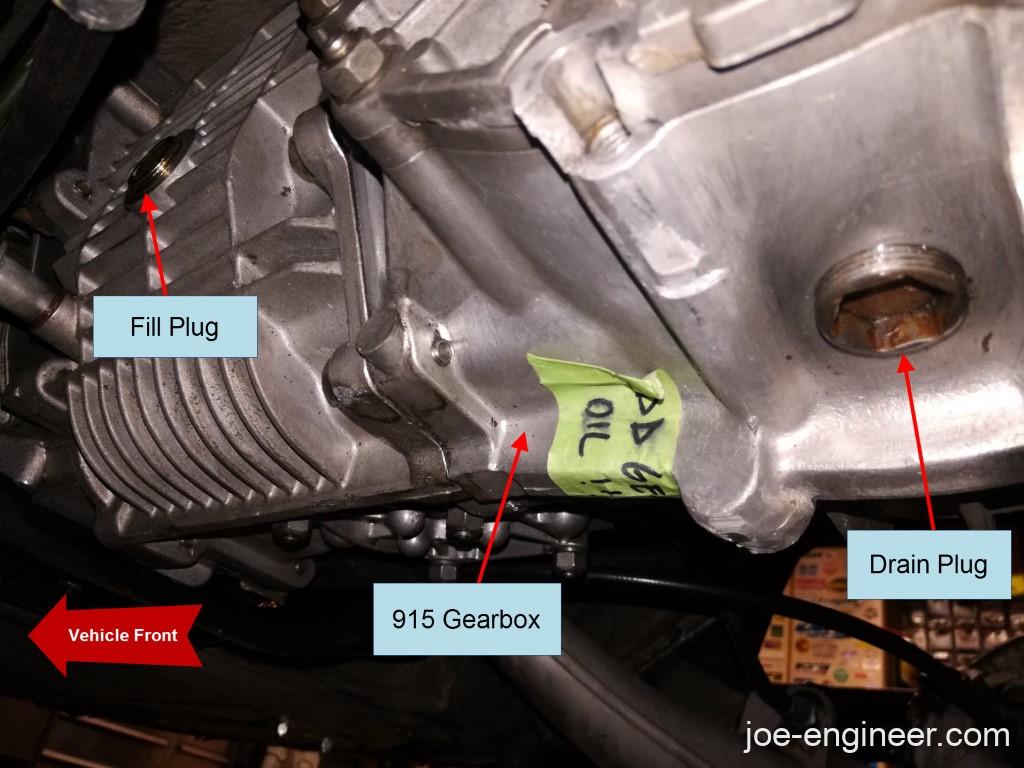
Drain the gearbox oil next to prevent any spills on the bench. Locate the fill and drain plugs on the case. The fill plug will be on the side of the case and the drain plug will be on the bottom.
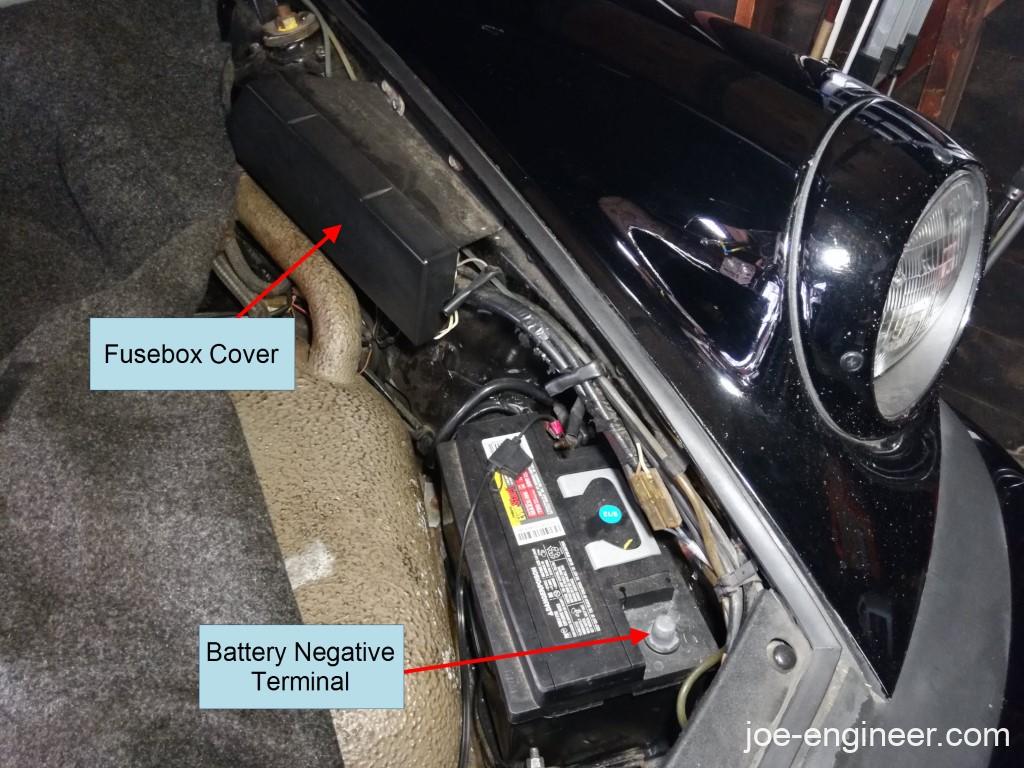
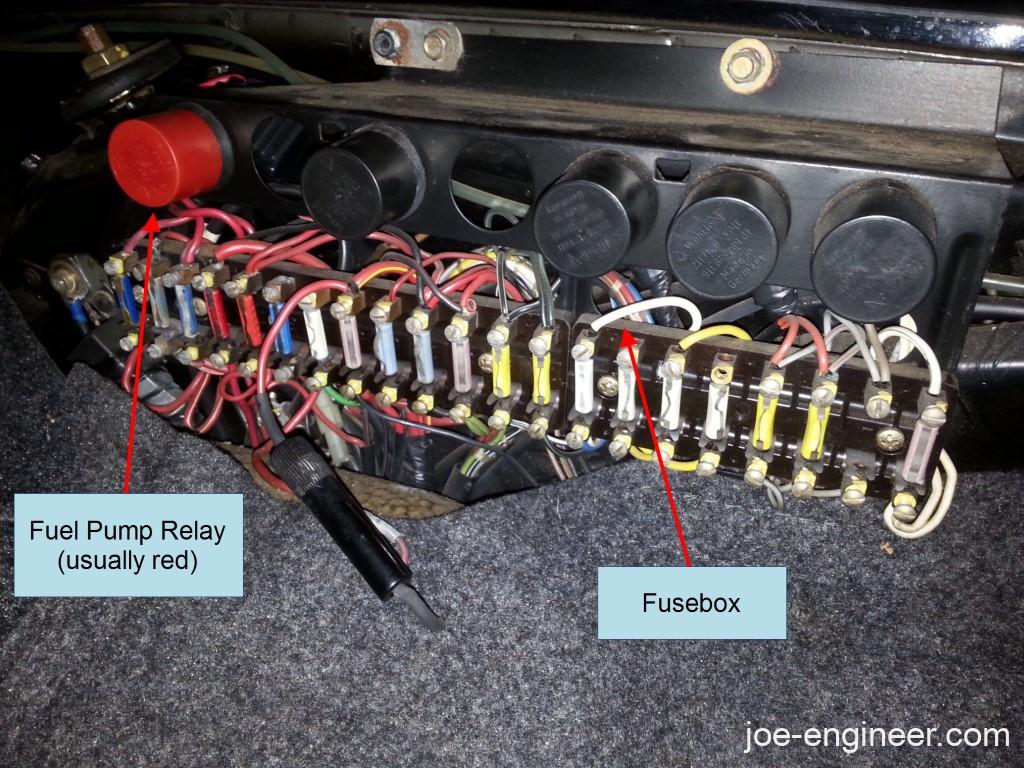
Disconnect the negative battery terminal and pull the fuel pump relay. Both are located in the front trunk.
Even if you don’t plan on having the car apart for very long, it is a good idea to drain the gas tank now. This way you have zero concern of the gas going bad if the car is down for an extended period of time.
Once the car has cooled down, drain the gas tank as follows:
- If your tank is nearly full, drain from the top of the tank using a hand transfer pump after removing the fuel tank sender as shown here.
- If your tank has a small amount of fuel, drain by disconnecting the fuel pump inlet using steps 1 to 4 in this procedure.
Step 3: Detach Rear Sway Bar & Muffler
Unbolt the sway bar brackets and the ends of the sway bar from the end links.

If you would like to have less weight to control while lowering the engine, you can remove the muffler at this time. Otherwise you can remove the engine with it still attached.
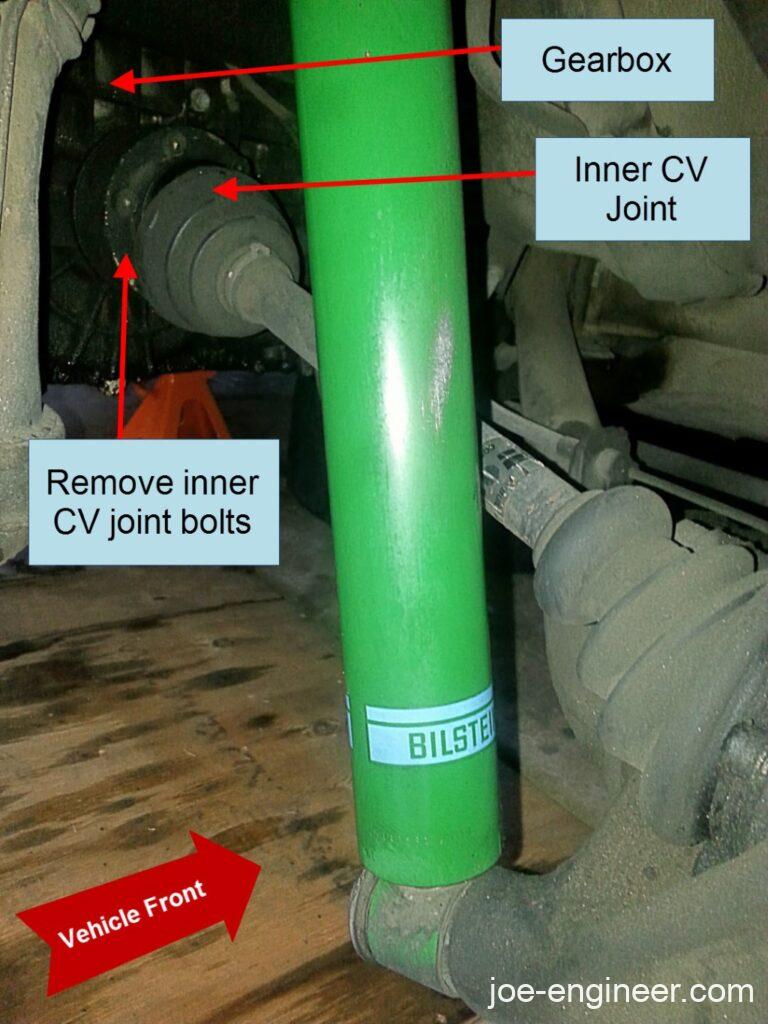
Step 4: Detach Inner CV Joints from Gearbox
Note: Make sure you have the correct tool for your particular CV axle bolts, otherwise you may risk stripping them.
Shift the gearbox into first and pull the hand brake so the axle stays put as you loosen the bolts. There is very little tool clearance above the CV axle, so you will need to remove the lower bolts and rotate the axle to bring the upper bolts down to a more accessible location. Remember to release the hand brake and put the gearbox into neutral to spin the axle.
Step 5: Disconnect Clutch Cable, Arm, and Helper Spring
1987-1989 911s have a hydraulic clutch release with a slave cylinder on the gearbox. Remove the slave cylinder.
On 1972-1986 911s loosen the clutch cable threaded collar and unhook the end of the cable from the large clutch release arm. Then remove the circlip at the bottom of the small lever arm shaft and unhook the small coil spring. Pry off the small lever arm with a screwdriver then pry the large clutch release arm directly above it forward. This will release the tension on the omega-shaped spring and cause it to rotate. Watch your fingers as you do this. Then pull the large release arm and omega spring off.
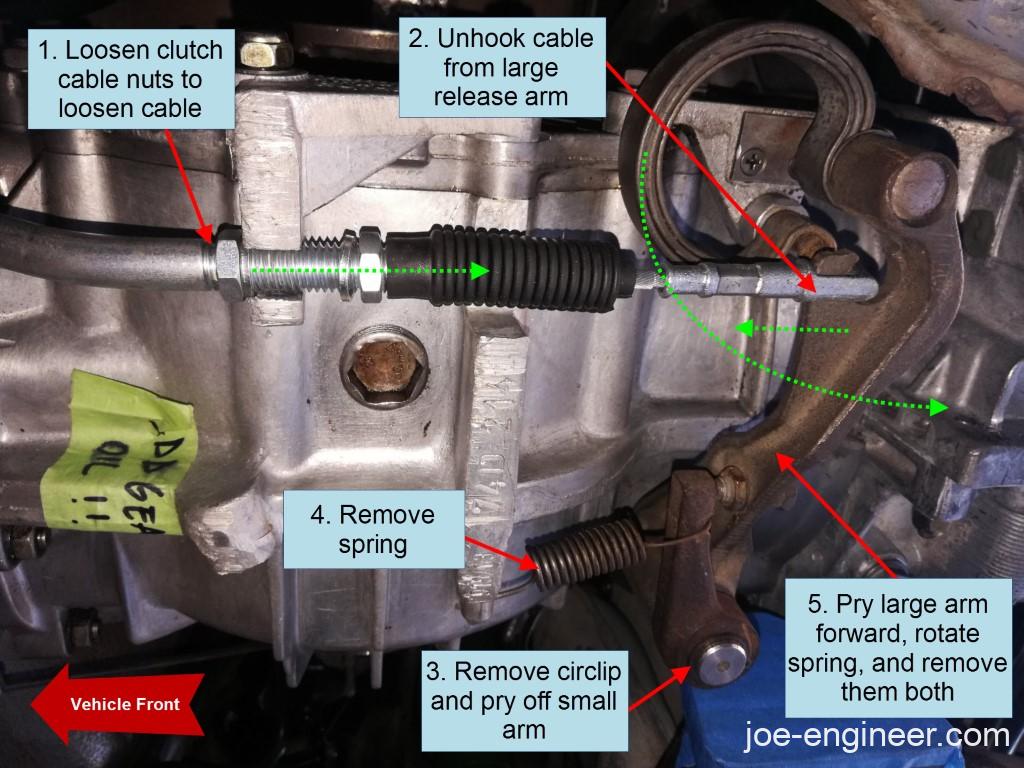
On earlier 911s the clutch cable is connected directly to the throwout arm and is much easier to remove.
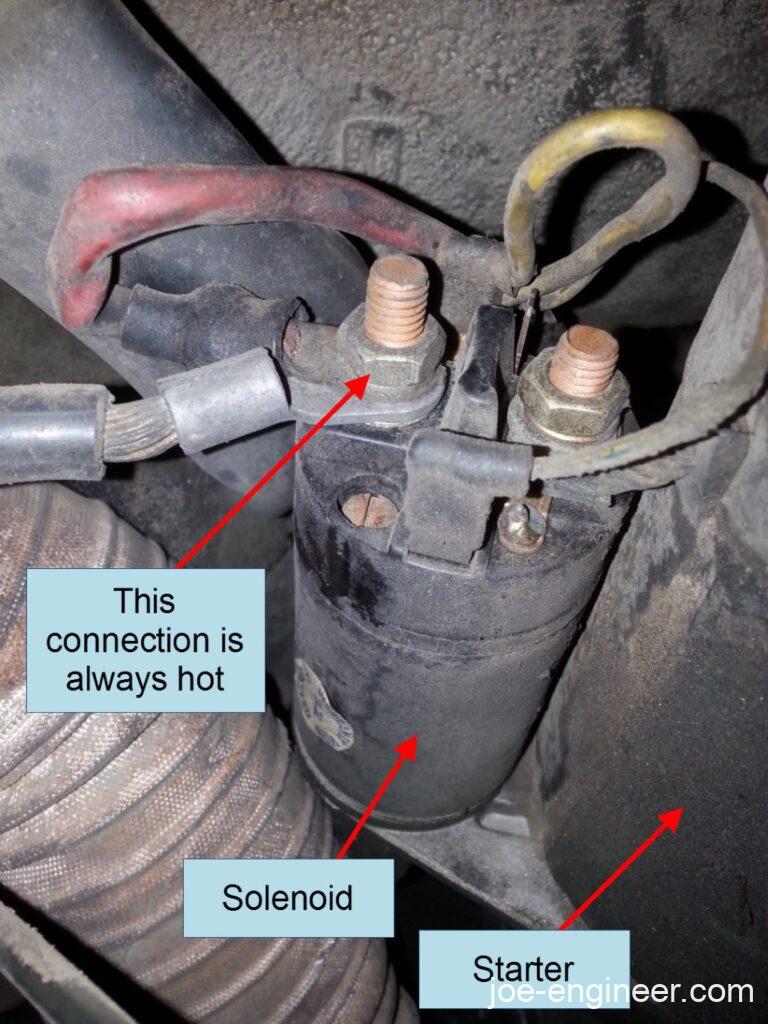
Step 6: Disconnect Starter Wiring
Disconnect all the starter solenoid wiring.
Caution: Make sure you have disconnected the battery before starting this step. The positive starter wire is always hot!
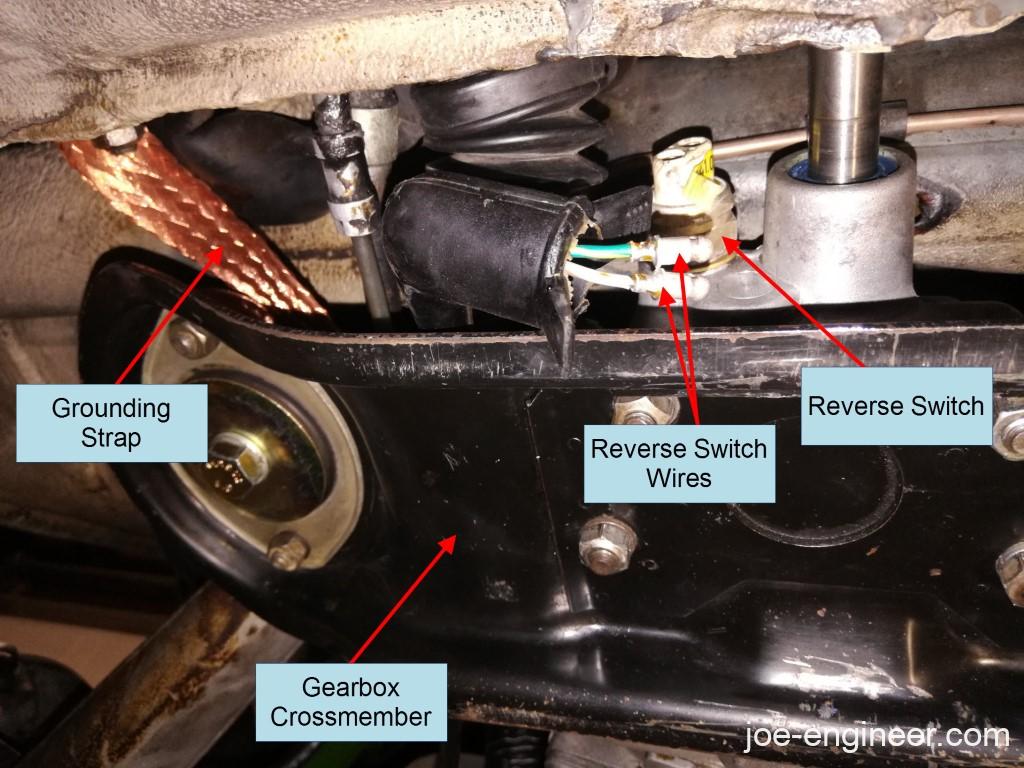
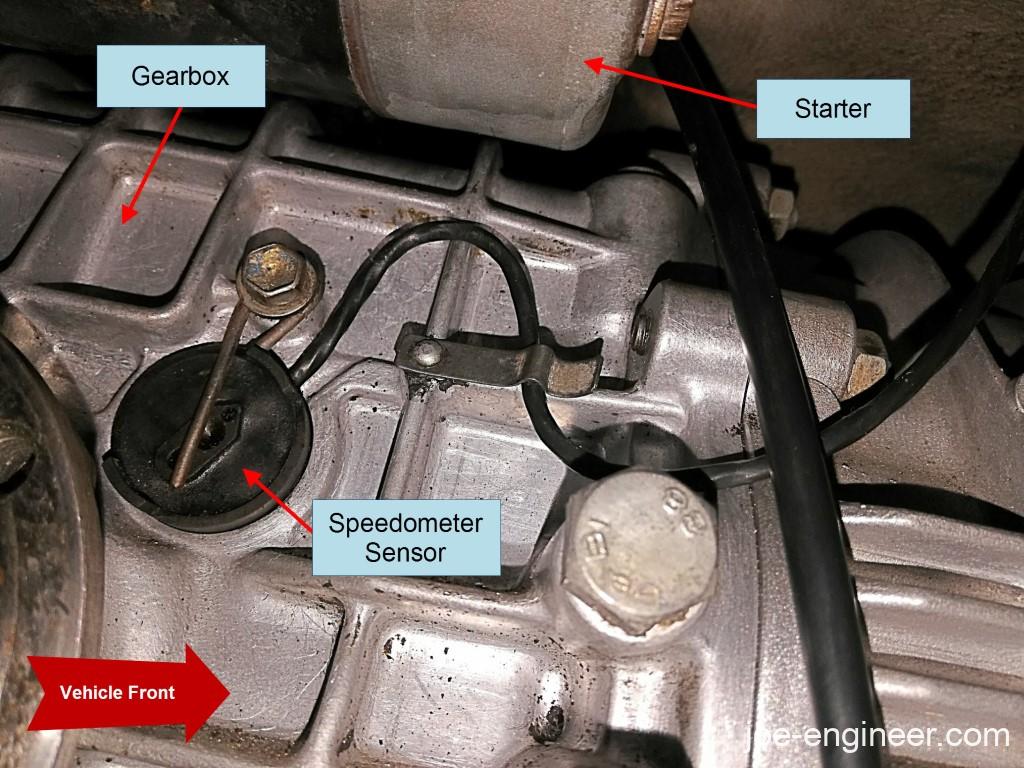
Step 7: Disconnect Reverse Switch, Speedometer Sensor, and Grounding Strap
Disconnect the reverse switch and the speedometer sensor both located on the gearbox. Their locations vary between the types of gearboxes but essentially both components are located either on the front or the side of the gearbox case. 901 gearboxes (1971 and earlier) have a speedometer that is mechanically driven by a cable on the right side of the case. Disconnect the cable and pull it out of the way. Disconnect the large grounding strap where it attaches to the body just ahead of the gearbox.
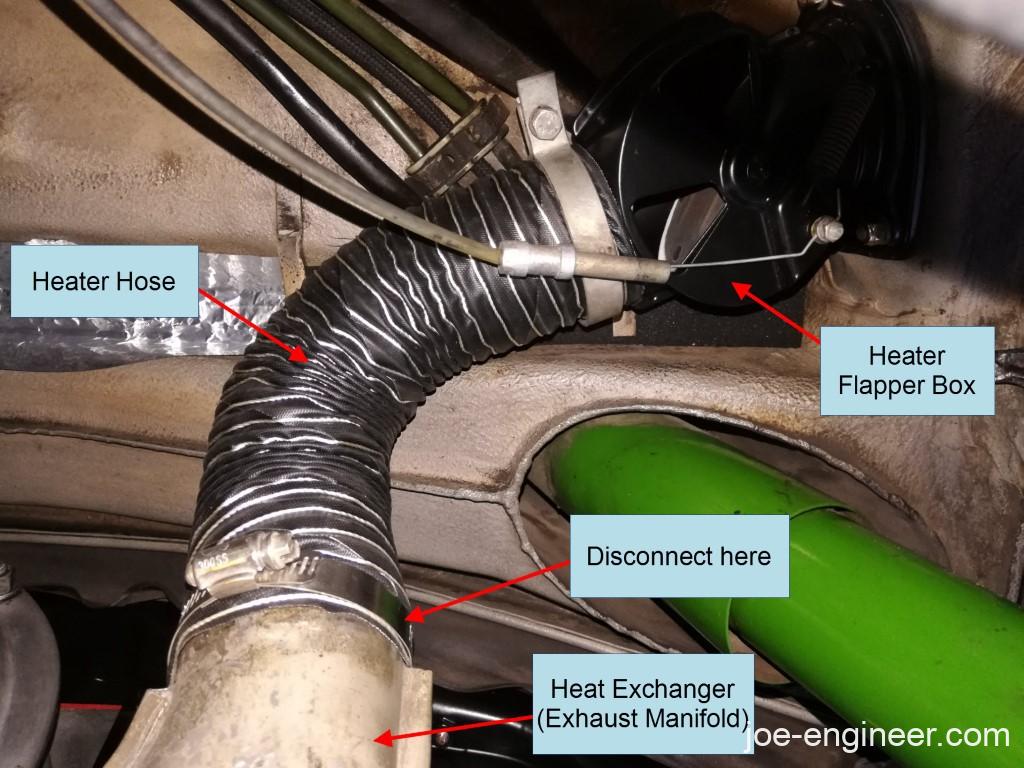
Step 8: Disconnect Heater Hoses
Disconnect the two heater hoses at the front of the heat exchangers.
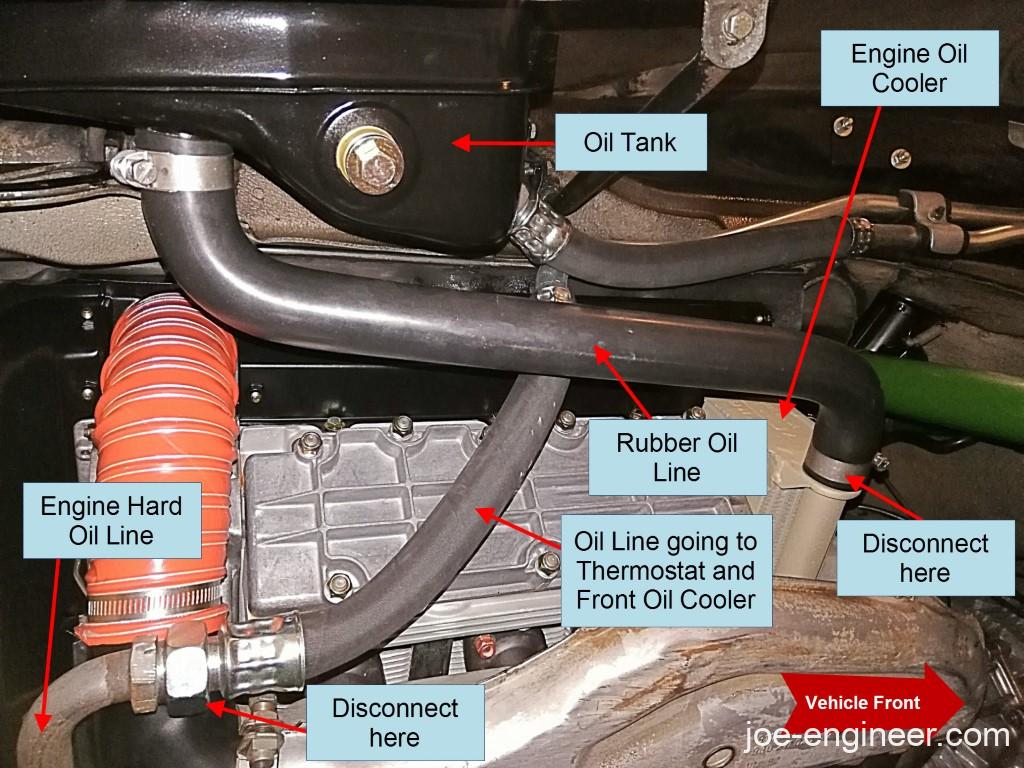
Step 9: Disconnect Oil Lines
Disconnect the hard oil line and rubber oil lines going to the oil tank and external thermostat for the front oil cooler. Be prepared for oil drips.
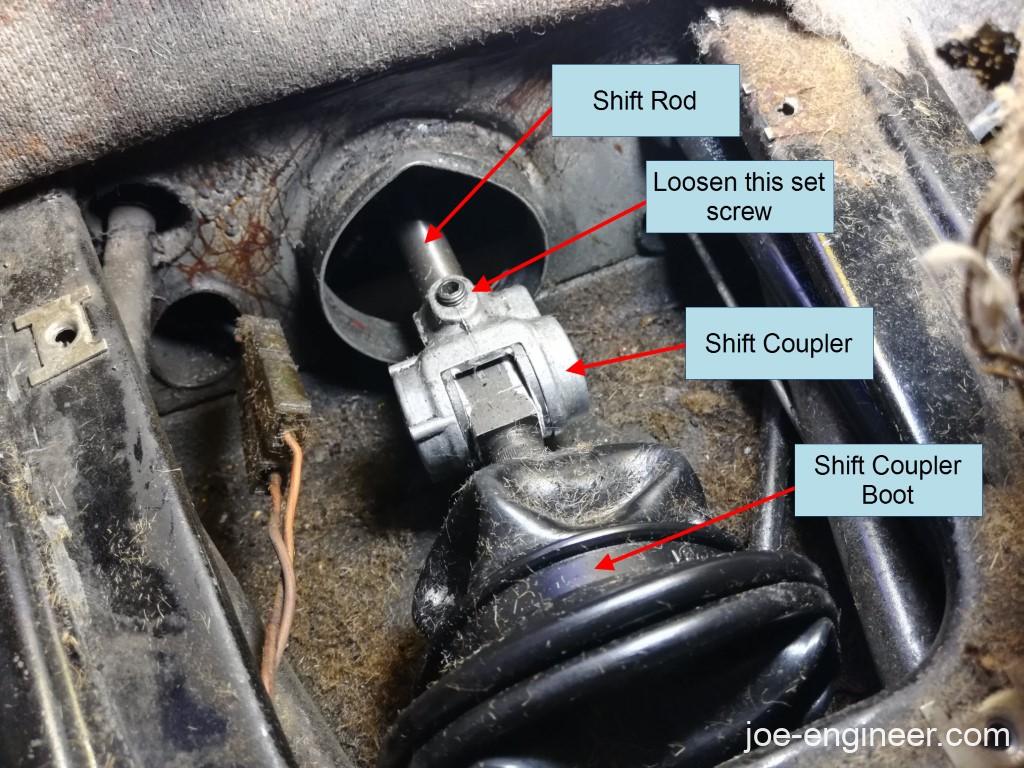
Step 10: Disconnect Shift Coupler
Disconnect the shift coupler from the gearbox shifter rod. You will need to do this from inside the cabin by removing the small access panel in the floor between the 2 rear seats. Pull back the rubber boot and loosen the single cone-shaped set screw at the rear of the coupler to free it from the shifter rod.
Step 11: Detach Heater Blower Hose, AC Compressor, and Air Pump
If your car has a heater blower fan in the engine compartment near the firewall, remove the hose connecting the fan to the left heater duct.
If your car has an air conditioning system, disconnect the harness connector, remove the belt, unbolt the AC compressor from its mounting bracket and, without disconnecting any of the hoses, hang it outside the engine compartment. Take a towel and wrap the compressor, then wrap the towel itself a few times with masking tape to make sure the towel stays on the compressor and protects the paint.
If your car has an air pump, also known as a smog pump, installed on the left side of the engine next to the fan, remove the belt tension adjuster support and the belt. Remove the hoses connected to the air pump, the drive pulley, and the air pump mounting bolt to allow you to remove the unit from the car.
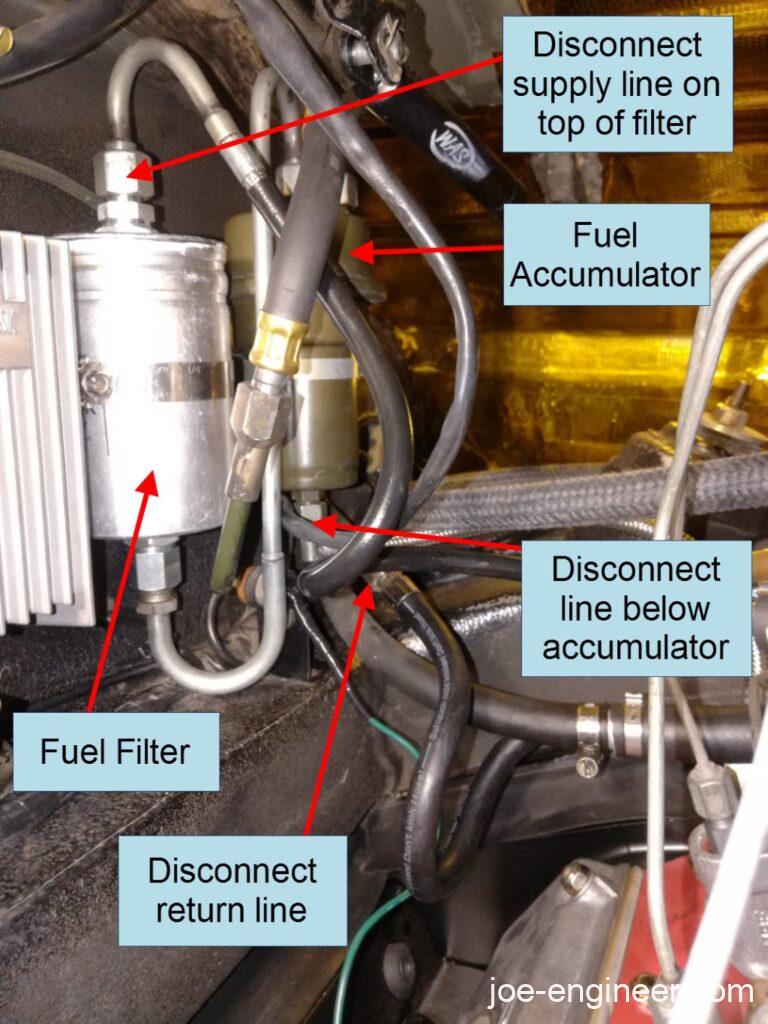
Step 12: Disconnect Fuel Lines
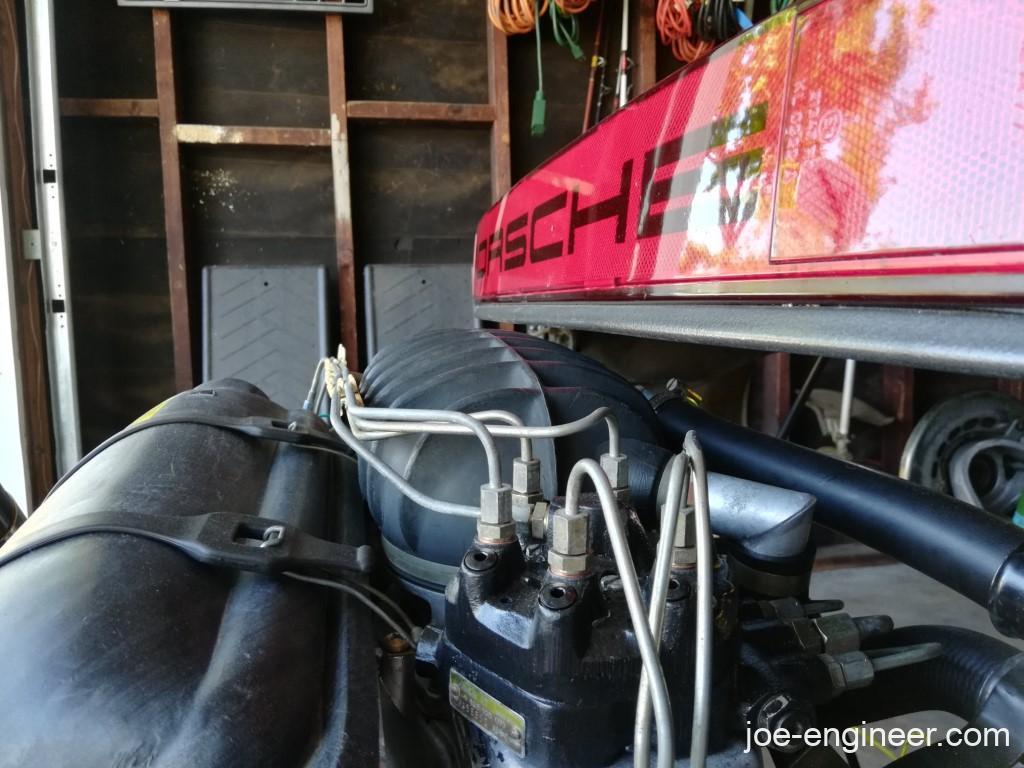
Disconnect the fuel lines in the engine compartment. There will be at least a supply and return line but CIS cars will have 3 connections. Keep a rag over each connection as you loosen it to protect from fuel spray.
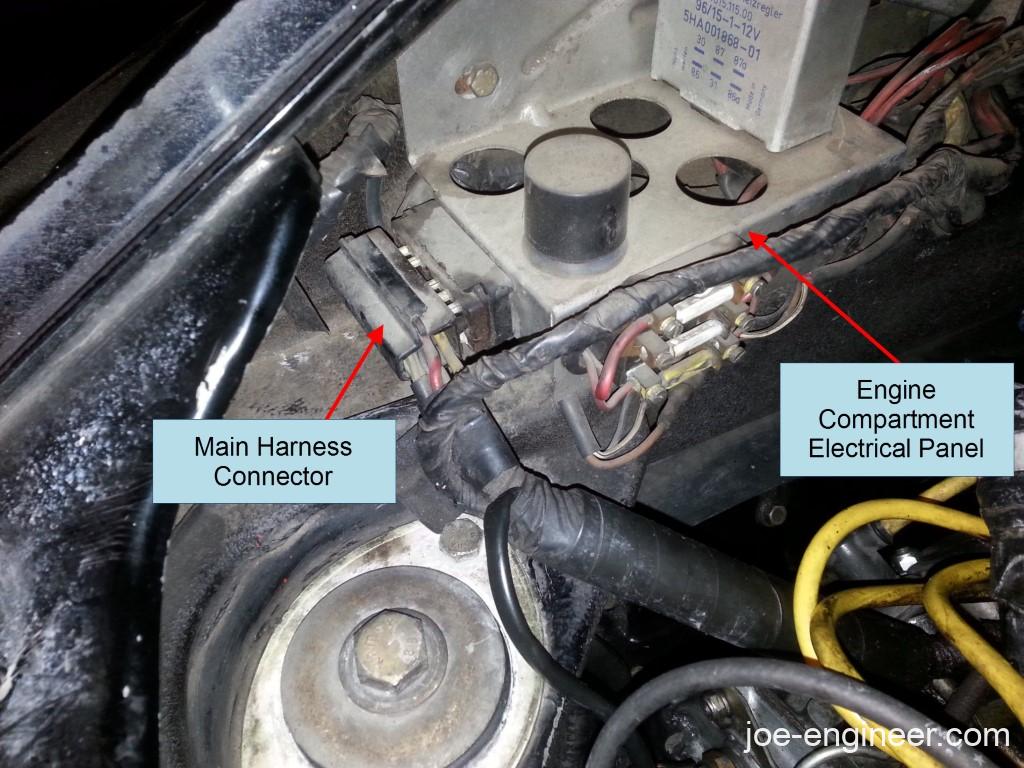
Step 13: Disconnect Wire Harness
Remove the engine compartment electrical panel cover. Disconnect the main wire harness via the large rectangular 14 pin connector. Disconnect the CDI box at the bottom, and if equipped, disconnect the voltage regulator.
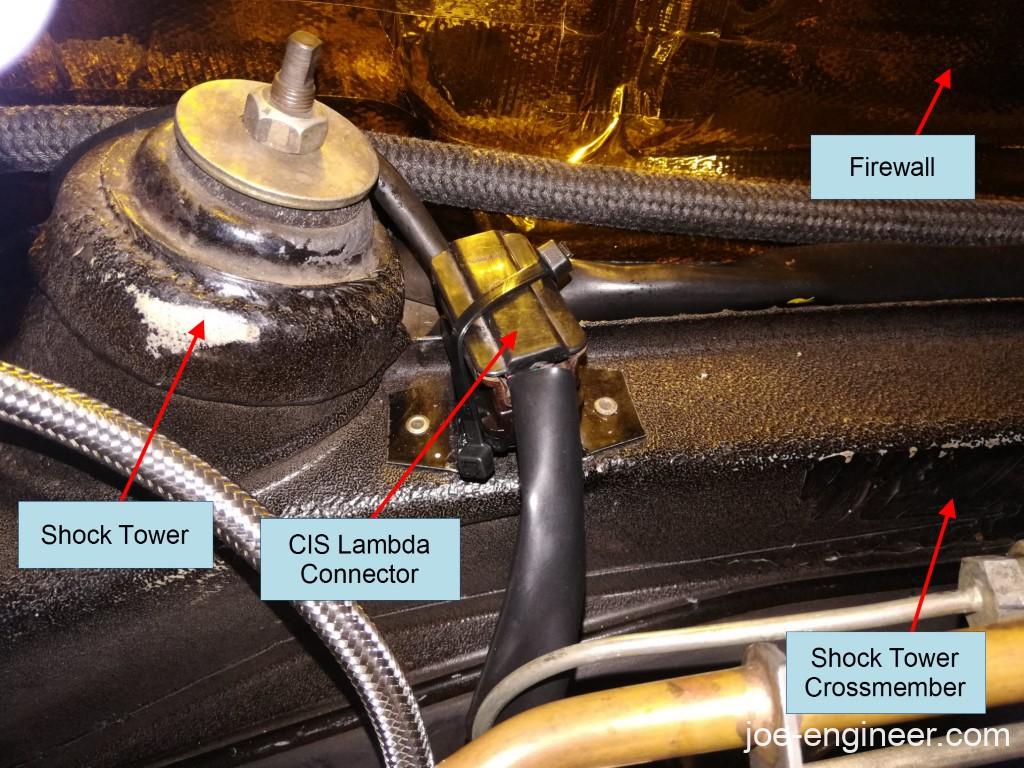
CIS cars from 80-83 will have an additional CIS Lambda harness connector at the front of the engine compartment against the firewall. This is also a large 14 pin rectangular connector.
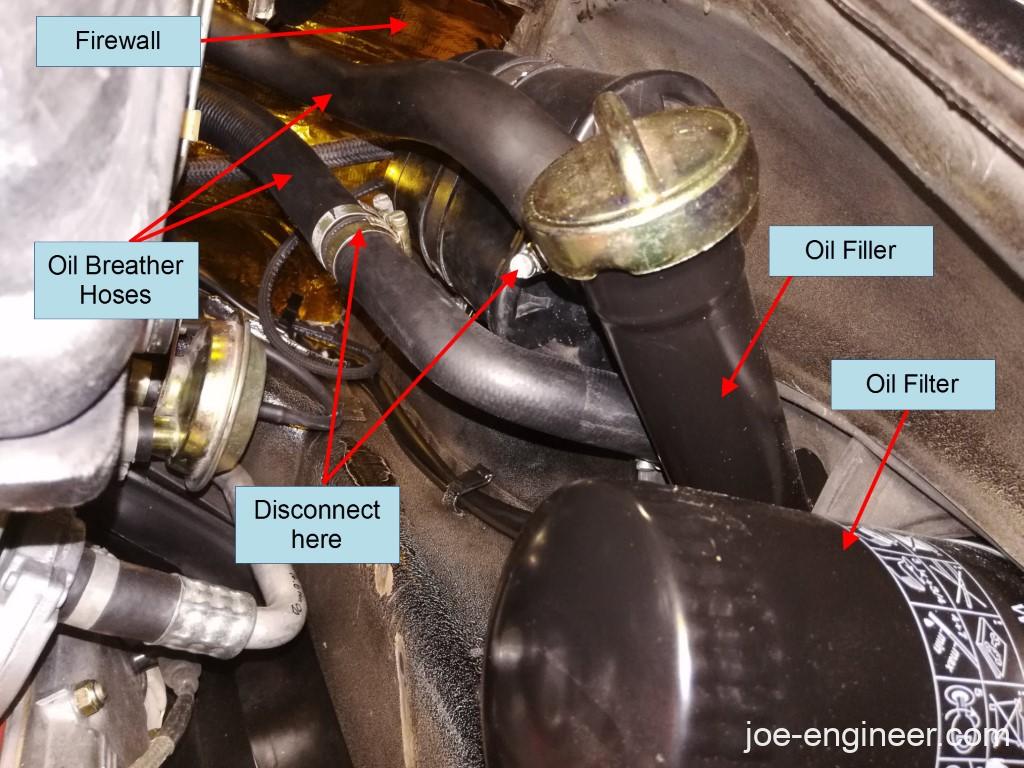
Step 14: Disconnect Oil Breather Hoses
Disconnect the breather hoses in the engine compartment on the oil tank side. There will typically be two of them but this depends on the fuel system present on the car.
Step 15: Remove Accelerator Rod and Cruise Control Cable
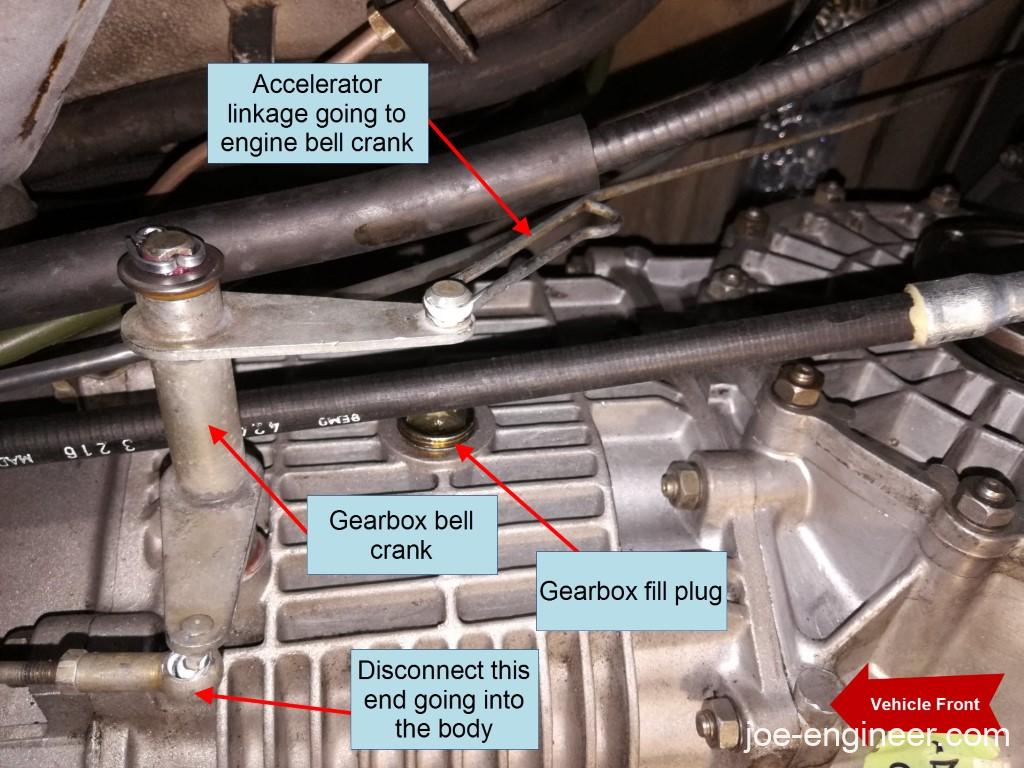
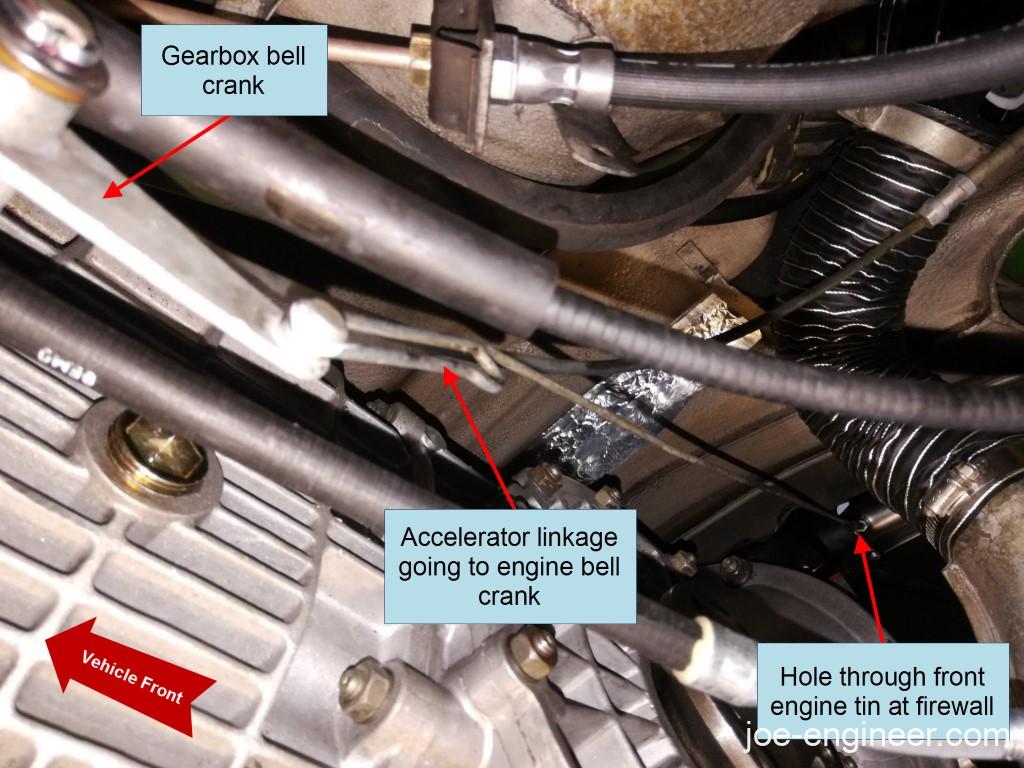
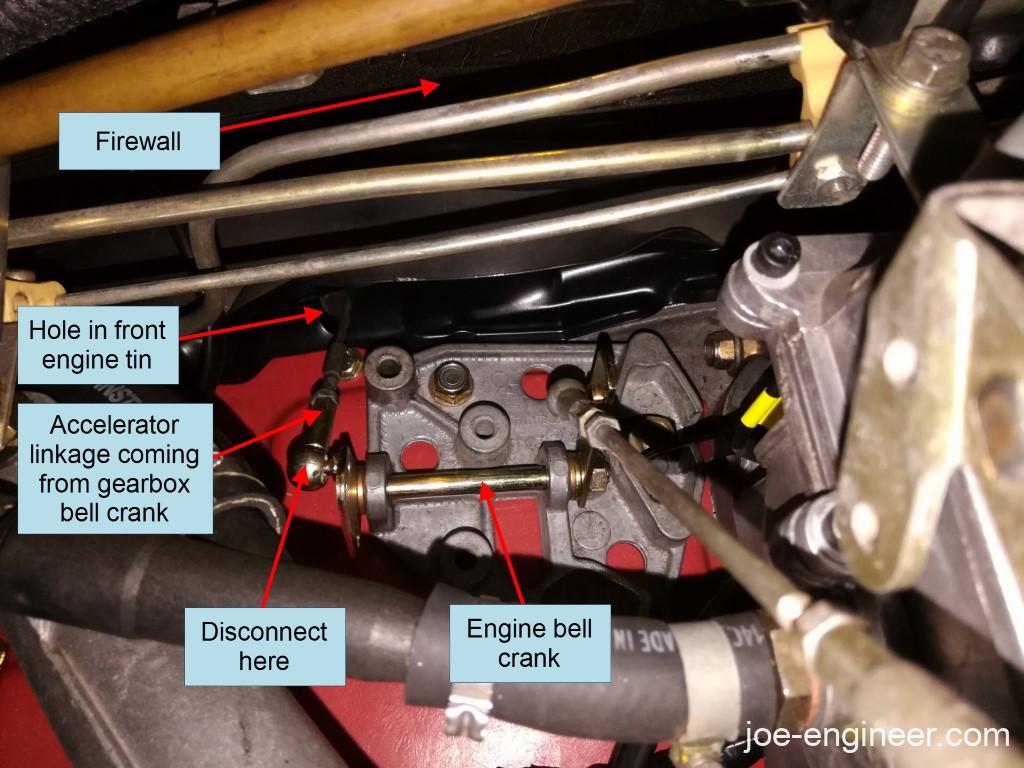
There is an accelerator linkage rod that starts at a bell crank on the left side of the transmission case, goes through the front engine cooling tin at the firewall, and ends at a second bell crank sitting on the engine fan shroud near the firewall. The top connection is of a ball and socket type and should separate if you pry gently with a screwdriver or trim removal tool. The lower connection slides off.
Disconnect the socket at the transmission case bell crank attached to the rod going forward into the body. If you can, disconnect the second socket at the engine bell crank and remove the rod connecting the two, to prevent this thin rod from getting damaged.
Sometimes the ball and socket connections will be stubborn due to corrosion and lack of lubrication at the joint so pry carefully to avoid bending a rod or either of the bell cranks. If they are stuck, at the bare minimum make sure the connection with the rod going into the body is disconnected.
If your car is equipped with cruise control, remove the cable at the throttle bracket held on by 2 screws and remove the 2 vacuum lines connected to the control unit.
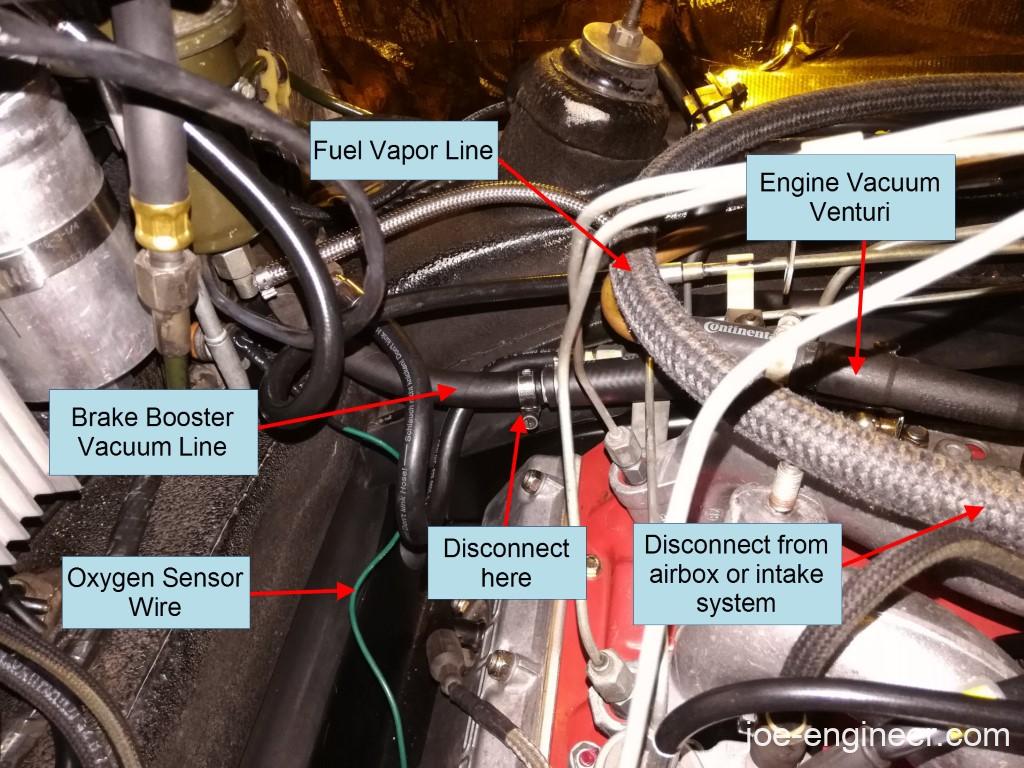
Step 16: Disconnect Oxygen Sensor and Vacuum Lines
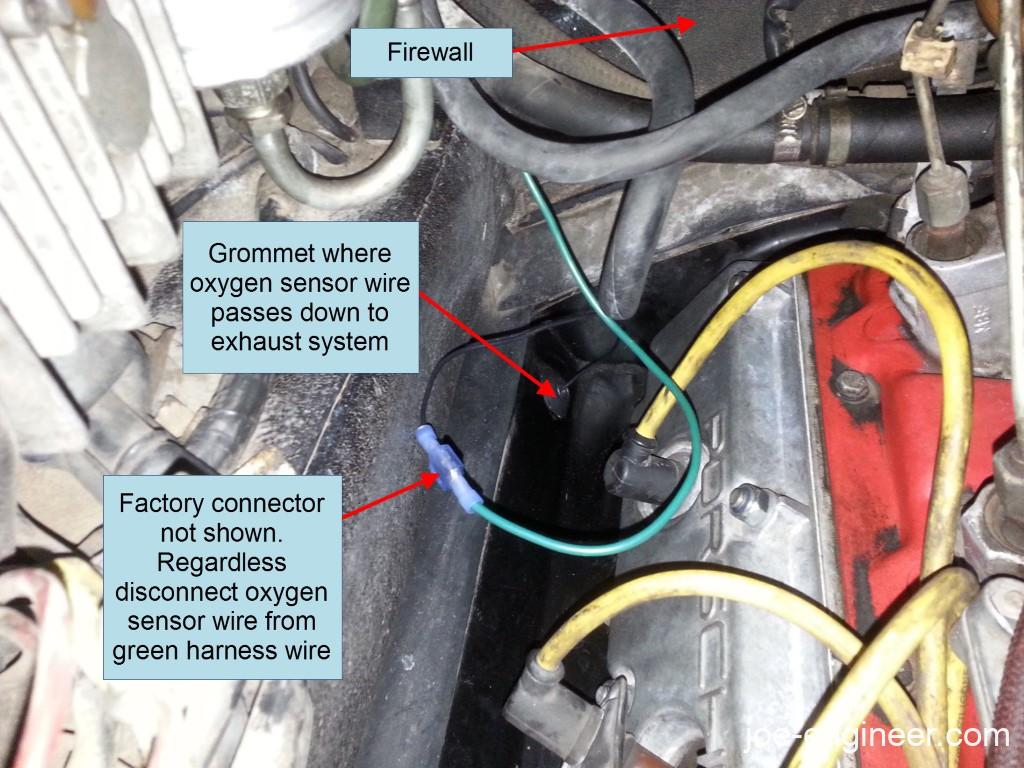
If your car is a 1980 or newer, disconnect the oxygen sensor wire located on the left side of the engine, next to the valve cover and below the fuel filter and accumulator assembly. The factory connector is very fragile and is often missing. It could have been replaced by a different connector such as this one.
Ahead of the oxygen sensor wire there may be 2 large vacuum lines near the bottom of the firewall. One will be for the brake booster and another for the fuel vapor charcoal canister. Pull the booster vacuum line off the engine’s vacuum assembly and the fuel vapor line off the airbox. The exact location of each will vary depending on the fuel system that is used.
Step 17: Support Engine and Gearbox with Jacks
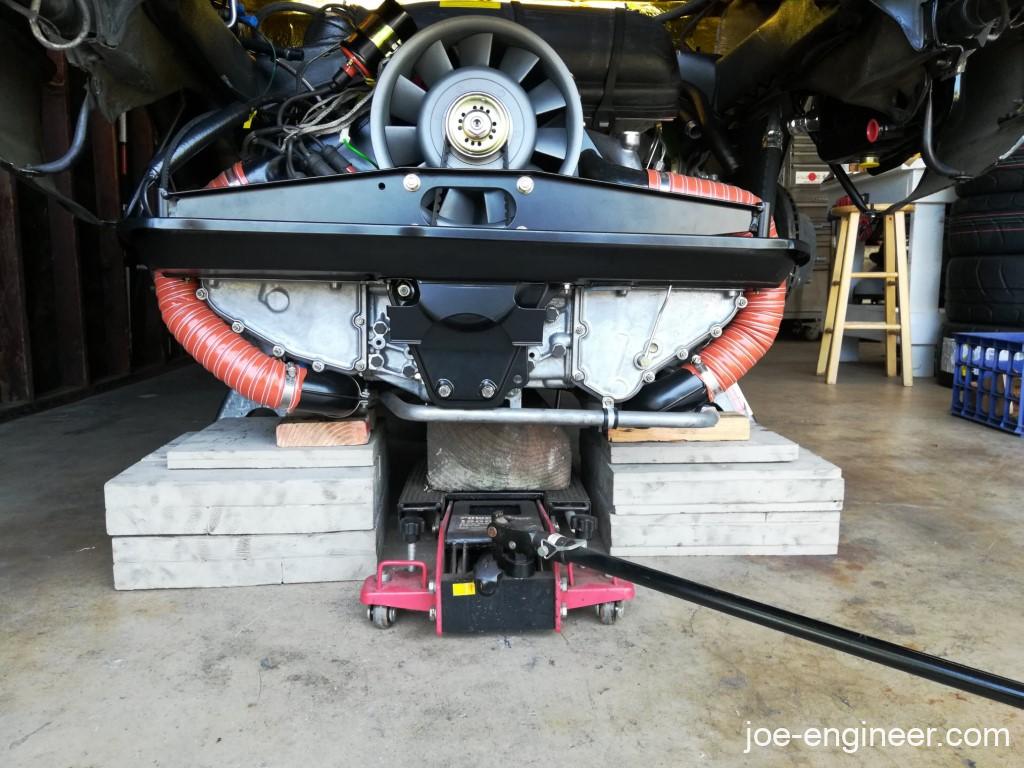
Place a motorcycle jack under the engine case, centered on the sump plate. Lift the jack until it just supports the engine. Point the jack handle rearward.
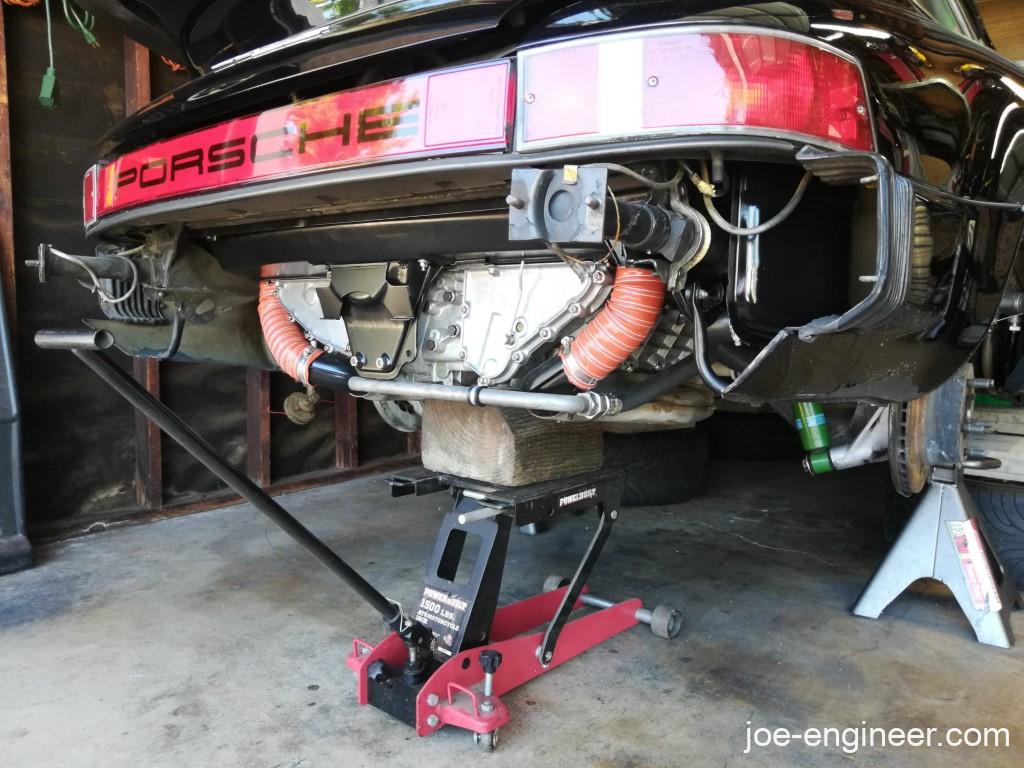
Place a second small floor jack under the gearbox, centered on the gearbox mount crossmember. Lift the jack until it just supports the gearbox. Point the jack handle forward, under the floor of the car.
Since you are starting at the installed height in both these operations, if your jacks do not have enough vertical travel, use a wood block on each jack as a spacer to reach the engine and gearbox.
Step 18: Unbolt Engine and Gearbox from Body
Note: If you are using a floor jack under the engine, it is recommended you get a helper to balance the engine on the jack pad after you unbolt it.
Remove the 2 gearbox mounting bolts from the crossmember. As you loosen them and slowly start to unthread them, make sure the engine and gearbox are still jacked firmly against the motor mounts. The gearbox weight should not hang on the bolts as you remove them as you can damage the threads in the body mounting points.
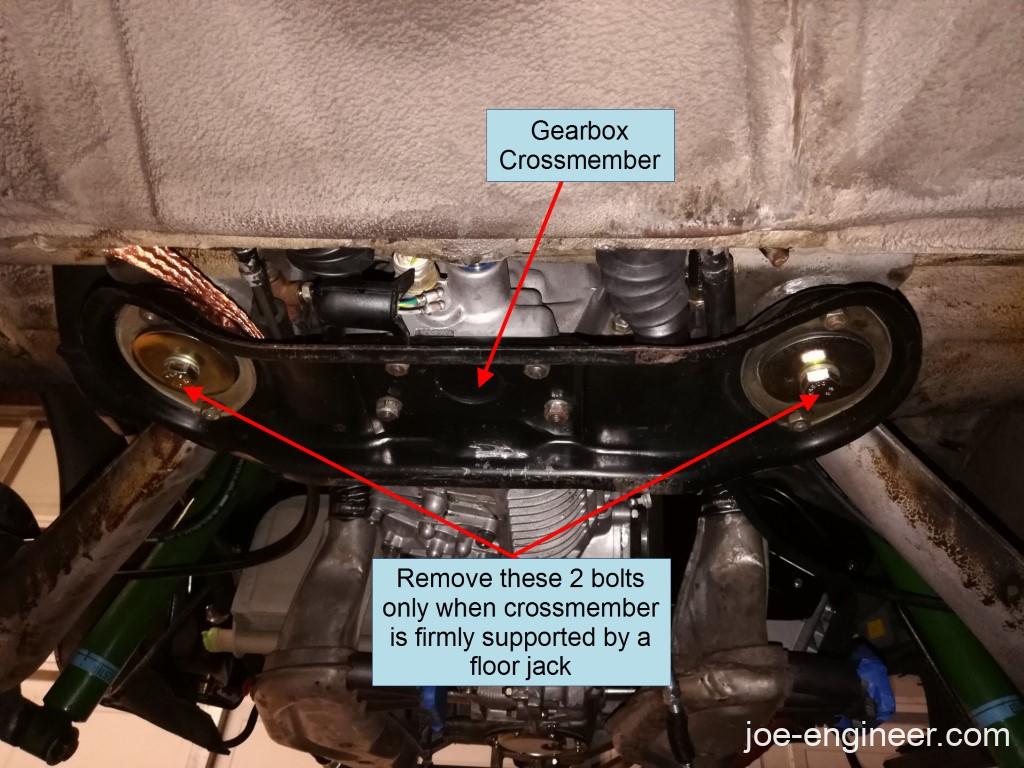
Remove the 2 engine mounting bolts from the rear corners of the engine compartment. Again, as you start to remove the bolts, the engine and gearbox should stay put and not hang on the bolts, otherwise you can damage the threads in the engine mount crossbar.
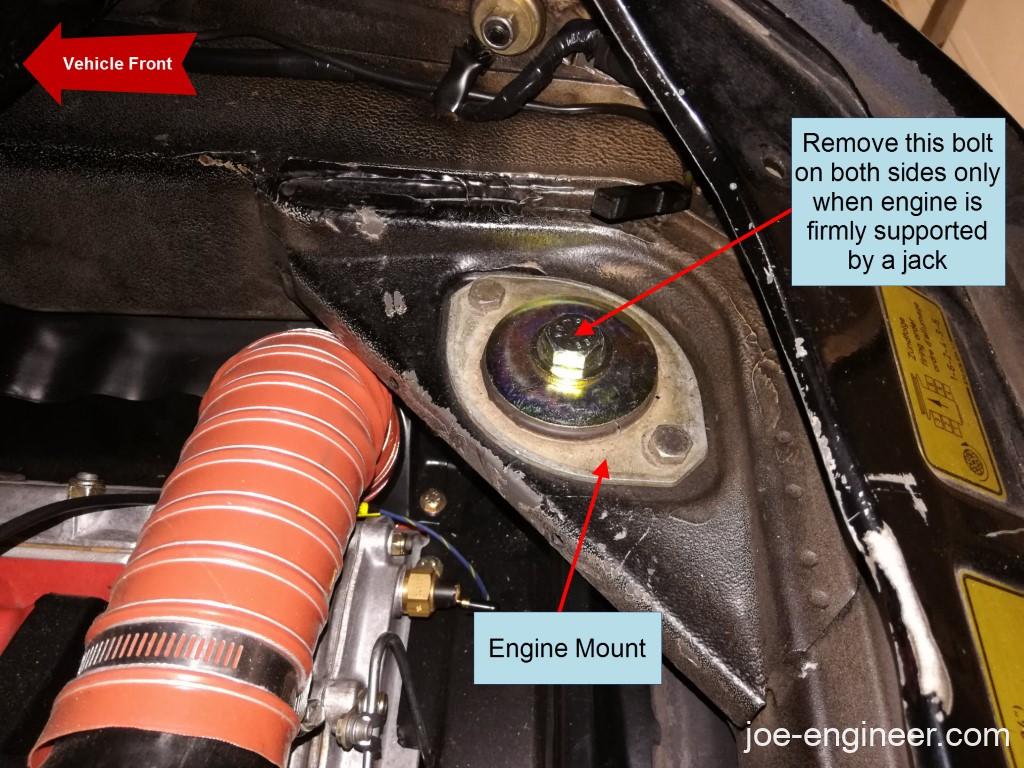
Store the 4 mounting bolts and their 8 large washers in a safe place to reuse later.
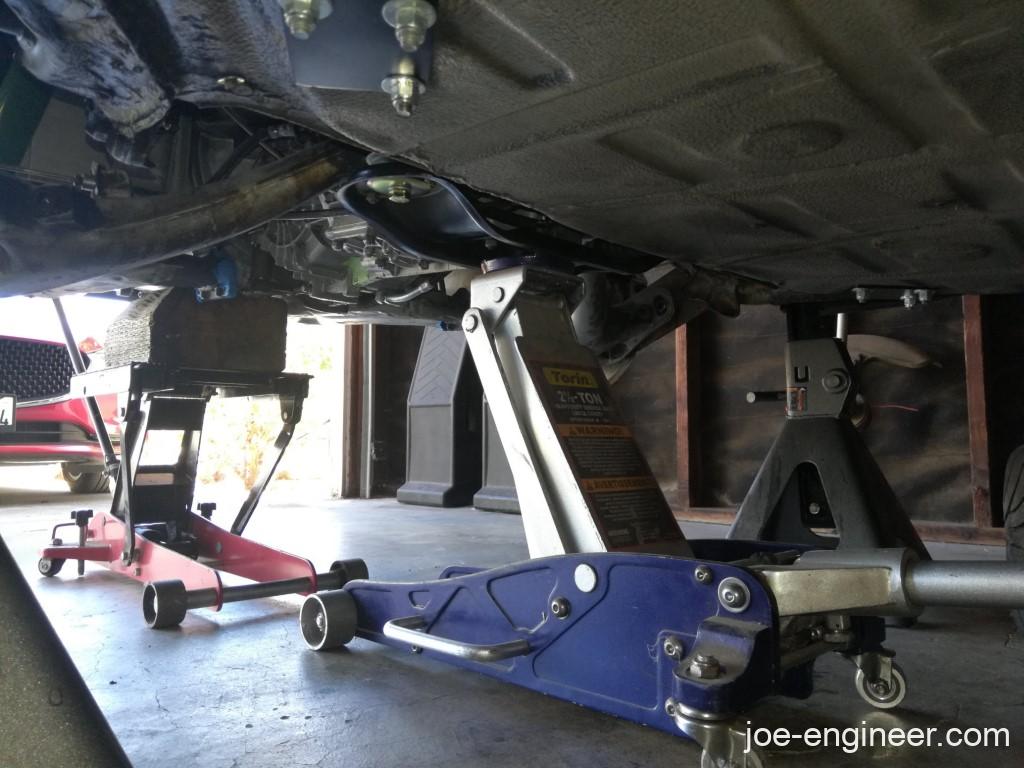
Step 19: Lower Engine and Gearbox
Once you remove all 4 mounting bolts, lower the engine first about an inch or two, then lower the gearbox about an inch, so the gearbox crossmember is no longer touching the gearbox mounting surfaces under the body. You will see that the engine shift rod is still in the center tunnel of the body.
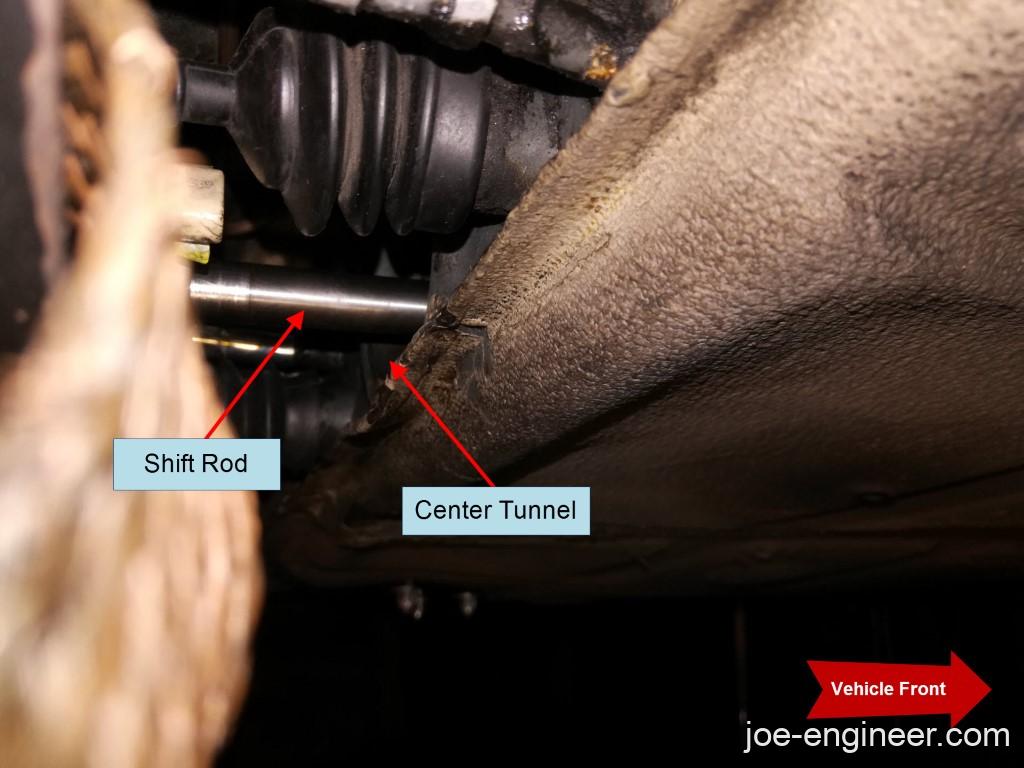
Roll the engine and gearbox backwards a few inches so the rod fully clears the center tunnel and the assembly can be lowered. Be very careful to never rest the weight of the gearbox on the shift rod otherwise it can bend.
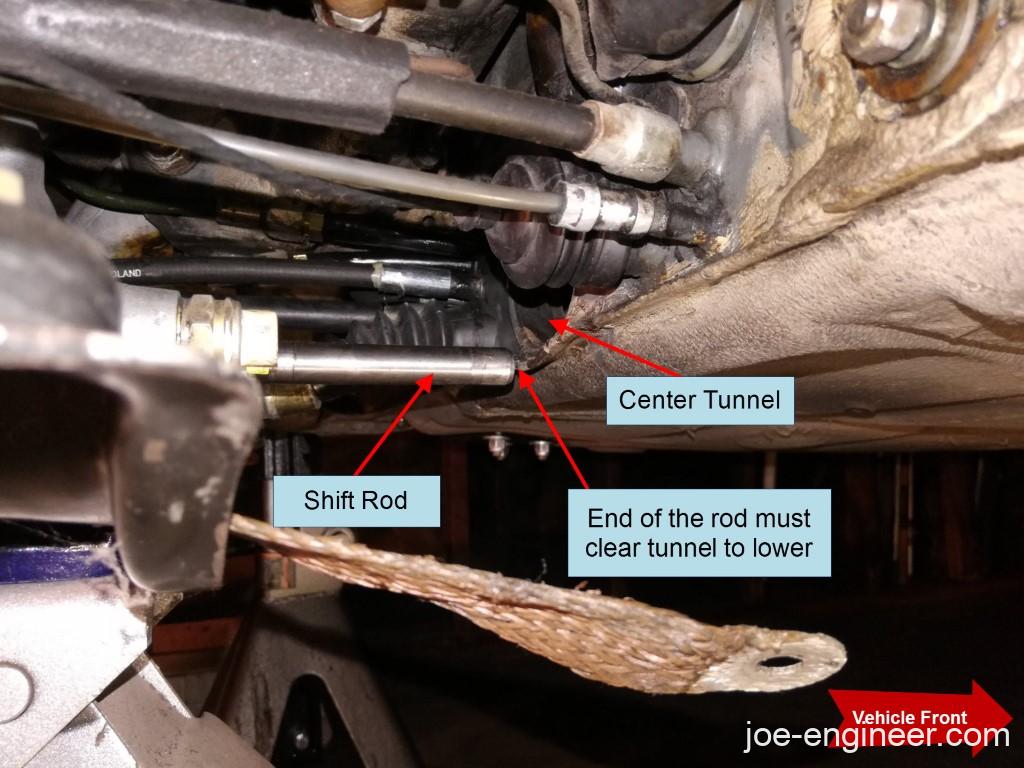
Once the end of the shift rod clears the body and you verify that nothing is still connected between the engine, gearbox, and the body, lower them both an inch or two at a time, alternating between the jacks until the engine and gearbox are on the ground.
Get a feel for balancing the weight of the engine and gearbox on the jacks. Keep them as level as possible to make them easy to balance. Watch for any components you forgot to disconnect that may snag or get damaged as you lower the engine.
Note that if you used wood blocks in between the jacks and the engine and gearbox you may need to stop halfway down and support the engine by wood blocks under the exhaust manifolds to allow you to temporarily unload each jack and remove the wood spacer. Then you can pick the engine and gearbox back up using the bare jack pads (or a thinner block) and lower each all the way to the ground.
Step 20: Roll Engine Out From Under Car
Once the engine and gearbox are on the ground, slowly roll the engine backwards to see if there are any fuel system components that will not clear the bottom of the rear bumper. If the rear bumper interferes you will have to decide if it is easier to remove the bumper or remove an easy to access component from the top of the fuel system to gain enough clearance to roll the engine out. In my case it was much easier to remove the bumper and set it aside. This particular procedure allowed me to clear the very top of the CIS assembly without having to disassemble it.
Once out from under the car, use the rear engine crossbar to keep the engine balanced on the jack as you tow the assembly with the jack under the engine. At this point you can use the jacks and wood blocks to slide a moving dolly underneath to easily move the engine and gearbox around the floor.
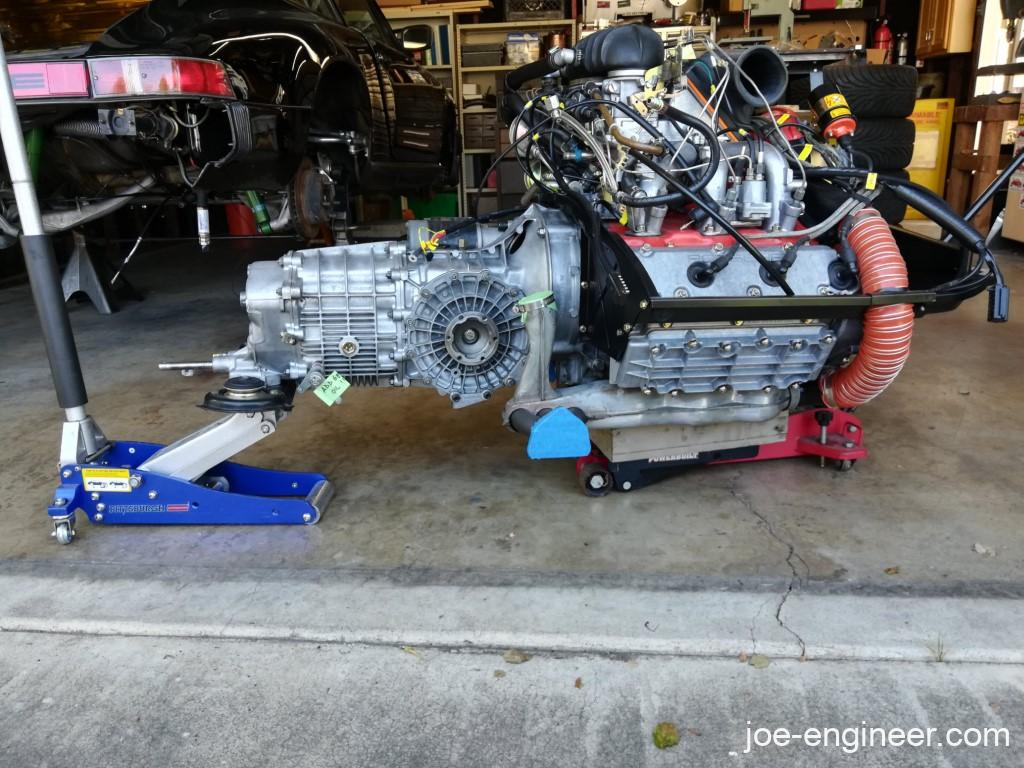
Your engine and gearbox drop is now complete.
Re-installing Engine and Gearbox
Re-installing the engine and gearbox is literally the reverse of the removal steps. Here are a few key items to note while raising the assembly back into place.
- Center the engine and gearbox along the centerline of the car as best as possible while on the ground. It is very difficult to scoot the drivetrain over laterally a small amount to get the motor mount holes to line up while it is in the air, however you can roll the jack forward and backward as needed.
- You can keep a floor jack under the front transmission crossmember for extra support but it doesn’t have to support it. With the CG of the engine and gearbox somewhere around the oil drain plate, it is easy to keep it balanced by holding onto the center slot of the rear engine crossmember.
- Raise the engine and gearbox keeping it level the entire time. Keep an eye on the shifter rod coming out of the front of the gearbox. You will need to roll the drivetrain backwards so the end of the rod clears the body at the entrance of the center tunnel. Continue lifting the drivetrain and as soon as the shift rod clears the center tunnel hole, roll the assembly forward so the rod is in the center tunnel. Now you can keep lifting and align the motor mount holes to install all 4 mounting bolts and 8 large washers hand tight.
- Note: The large washers follow the contour of the motor mount rubber, concave side towards the rubber. Do not install mounting bolts without the large washers! The mounts could tear and the engine and gearbox could fall out!
- As soon as you get all 4 mounting bolts started by hand, slowly raise the engine and gearbox so the drivetrain-side mounting surfaces contact the body-side mounts. Now tighten all 4 bolts slowly and firmly by hand. In this step it is critical that there is no gap between the drivetrain-side and the body-side mounting surfaces because this will cause the bolt threads to support the load and attempt to raise the drivetrain into position as you tighten the threads. This can cause the threads to strip on the rear engine crossbar, or even worse on the body side above the gearbox crossmember.
- Final torque the engine mount bolts to 65 ft-lbs and the gearbox crossbar bolts to 58 ft-lbs.
You can now proceed following steps 2-16 in reverse, to reconnect the axles, hoses, linkages, and wiring. Refill your gearbox with new gear oil using the fill plug on the side of the case. Keep adding gear oil until it starts to run down the side of the case, then torque the plug in the case.
Refill your engine with engine oil per steps 4 through 6 in this procedure. Add a few gallons of gas and your engine should be ready to run again.
Dropping your engine and gearbox may seem intimidating at first, and it is a lot of work, but once you have done it the first time, it becomes much easier every time after that. This is a huge benefit for the DIY Porsche owner as you will save immensely on Porsche service labor costs.
You now possess the ability to remove your engine and gearbox and gain access to almost any item on the car.