
DIY: Fuel Filter, Tank Screen, and Fuel Level Sensor Replacement on an Air-cooled Porsche 911
If your car has been sitting for a long time with old gas in it, or simply has high mileage, some of your fuel system components may be clogged with excess contaminants.
Note: The following information is for educational use only. Before proceeding please read my disclaimer page.
Disclosure: This post contains links to Amazon products and other trusted vendors. As an Amazon Associate I earn from qualifying purchases.
Like most cars, if your air-cooled Porsche 911 has had gas in the tank for an extended period of time, it may go bad and start to gum up some of your fuel system components. This could cause hard starting, rough running conditions, or make your fuel gauge unresponsive. Even if the car has been driven regularly, high mileage will start to take its toll and slowly cause similar symptoms. This is especially important on CIS and MFI cars. Replace your fuel systems filtration components and fuel level sensor with these simple procedures and improve your 911’s fuel delivery and fuel gauge function.
Model Years Applicable:
All Porsche 911 models up to 1989.
Note: Fuel filters changed several times over the years so make sure you select the correct one for your car. If your car has very old gas in the tank that smells bad, you should proceed to drain the tank completely so you don’t re-contaminate your new fuel system components as soon as you attempt to start the car again.
Tools Needed:
- Metric flare nut wrench set
- Rags (for fuel spill cleanup)
- Bucket
- Hand transfer pump (for draining fuel)
- Rubber gloves
- Safety glasses
- Fire extinguisher
- Penetrating oil
- Multimeter (for testing fuel level sensor)
- Bentley manual (for testing criteria)
For fuel tank screen replacement:
Parts Needed:
- Fuel filter (varies per year)
- Fuel filter sealing rings (varies per year)
- Tank screen (1974-89 only)
- Tank screen seal (1974-89 only)
- Tank level sensor
- Tank level sensor gasket
Caution: When working with the fuel system always take fire safety precautions.
- Disconnect negative battery terminal.
- Keep a fire extinguisher nearby for each of these procedures.
- Work in a well-ventilated area with no sources of heat, spark, or open flame.
- Make sure the fuel tank has as little fuel as possible to reduce the chance of gasoline spillage.
- Work with as much ambient and overhead lighting as possible to keep electric work lamps away from fuel vapors.
- Gasoline is carcinogenic so wear rubber gloves, long sleeves, and safety glasses to protect your skin.
- Immediately transfer any fuel drained in open buckets to a fuel can to prevent spills and spread of fuel vapors.
Fuel Filter Replacement Procedure
Step 1: Release Fuel Pressure
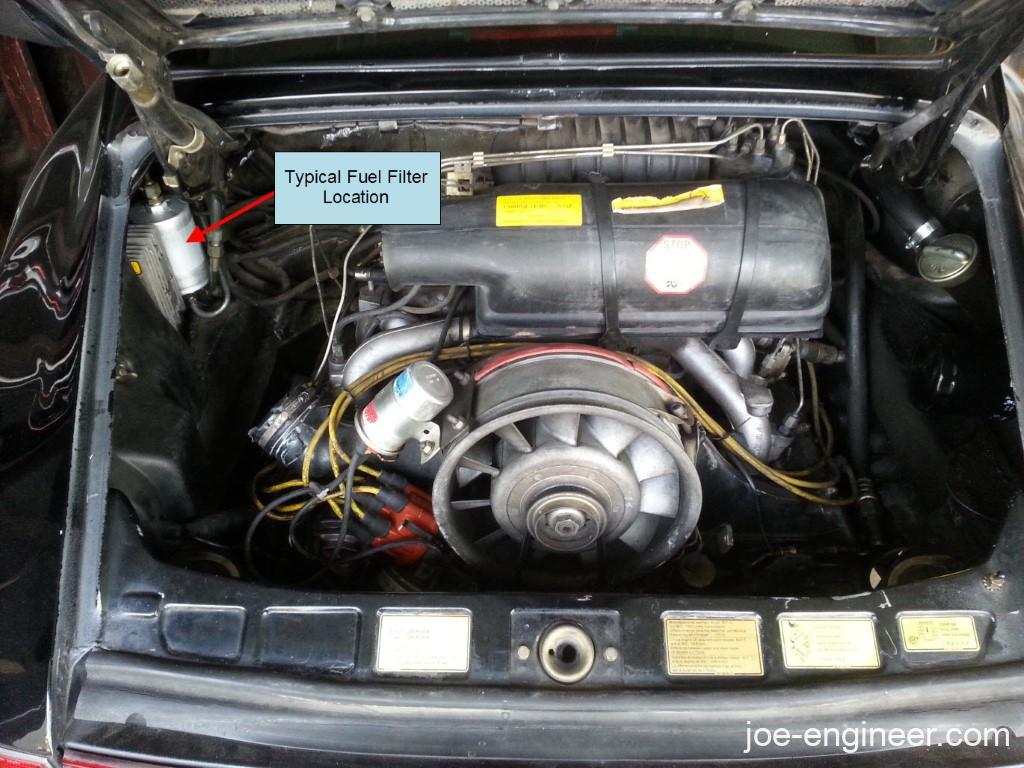
Locate the fuel filter in the car. In most 911s it will be in the engine compartment, above the engine, on the left side. Spray a little penetrating oil on the fuel filter fittings to make removal easier. If the engine has run that day let the car sit overnight to let some of the fuel pressure release within the system and let the engine cool down.
The next day, with a rag in hand to catch any spilling fuel, loosen the upper and lower fuel filter fittings. If there is any residual pressure left in the lines, a small amount of fuel may spray out momentarily.
Step 2: Remove Filter
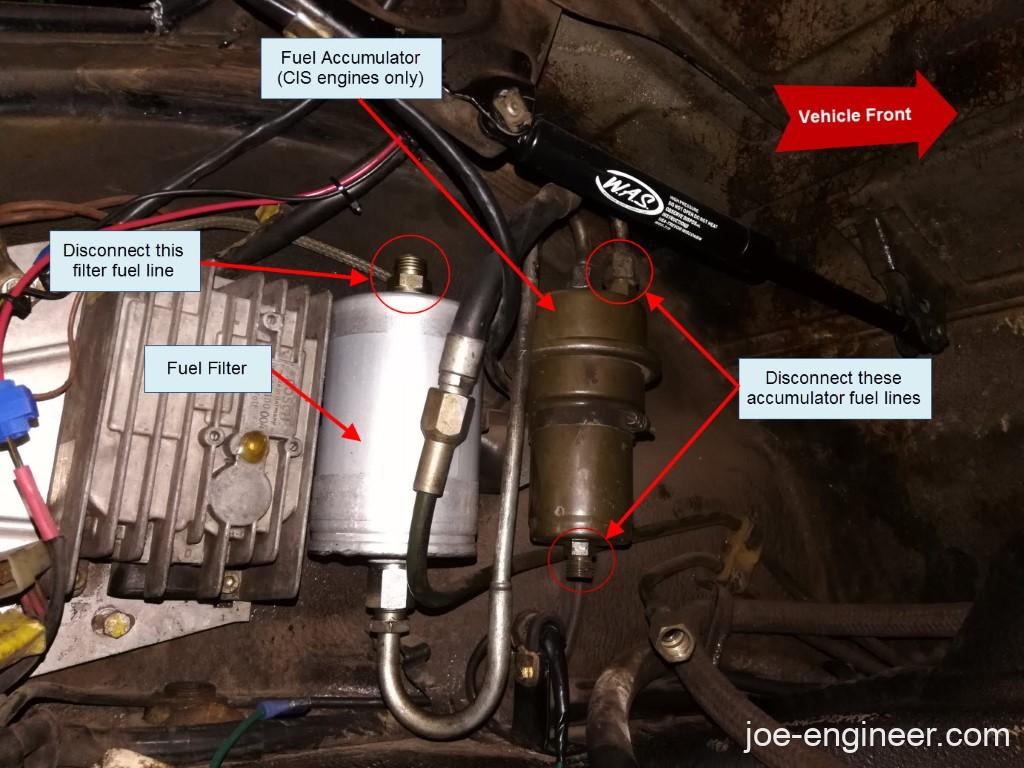
If you have a 911 SC, the fuel accumulator is right next to the filter, joined with an S-shaped hard fuel line. It may be easier to disconnect the upper fitting on the filter and the lower fitting on the accumulator and pull the whole assembly out so you can replace the filter on the bench.
Some early cars (with mechanical fuel injection) may have a fuel filter element located under a hard-plumbed filter mount, appearing similar to a very small spin-on oil filter. In this case, disconnect the lower hose and loosen the filter by spinning it off the upper filter mount. Early cars with carburetors had a small can filter with hose clamps securing the fuel lines. Loosen the hose clamps and pull the fuel lines off.
Remove the filter from the car and take it to a bench. Examine it next to your new replacement filter. Compare the filter connections.
If your new filter comes with new threaded fittings to connect it to your fuel lines, use those. Otherwise move any missing fittings from the old filter onto the new filter, along with new sealing rings to prevent fuel leaks. Tighten the fittings onto the new filter while you have it on the bench.
Step 3: Re-install Filter
Carefully re-install the new filter onto the fuel lines making sure you use new sealing rings. Thread the fuel line fittings and tighten as far as you can with your fingers. Finish tightening each fitting with a wrench, holding the filter fitting still and turning the fuel line fitting to tighten.
On early mechanical fuel injection cars, spin on the filter and tighten as much as possible by hand. Much like an oil filter, a rubber sealing ring will seal against the filter mount surface. If necessary, snug it a bit further using the hex fitting on the bottom of the filter. Reconnect the lower fuel line as it was originally connected. On early cars with carburetors simply push the fuel lines back onto the new filter and tighten the hose clamps to secure them.
Step 4: Pressurize Fuel System and Check for Leaks
With a fire extinguisher and rags nearby, turn the ignition key to “on” position to start the fuel pump and pressurize the system. Check for leaks around the filter and engine compartment. Once you have confirmed there are no leaks, start the car and let it run for a few minutes to confirm no leaks are present. The car may take a few extra cranks to start since it needs to purge the air out of the fuel lines and the new filter.
If you have a very early car with a mechanical fuel pump you will have to start the car to check for fuel leaks around the filter. As before, keep an extinguisher nearby just in case.
Fuel filter installation is now complete.
Fuel Level Sensor Removal, Testing, & Replacement Procedure
Step 1: Empty Front Trunk and Locate Sensor
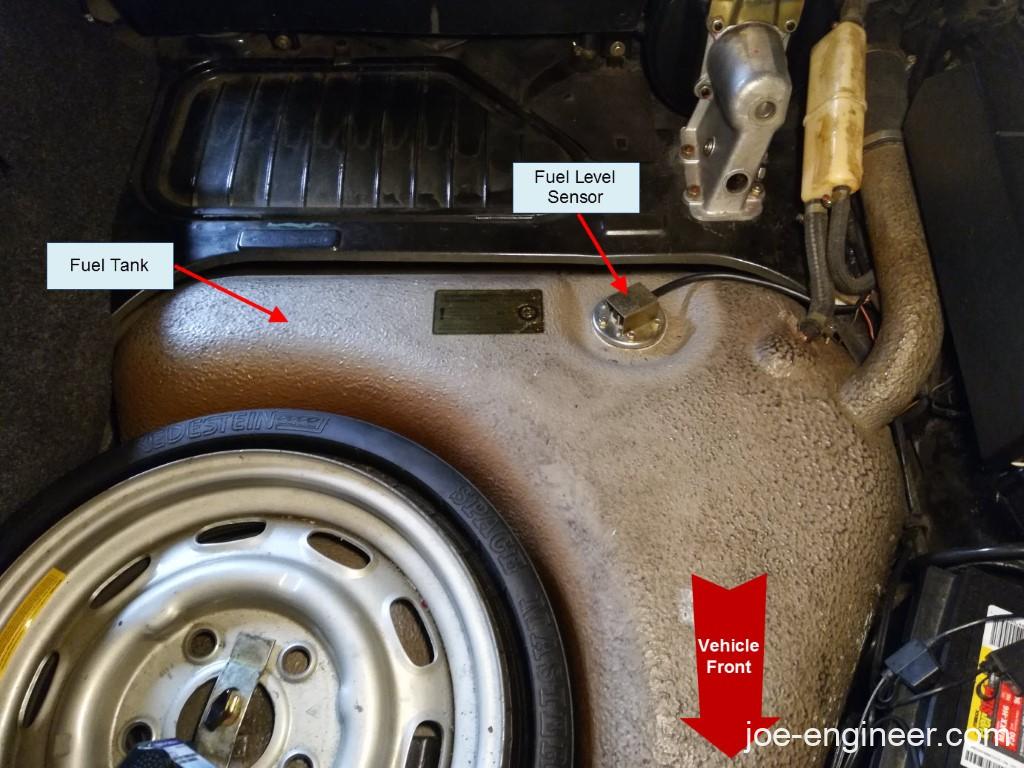
Open the front trunk and empty it out. If you have trunk carpet remove it to expose the bare fuel tank. Find the electrical connection for the fuel level sensor on top of the tank.
Step 2: Remove Sensor
Remove the bracket holding the sensor electrical plug in place. Save the nuts and washers for reuse later.
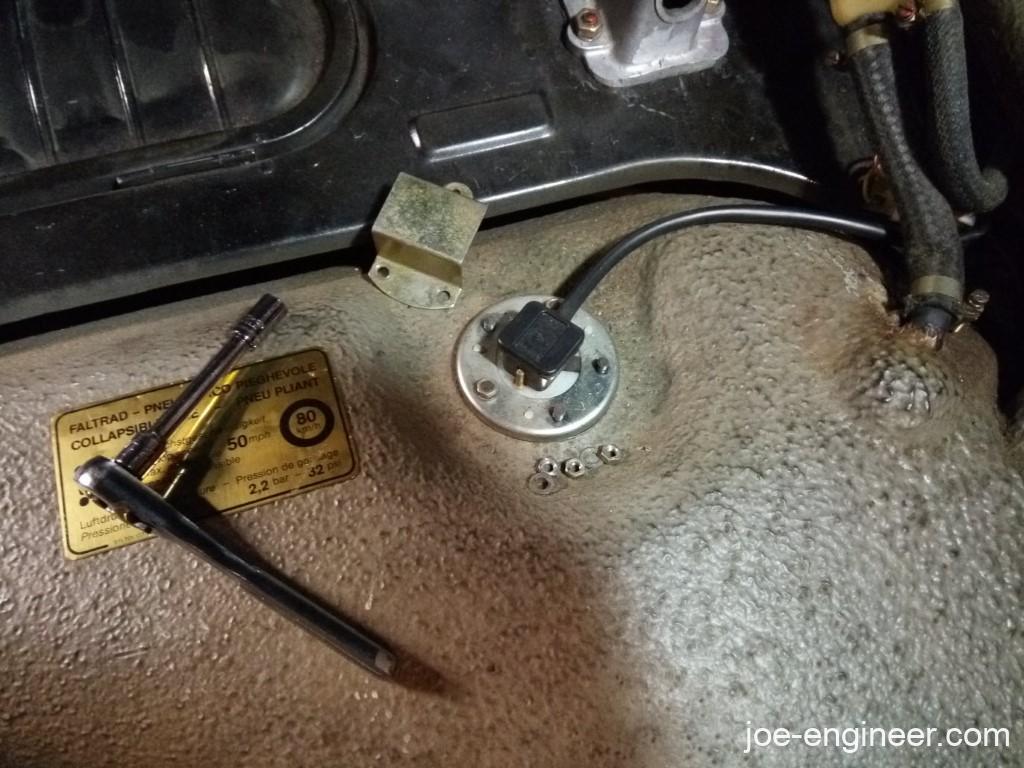
Gently pull off plug to expose the top of the fuel level sensor.
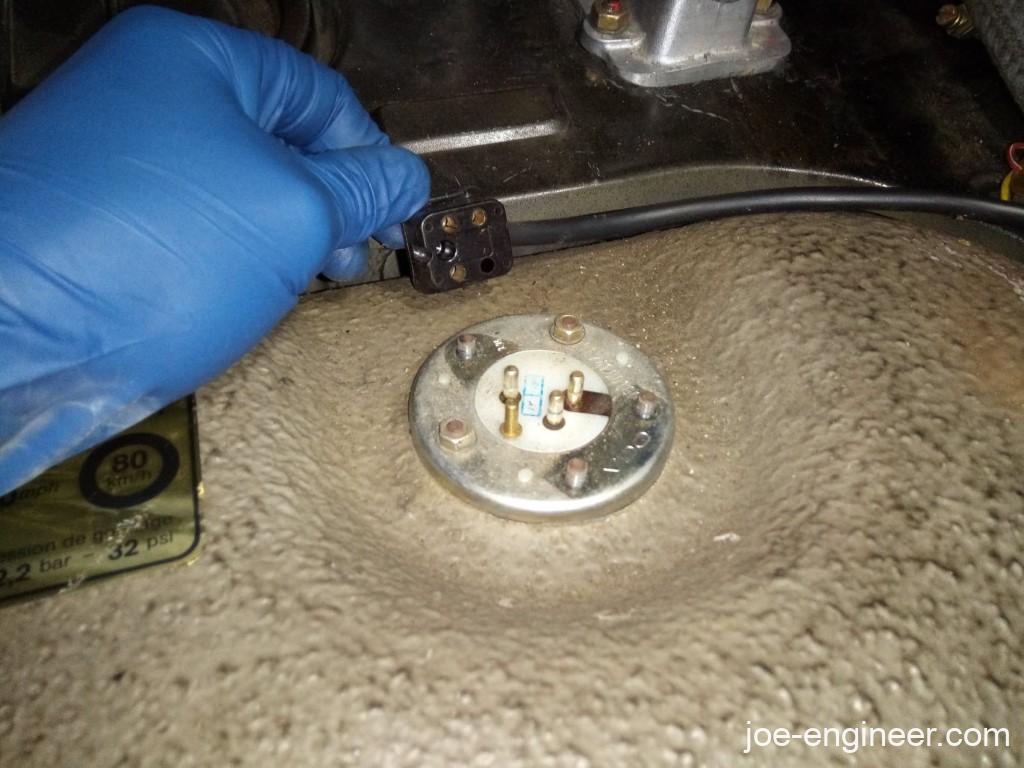
Remove the remaining nuts and washers from the top of the sensor and set them aside. Using a plastic trim removal tool gently pry all around the sensor flange. Once it begins to lift, grab a rag and get ready for a small amount of fuel to leak out from around the sensor tube.
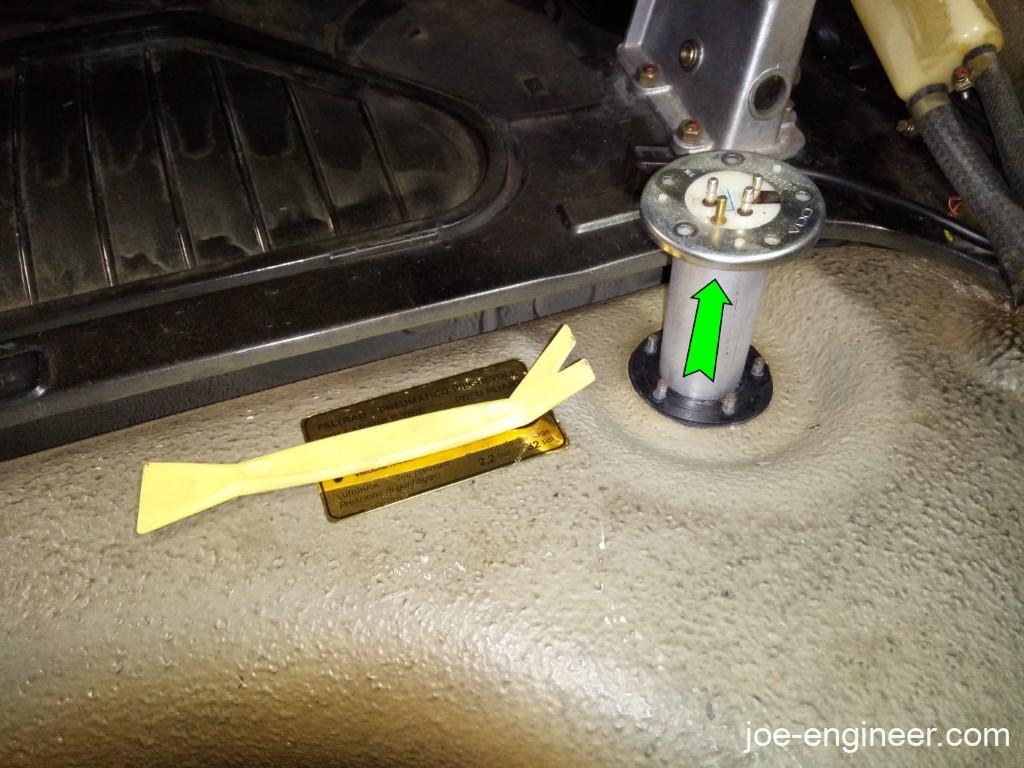
Slowly lift the sensor all the way out and let the end momentarily sit over the opening of the tank to allow any fuel in the sensor to drain back into the tank. Wipe up any spilled fuel.

Step 3: Remove Gasket and Inspect Tank
Wipe the sensor dry and set it aside. If the sensor rubber gasket is stuck to the tank opening, carefully peel it off with the plastic trim tool, taking care not to drop any pieces of gasket into the tank. This is a good time to peer into the tank with a flashlight and get a good view of its interior. It should be nice and clean with no debris at the bottom.
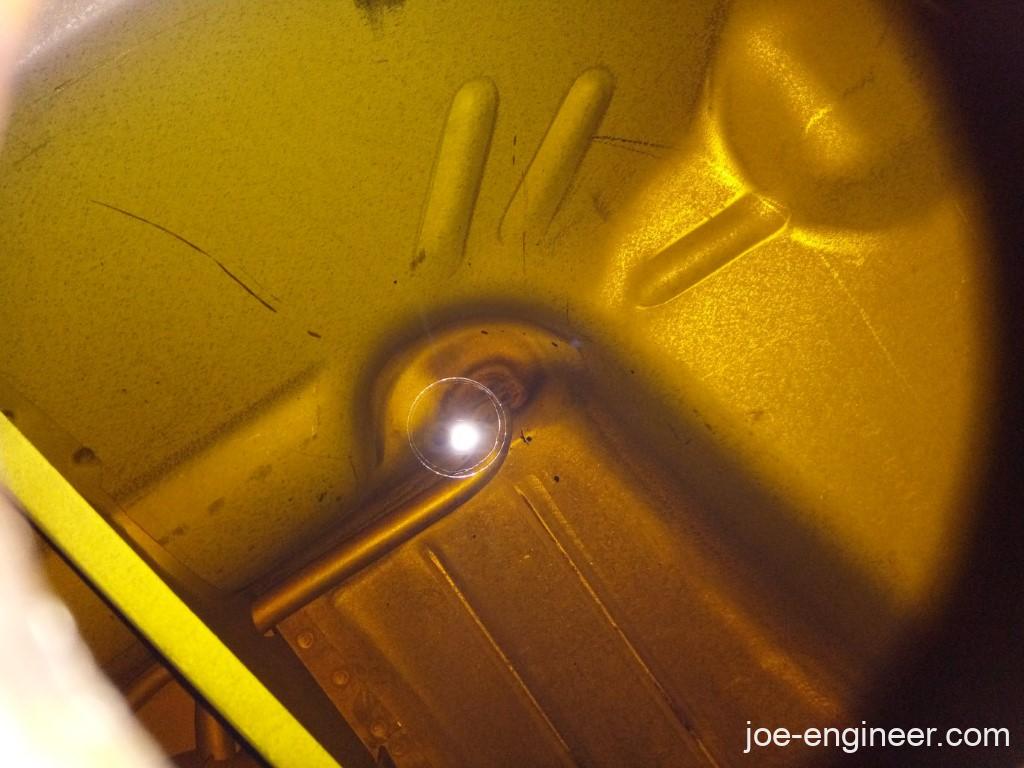
If your tank interior is very dirty or worse, rusty, you may need to consider draining the tank and either taking it to a specialist for professional cleaning or replacing it with a new one as any contaminants in the tank will quickly clog up your fuel system once again.
Note: If you will be replacing the fuel tank screen next and you still have gas in the tank, it is recommended you drain the tank now through the tank opening using a hand transfer or siphon pump.
Step 4: Testing Fuel Level Sensor
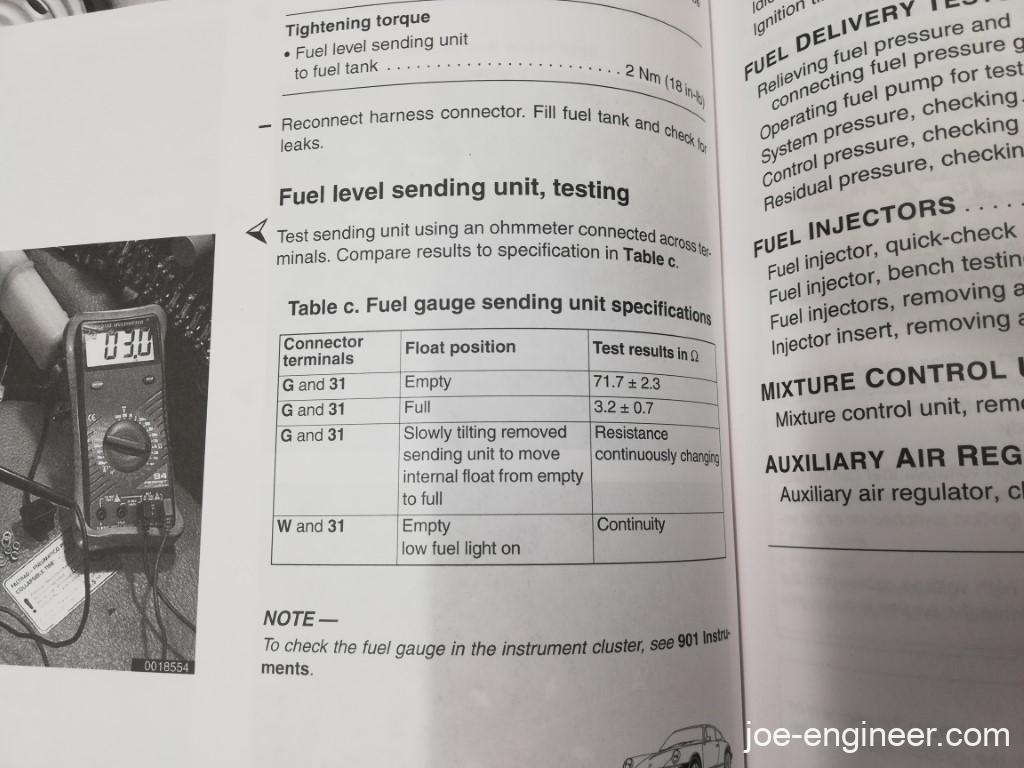
Visually inspect your fuel level sensor for any obvious damage. Slowly tilt the sensor to let the float inside slide back and forth. It should slide smoothly and not get stuck anywhere along its travel. Next grab a multimeter and your Bentley manual to give it a quick bench test. The sensor is nothing more than a linear variable resistor. As the fuel level changes in the tank, the float inside the sensor rises or falls and generates a corresponding change in electrical resistance.
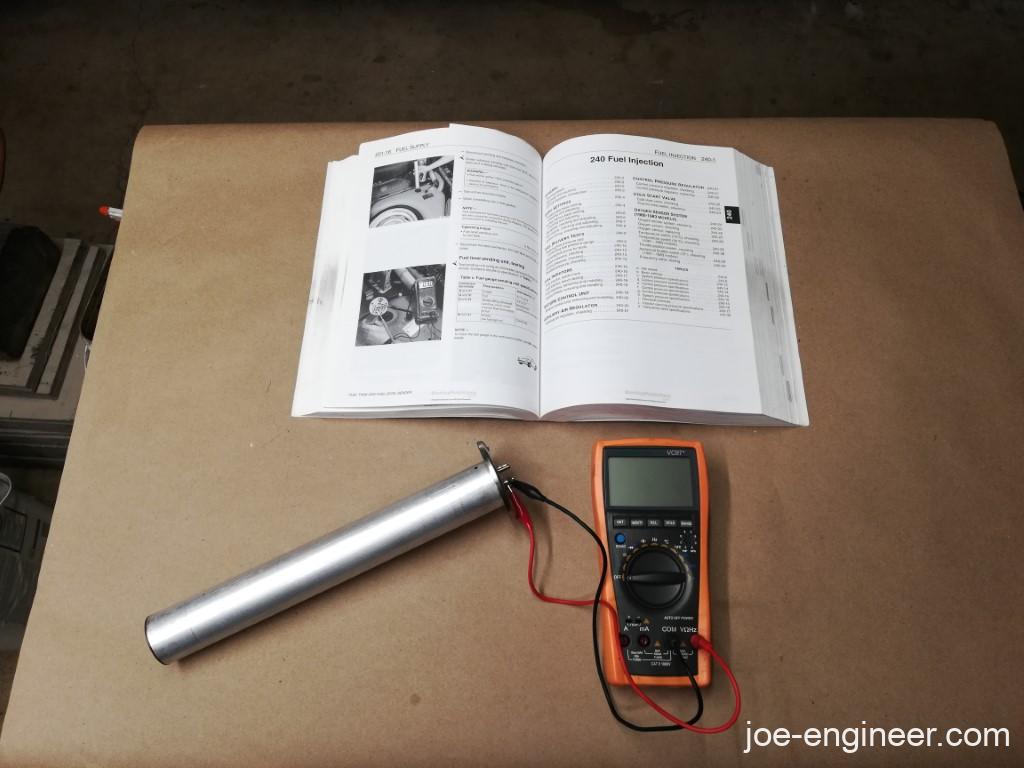
Set the multimeter to read ohms and connect to terminals G and 31. Flip the sensor upside down to get the float in the full position and right side up for the empty position. Hold it sideways and tilt it to let the float gently slide back and forth to watch the resistance change. If the resistance values match what the Bentley calls out, switch the multimeter to test continuity between terminals W and 31. If you hold the sensor right side up to put the float in the empty position, you should get continuity which would trigger the low fuel light on the fuel gauge.
If your old fuel level sensor passes all of these tests, it is ok to reuse. If it fails any of them, it is faulty and should be replaced with a new unit.
Step 5: Reinstall New Sensor and Gasket
If your tank interior is clean you may now place a new gasket onto the tank opening and insert the fuel level sensor into the opening. Install the electrical plug and bracket and the washers and nuts. The nuts are very tiny so they should be hand tightened snug in a star pattern. Do not re-use your old gasket as it may cause fuel vapor leaks.
Start the car and the fuel gauge needle should now flip to life.
Fuel level sensor replacement is now complete.
Fuel Tank Screen Removal, Cleaning, & Replacement Procedure
Note: The fuel tank screen is essentially a large fuel tank drain plug. This procedure will drain your tank very quickly. It is highly recommended you start with an empty tank to prevent dangerous fuel spills, otherwise you will need to drain it by disconnecting the fuel pump inlet line under the tank as described in steps 1-4 in this procedure and collecting the fuel in a bucket. Another way is through the fuel level sensor opening at the top of the tank using a fuel transfer pump as described in steps 1-3 in the previous procedure.
Step 1: Raise the Car on Jack Stands
Raise the car on jack stands using this procedure. We will be working on the bottom of the tank and will need room to put a bucket under the car to drain any remaining gas.
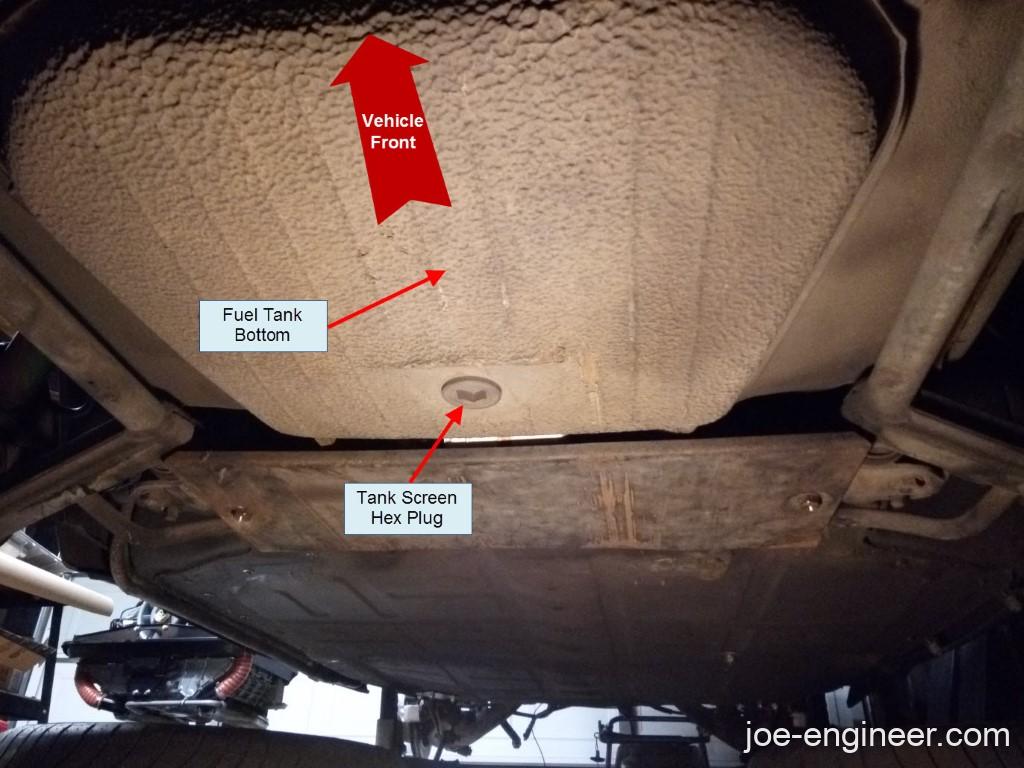
Step 2: Locate Tank Screen Plug & Remove
Under the tank look for the large hex plug. It should be very easy to spot. Place a bucket under the hex plug to catch any remaining gas in the tank.
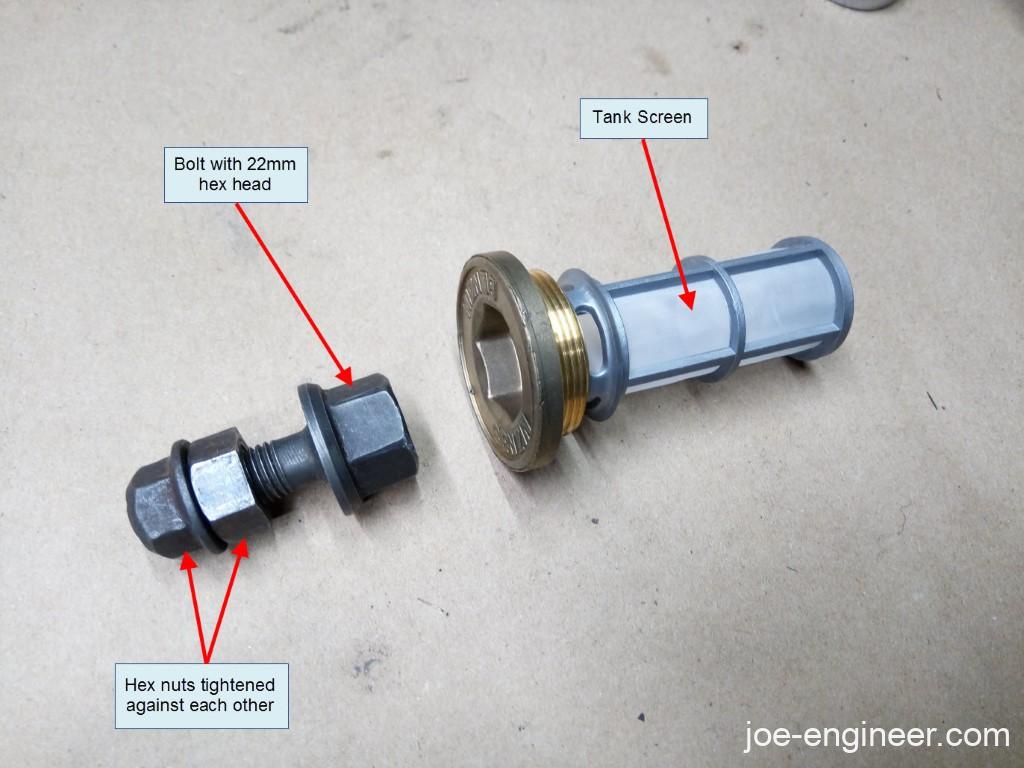
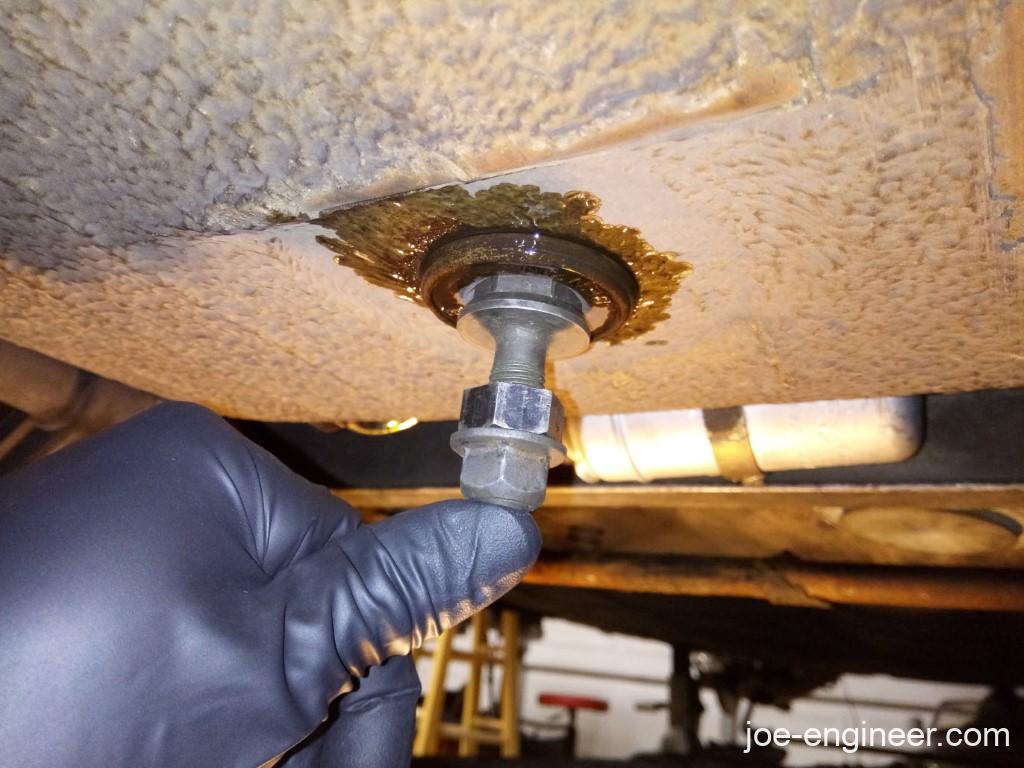
Use a 22mm hex bit to loosen the plug. If you do not have a hex bit that large, in a pinch you can use a spark plug socket with a 13/16” external hex. Insert the hex end into the tank plug and insert a ratchet extension from the opposite side of the spark plug socket to turn it. A third option is making a tool with a large bolt with a 22mm hex head and 2 nuts tightened against each other on the bolt threads.
Crack the plug loose and slowly turn until gas starts to drip out. Turn the plug until gas drains out at a controlled rate into the bucket. There are very few threads on the plug so it may just come out completely with gas rushing out at full speed. Once gas is fully drained, immediately transfer it to a closed fuel container. If the plug sealing ring is stuck to the tank opening remove it.
Step 3: Replace Tank Screen Plug and Seal
If the tank screen is in good shape you could probably clean it with carb cleaner and re-install it, but they are relatively inexpensive so may as well put in a new one. Place a new plug seal over the new tank screen plug and thread back into the bottom of the tank by hand. Torque to 25 N-m (18 ft-lbs).
Tank screen replacement is now complete.
Your fuel tank is now ready to deliver clean fuel and register correct fuel level for years to come.