
DIY: Fuel Pump Replacement on an Air-cooled Porsche 911
If you are having rough running engine issues and your troubleshooting has pointed you to the fuel pump, here is an easy way to replace it.
Note: The following information is for educational use only. Before proceeding please read my disclaimer page.
Disclosure: This post contains links to Amazon products and other trusted vendors. As an Amazon Associate I earn from qualifying purchases.
Most years of 911 have an external electric fuel pump located right below and behind the fuel tank at the front of the car. It is very easy to access should it ever require replacement. Some very early 911s have a mechanical or electric fuel pump located in the engine compartment however there are so few of those that we will only cover the front pump replacement procedure.
Model Years Applicable:
All Porsche 911 models up to 1989.
Tools Needed:
- Floor jack
- Jack stands
- Wheel chocks
- Flat and Phillips screwdrivers
- Metric socket set
- Channel lock pliers
- Fuel line clamp or very small C-clamp
- Rags (for fuel spill cleanup)
- Rubber gloves
- Safety glasses
- Fire extinguisher
- Penetrating oil
Parts Needed:
- Fuel pump
- Fuel pump check valve (including 3 replacement crush washers)
- Electric connection rubber boots (if any are damaged/missing)
Procedure
Caution: When working with the fuel system always take fire safety precautions.
- Disconnect negative battery terminal.
- Keep a fire extinguisher nearby.
- Work in a well-ventilated area with no sources of heat, spark, or open flame.
- Make sure the fuel tank has as little fuel as possible to reduce the chance of gasoline spillage.
- Work with as much ambient and overhead lighting as possible to keep electric work lamps away from the fuel pump area.
- Gasoline is carcinogenic so wear rubber gloves, long sleeves, and safety glasses to protect your skin.
Step 1: Raise Car on Jack Stands
Raise your car on jack stands using this procedure. We will be working in the space between the front wheels, which is quite cramped. In order to give you the most room to move around it is recommended that the entire car be raised on stands.
Step 2: Locate & Remove Belly Pan
Locate the rectangular belly pan between the front wheels. Remove the 4 fasteners holding it in place. On this particular car there are 2 bolts and 2 nuts holding it in place. Be careful as it is a surprisingly heavy piece of sheet steel and you don’t want it falling on you. On some cars, 2 of the belly pan mounting points are shared with the front sway bar mounts so you may see the sway bar rotate slightly as you unload the sway bar by removing the bolts or nuts.
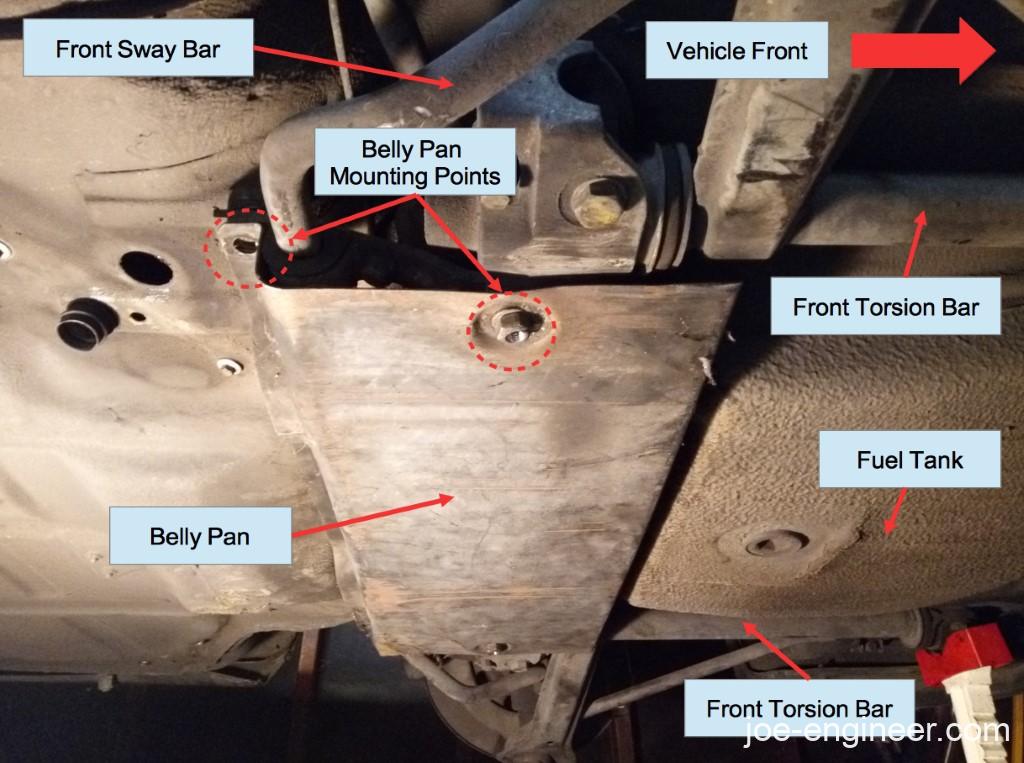
Once the belly pan is removed you should see the fuel pump which is shaped like a small “Scarlet Steer” energy drink can with hoses connected on both ends. 😉
Step 3: Clamp Fuel Line
Gently clamp the short fuel line between the tank and the fuel pump inlet to pinch off fuel flow and prevent fuel spillage. You can use a very small C-clamp with no sharp edges on the 2 clamping surfaces. Clamp just hard enough to pinch the line shut.
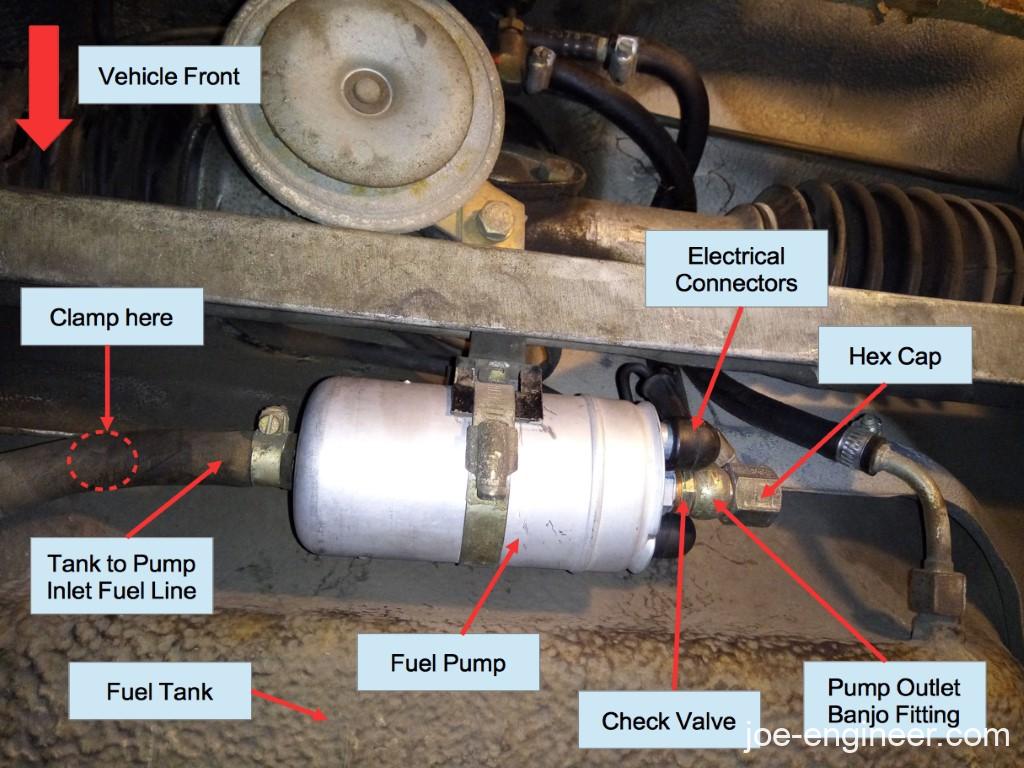
Step 4: Disconnect Fuel Pump
The fuel pump will have 2 electrical terminals labeled “+” and “-“. Write down which color wire goes with which polarity terminal for later reference. If any of the rubber boots covering the pump terminals are damaged, plan on replacing them along with the pump. Disconnect wires and tuck them out of the way for now.
Loosen the small hose clamp on the pump side of the short fuel line between the tank and the pump. Pull the hose off and verify the clamp has stopped fuel from flowing from the tank. A small amount of fuel may spill from inside the pump so have a rag ready.
On the outlet side of the pump there will be a banjo fitting for the pressurized fuel line going to the engine. Loosen the hex cap at the end of the banjo fitting. This may be tricky because the pump may want to turn as you apply torque to the hex cap. Some penetrating oil on the hex cap may help. You may be able to get a pair of channel lock pliers or an open-ended wrench on the flat faces of a hex feature on the outlet side of the pump to hold the pump fixed while you turn the hex cap. Once the hex cap is loose, spin it off and remove the banjo fitting along with the 2 crush washers. More fuel may spill from inside the pump body and/or the banjo fitting so have a rag ready.
Loosen the large hose clamp holding the pump body in place. The pump body is now free to be removed from the car. If there is a rubber cushion between the hose clamp and pump body save it for re-installation later.
Step 5: Replace the Check Valve on New Pump
Many 911 fuel pumps will have a check valve screwed into the outlet of the pump body. If yours has one, it is a good time to replace this inexpensive part. Unscrew it from the body of the old pump to verify it is actually a check valve and its orientation. Then install a new check valve onto the outlet of the new pump with a new crush washer and tighten by hand. Some 74-79 911s came with an OE pump with an internal check valve. If this is the case in your car, it is ok to replace it with the same kind of internal check valve pump or a regular pump with an external check valve.
Step 6: Replace New Pump in Car
Now re-install the pump in the reverse order as the removal.
- Reinstall the pump and the rubber cushion on the large hose clamp in the same orientation as before.
- Reconnect the banjo fitting for the pressurized line going to the engine to the pump outlet with 2 new crush washers and tighten the hex cap by hand. Be gentle when holding the pump body steady during tightening so you do not damage your new pump.
- Reconnect the short fuel line from tank to the pump inlet and tighten the small hose clamp. Release the C-clamp cutting off fuel flow from the tank.
- Reconnect the electrical terminals with the same polarity as before.
Step 6: Test and Check for Leaks
Turn the engine on for a few minutes and check for fuel leaks. The car may take a few extra cranks firing up for the first time with the new pump as air is purged out of the fuel lines. If everything looks ok, turn the engine off. It’s time to re-install the belly pan.
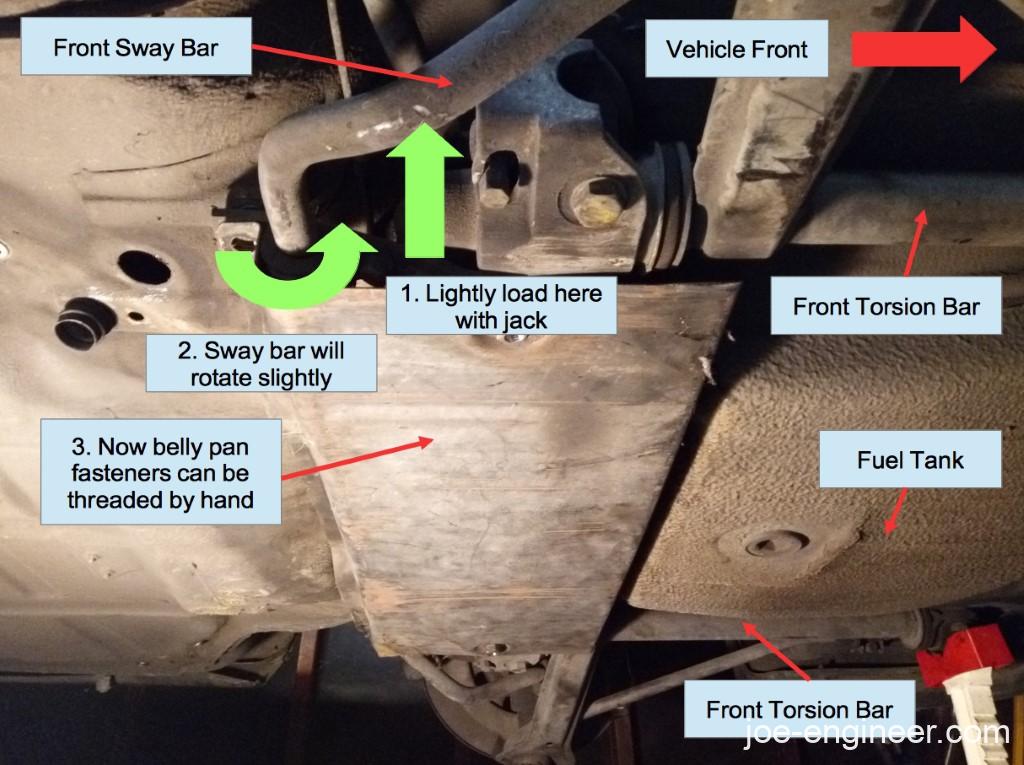
Step 7: Re-install Belly Pan
If your front sway bar moved as you first removed the belly pan, you will have a difficult time pushing it back into place to allow the belly pan to bolt back in. If this is you, you will have to take your floor jack or a bottle jack to gently push on the sway bar arm, just outside of the belly pan area (slightly outboard of the front torsion bars). Do not keep cranking on the jack and lift the car by the sway bar! The idea is to put a slight pre-load on the bar itself to get it to rotate back into its normal bolted-down position. You should now be able to place the belly pan into position and hand-tighten the bolts and nuts snug. At this point release the jack from the sway bar and finish tightening all the belly pan fasteners.
Your fuel pump is now ready to deliver full smiles per gallon.