
DIY: How to Replace the Shifter Bushings on an Air-cooled Porsche 911
The classic air-cooled 911 is not known for having very good shifter action. Fortunately you can replace the bushings easily and adjust it for instant improvement.
Note: The following information is for educational use only. Before proceeding please read my disclaimer page.
Disclosure: This post contains links to Amazon products and other trusted vendors. As an Amazon Associate I earn from qualifying purchases.
Your air-cooled Porsche 911 probably shifts in a way that makes you wonder whether or not an expensive gearbox rebuild is in your near future. Before you take such drastic measures you can dramatically improve the accuracy and tightness of your shifting by replacing your shifter bushings and shift coupler. Follow along to see how easy it is.
Model Years Applicable:
All manual transmission Porsche 911 cars 1986 and earlier. This procedure works with factory shifters with and without short shift kits but not on aftermarket shifter mechanisms.
The procedure shown here is on a 1983 911SC.
Tools Needed:
Parts Needed:
- Shifter crush sleeve (for cars with factory shift knobs)
- Shifter ball cup bushing
- Shifter rod support bushing
- Shift coupler
- Shift coupler screw (if yours is damaged)
Procedure
Step 1: Remove Center Console and Shifter
Remove your shift knob. If you have the factory shift knob, it should pull straight off the shifter handle with a good amount of force. It is held on with a crush sleeve. You will need a new crush sleeve when you put it back together but save the old one for the shifter adjustment procedure.
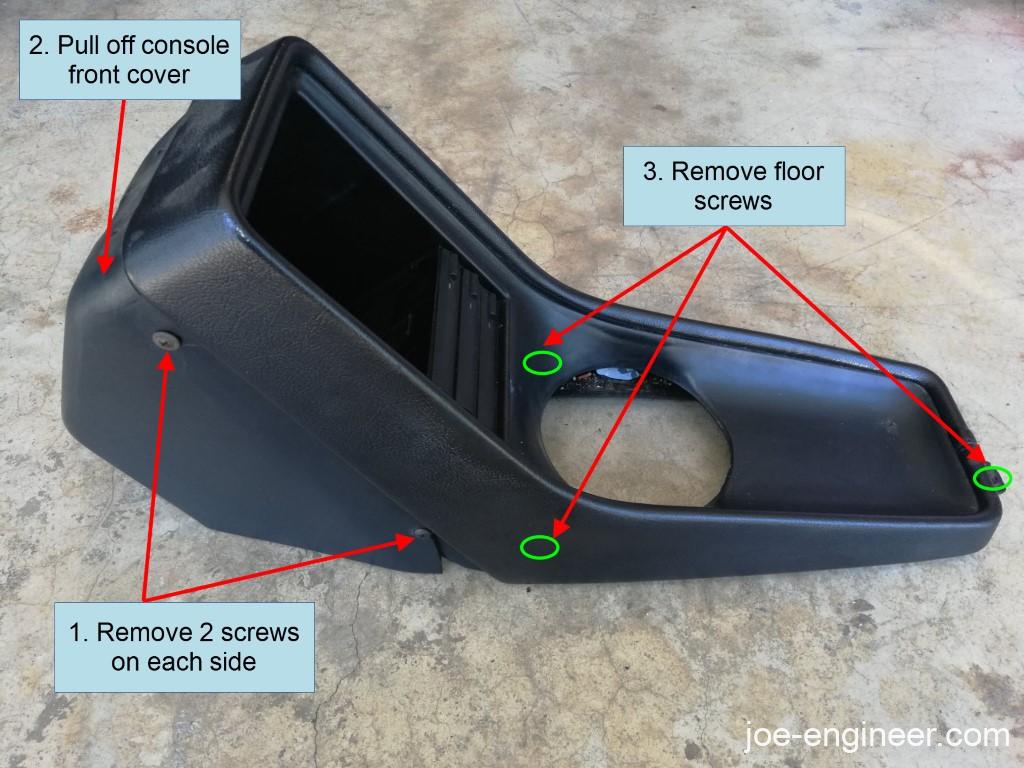
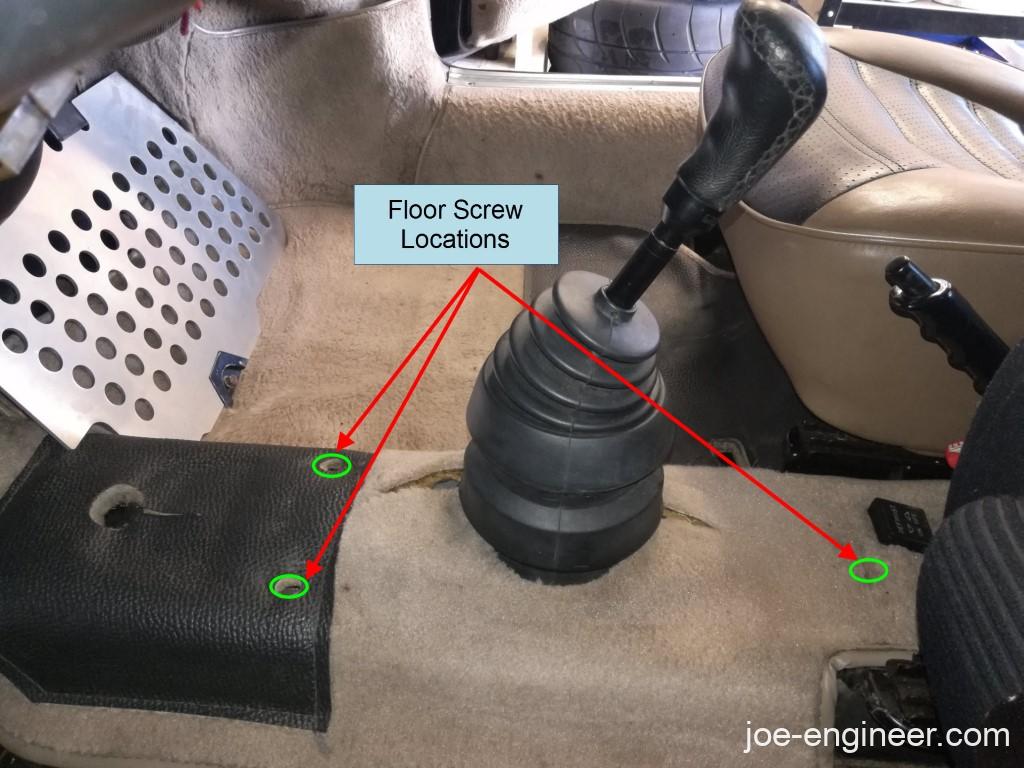
If your car has a center console you will need to remove it to access the shifter. It is typically attached to the floor with several screws around the bottom edge of the console. They may be obscured by carpet. On the 1983 SC you remove 2 screws on each side of the console, pull off the front cover, then access the 3 floor screws to remove it.
Once you release the center console, carefully lift it over the shifter lever. There may be air conditioning or audio wiring underneath the console. If there is wiring connected, place the console in the passenger side footwell for now.
Your shifter and shift boot are now exposed. If you lift the boot off the lever and pull the center tunnel carpet out of the way you will see the base of the shifter bolted to the floor. Make sure the shifter is in neutral and avoid moving the shifter into any gear.

Remove all the bolts and the shifter assembly will lift off the floor. Save the bolts and washers and set them aside.
Step 2: Replace Shifter Bushings
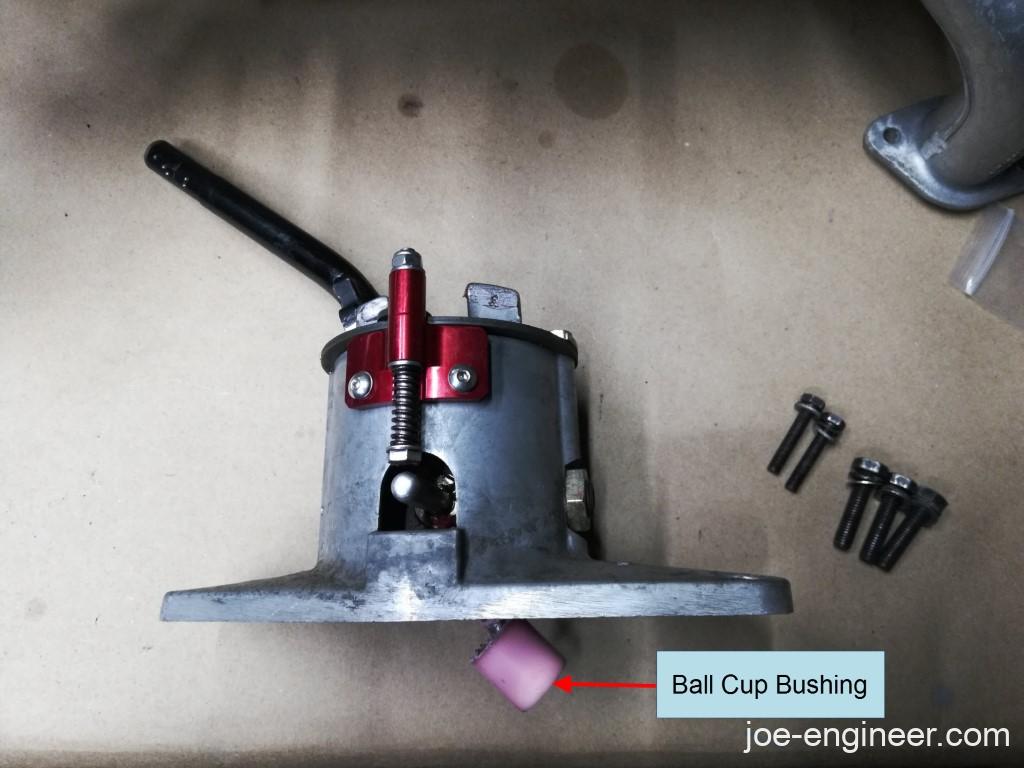
Underneath the shifter assembly you will see a cylindrical ball cup bushing around the bottom of the shifter lever. Pull this bushing off and clean the ball at the end of the shifter lever. Grease the ball and the inside of a new bushing and snap the bushing on. Make sure it is fully seated as sometimes it pops off due to air trapped inside the bushing.
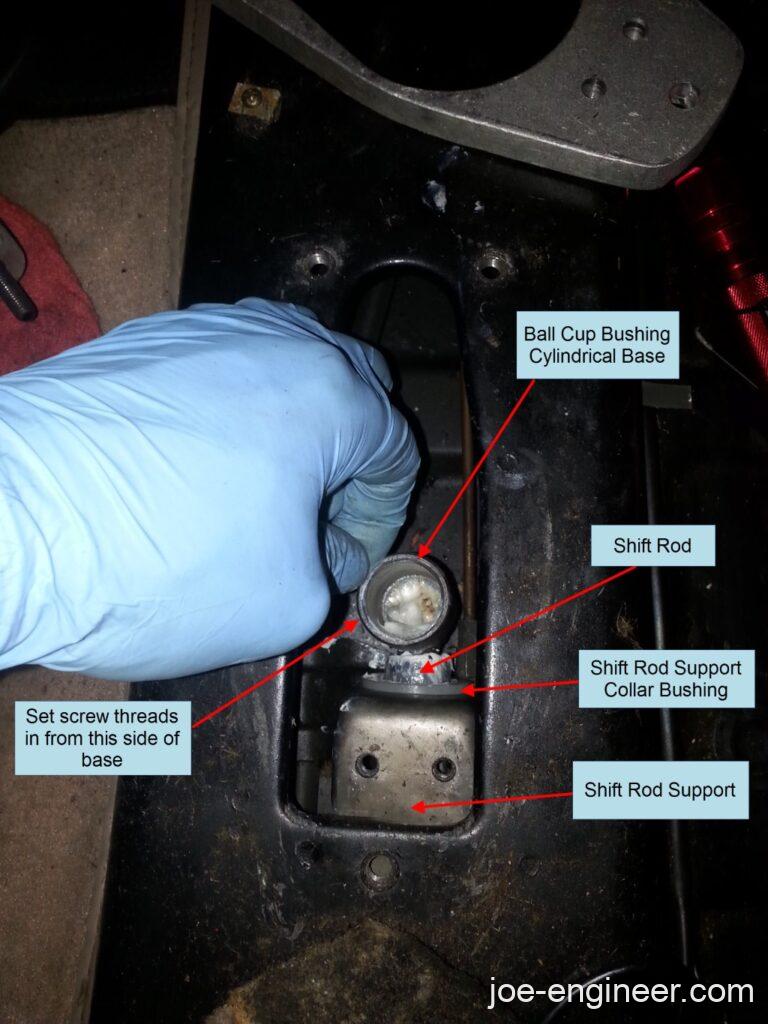
Back in the car, in the shifter opening in the center tunnel, you will see the cylindrical base that the shifter ball cup bushing drops into. It is connected to the shift rod which travels down the center tunnel. Directly behind the shifter is a support collar with another bushing that needs to be replaced.
But first you have to disconnect the shift rod at the rear where it connects to the gearbox.
Step 3: Remove Shift Rod Cover and Coupler
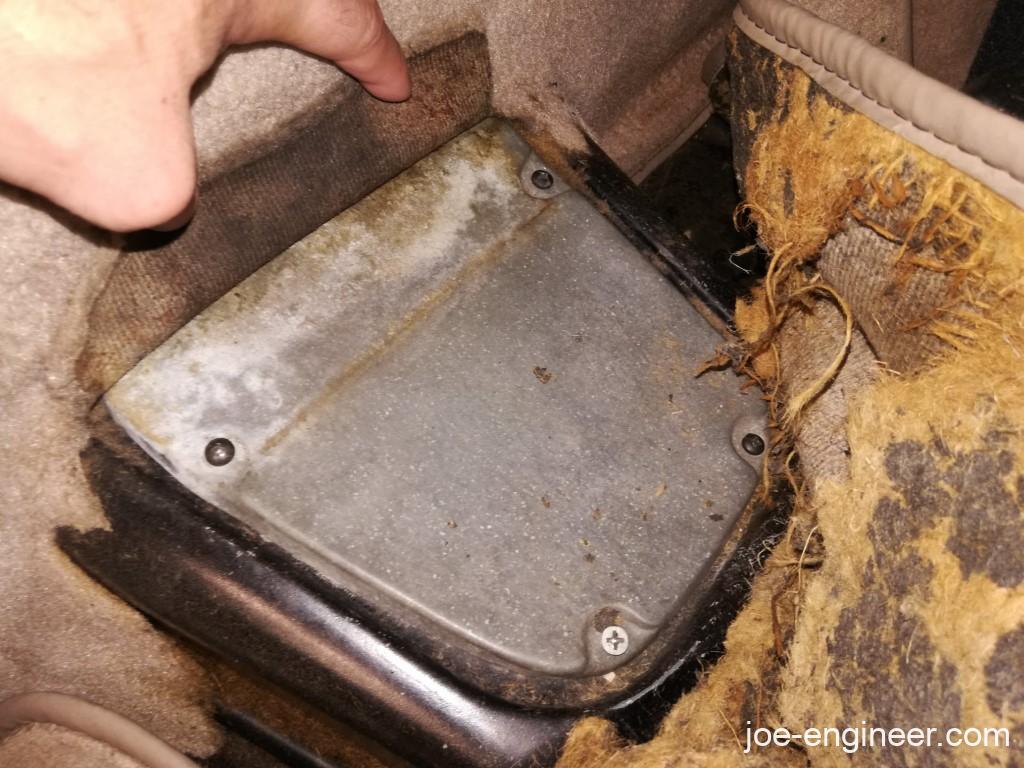
In the floor directly behind the front seats and in front of the rear seats is a small access panel under the carpet. Remove the 4 screws and lift the cover off the access panel.
Inside you will see a rubber boot covering the shift coupler. The coupler connects the shifter rod from the shifter assembly to the shift rod at the gearbox. Pull the boot forward off the coupler and mark the position of the coupler splined shaft with respect to the clamp on the end of the shifter rod. Using a permanent marker mark 2 lines as shown below to mark the position of the coupler clamp to use as a reference later.
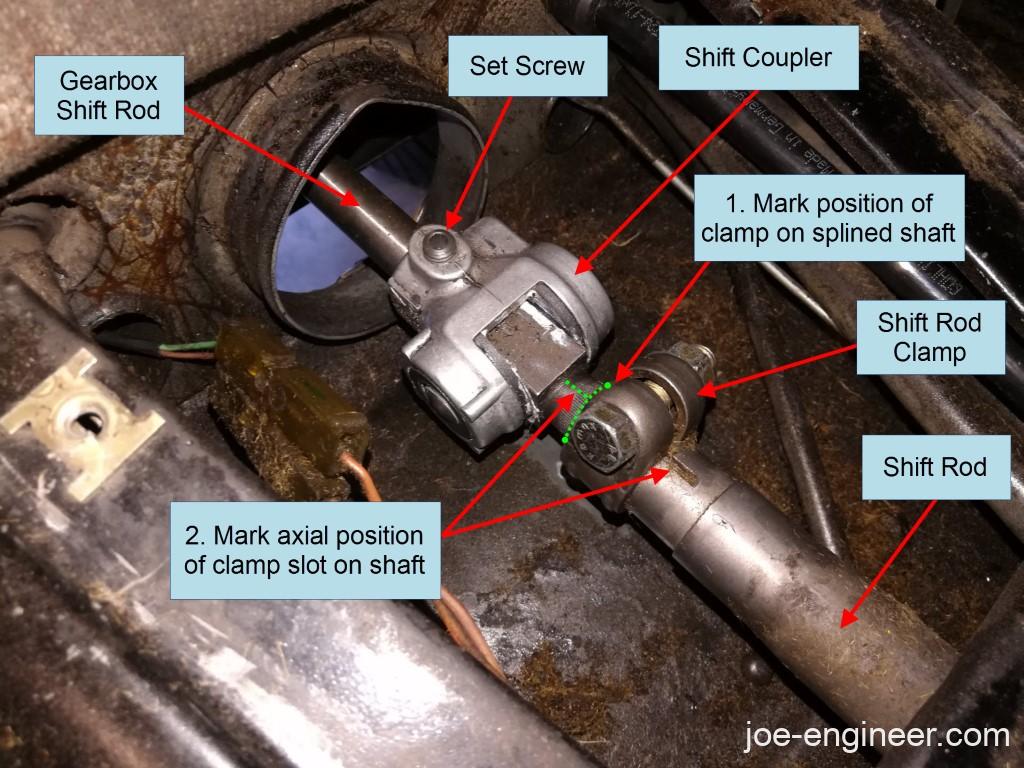
Loosen the nut to disconnect the shift rod clamp from the splined shaft on the coupler.
Step 4: Replace Shift Rod Bushing
Now you can move back to the front of the shift rod and pull it forward and upward out of the tunnel to remove a set screw holding the cylindrical base onto the rod. Refer back to the photo in step 2.
Once the set screw is off, pull off the cylindrical base and you should be able to slide the shift rod support collar off the shift rod. Set all pieces aside and don’t lose the set screw.
Snap the old shift rod bushing off the collar and snap in a new one. Slide it back onto the shift rod and apply some grease on the rod around the bushing. Re-attach the cylindrical base with the same set screw as before and tighten by hand as much as possible.
Step 5: Replace Shift Coupler and Re-install Shifter
Moving back to the shift coupler, you will find that it is still attached to the end of the gearbox shift rod with a single cone-shaped set screw. Loosen this set screw and pull the shift coupler off. Do not lose the set screw.
Inspect the shift coupler for any damage, especially on the plastic bushings. If you wiggle the splined shaft sometimes you will see that the pin going through the bushings has some slop in it. If it is excessive or if the bushings are damaged, replace the coupler with a new one.
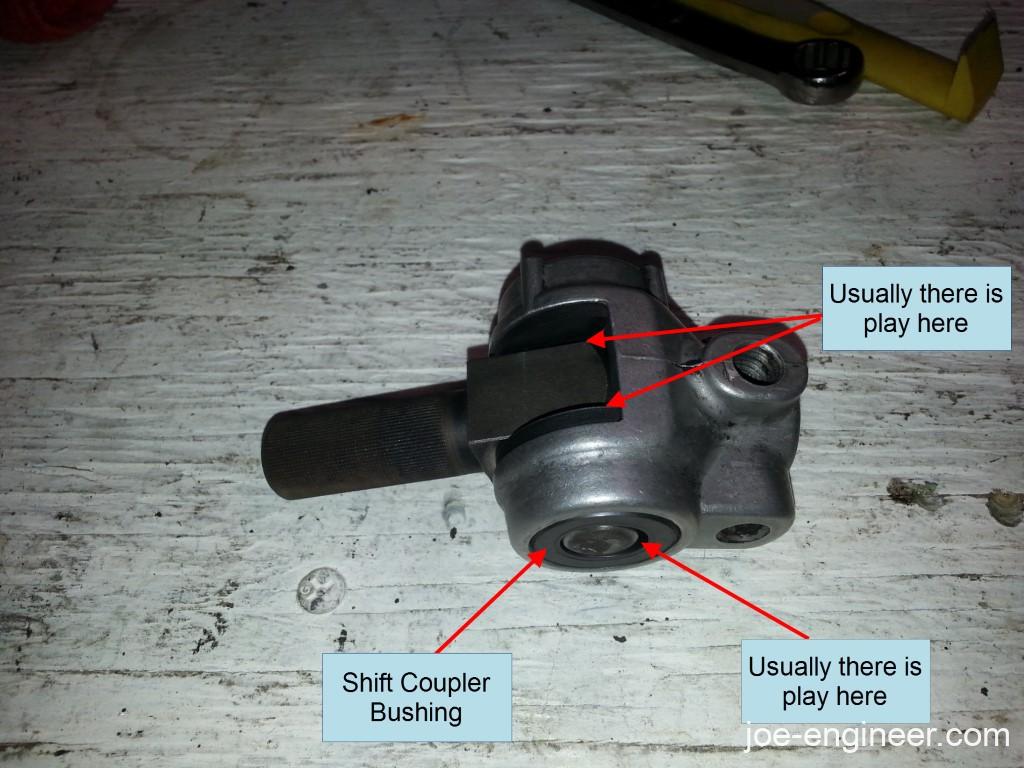
You can replace the bushings themselves and reuse the coupler but the die cast coupler housing often gets damaged when attempting to press out the bushings. It is usually easier to replace the entire unit.
Re-attach the shift coupler to the gearbox shift rod using the set screw. Insert the splined end of the coupler back into the clamp on the shift rod but don’t tighten it down yet.
Next move forward to re-attach the shifter assembly. The tricky part is getting the shift rod collar to stay up while you cover the center tunnel hole with the shifter base. Line up the shift rod collar threaded holes with the ones on the rear of the shifter base and start threading the 2 screws that hold the shift rod collar to the base. Leave the collar loose, lower the shifter assembly base onto the center tunnel, and line up the holes to bolt the shifter base onto the tunnel. Remember that the shifter should still be in neutral with the lever in the center.
Verify that the shift rod coupler at the rear still has its splined shaft inserted into the shift rod clamp. Tighten the 3 shifter base bolts to 25 Nm (18 ft-lbs) and the 2 shift rod collar bolts to the bottom of the shifter base to 10 Nm (89 in-lbs).
Using the lines you drew on the old shift coupler as a guide, orient the shift rod and coupler in the same location as best as possible without forcing the gearbox into any gear. You will fine tune this position next.
Step 6: Adjust Coupler and Shifting Action
Note: The 911 shifter mechanism will always have some amount of free play in it. This adjustment procedure helps you find the ideal spot in your car’s shifter, within the range of play, where it engages all the gears with no problem. All the adjustments described below are made with the gearbox in neutral for simplicity.
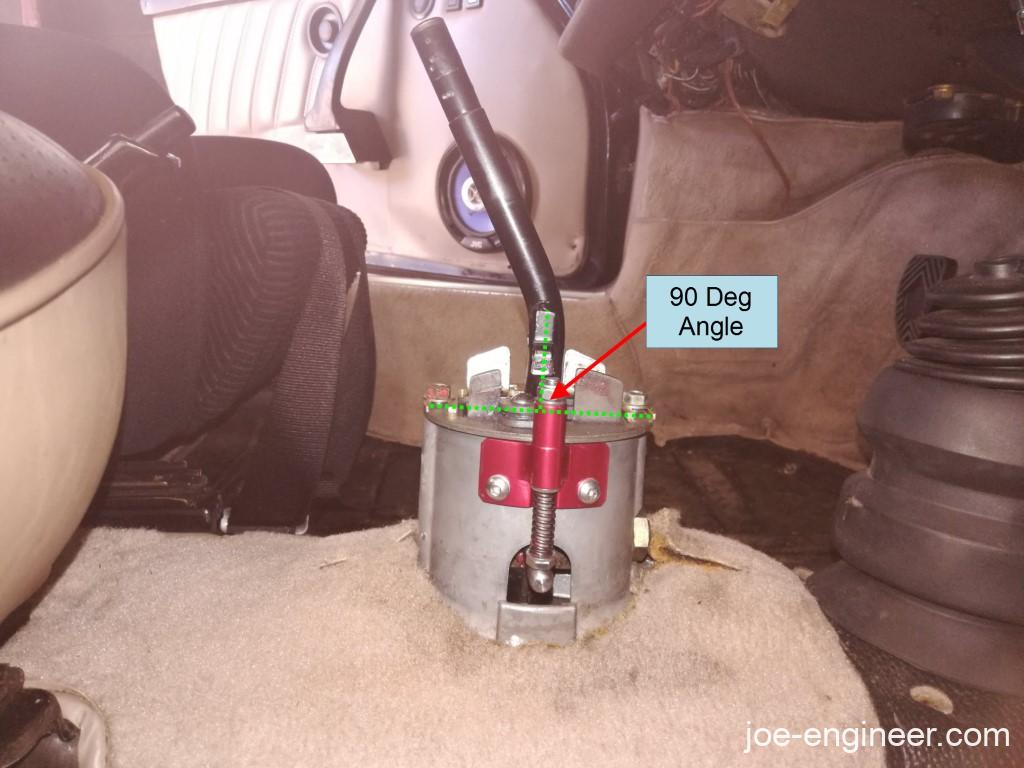
With the shifter boot off and the shift knob temporarily back on with the old crush sleeve, sit in the driver seat and set the shifter into neutral. While still in neutral, rotate the lever slightly so that it is perpendicular to the top of the shifter assembly when viewed from the side
While in the driver seat and making sure the shift lever stays perpendicular to the top of the shifter housing, grab the shift coupler by itself, and within its range of play, move it all the way forward and all the way back to find its free travel, then set it in the middle (front to back).
Then, with you facing the front of the car, turn the coupler clockwise until it stops (right side of the coupler down).
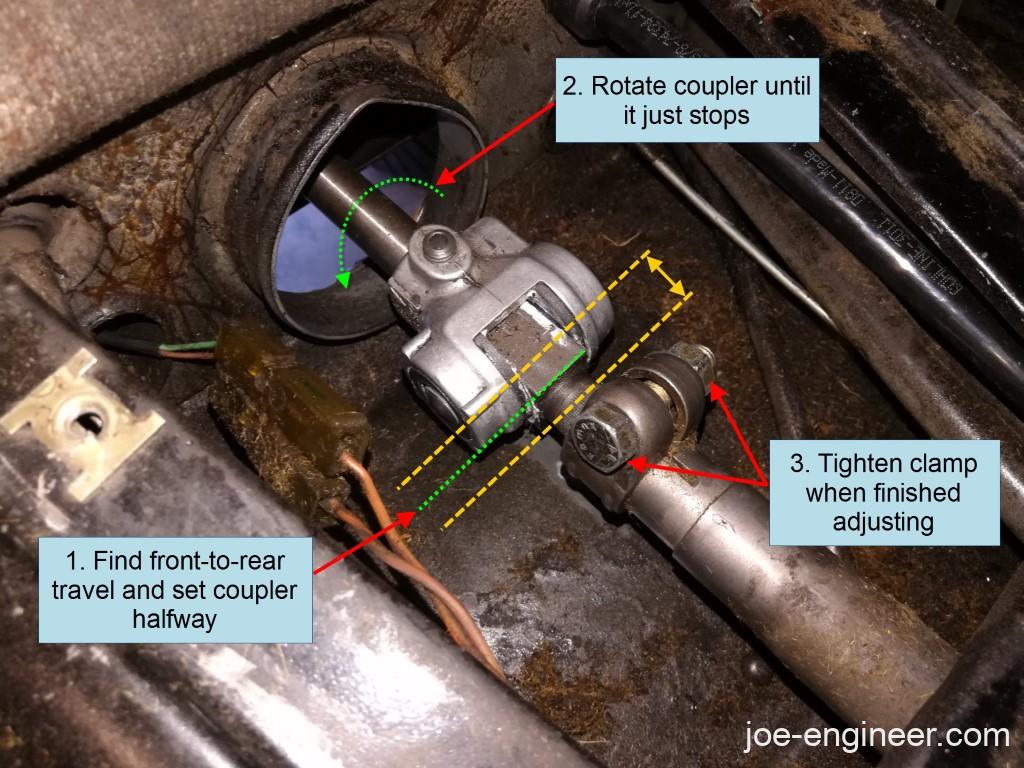
Now gently rotate the shift lever left until it just stops between the 1 and 2 gear positions (leftmost 2 gears in the H-pattern).
Reset the coupler to the position previously described. Centered front to back, and rotated clockwise (right side of the coupler down) with the shifter still vertical when viewed from the side. From the driver seat with 2 wrenches, gently tighten the shift rod clamp on the coupler and try cycling the shifter in all gears including reverse. Shifting action should be more precise with the new bushings and it should engage all the gears easily. If your shifter has a reverse lockout, make sure the adjustment still allows it to function correctly. The reverse lockout on the 915 gearbox, for example, has a spring loaded tooth that allows a shift into reverse from neutral but prevents going into reverse from 5th.
If it still nicks a few gears, repeat this entire process but when you pull the shift lever left between the 1 and 2 positions push it ever so slightly forward within its range of free play. With each adjustment you should get closer and closer to a precise shifting action in each gear. After a few iterations you will get the feel for how each adjustment influences gear engagement, and can then use your own judgement to find the sweet spot where your shifter and gearbox are happy.
Tighten both the shift rod clamp and the coupler set screw to 23 Nm (17 ft-lbs).
You should see a dramatic improvement with new bushings, a new coupler and the position adjustment. If you still feel the shifter nicking gears after going through the above process, it doesn’t hurt to check your clutch cable adjustment (per your factory manual or a future DIY coming soon).
Step 7: Reassemble Everything and Test Drive
Put the boot back on the shifter housing, carpet and center console back onto the center tunnel, and shift knob back onto the shifter with a new crush washer.
Pull the rubber boot back over the shift coupler and replace the access panel with the 4 screws and go for a test drive.
As you drive your air-cooled Porsche 911 keep in mind that they require a different shifting strategy than most cars. Be gentle and deliberate with your shifts instead of power shifting. Double-clutch your downshifts whenever possible. If you do this the car’s driving experience will reward you immensely. Remember that these cars were not designed to win drag races, but rather to win endurance races.
Your shifter assembly and linkage is now ready to give you a much improved driving experience.