
DIY: How to Replace the Brake Master Cylinder on an Air-cooled Porsche 911
If you mysteriously find brake fluid in the front trunk or around the pedals of your Porsche 911, it may be time to replace your brake master cylinder.
Note: The following information is for educational use only. Before proceeding please read my disclaimer page.
Disclosure: This post contains links to Amazon products and other trusted vendors. As an Amazon Associate I earn from qualifying purchases.
Many of these driver’s cars have covered hundreds of thousands of miles and as they get older, the brake master cylinder will often begin to leak. This can lead to paint damage and eventually brake system failure. Prevent both of these situations with this not-so-quick but still faily easy DIY.
Model Years Applicable:
All Porsche 911 models up to 1989.
Note: The 911 has vacuum-assisted power brakes from 1977 onward. We will cover this more complex system in this procedure however the steps involving the brake booster can be omitted for 1976 and earlier models. All other steps involving the master cylinder replacement itself are applicable. Regardless please read this entire procedure before starting.
Tools Needed:
- Floor jack
- 4 Jack stands
- Metric flare nut wrench set
- Channel lock or slip joint pliers
- Drip pan
- Rags
- Rubber gloves
- Safety glasses
- Penetrating oil
- 2 liters of DOT 3 or 4 brake fluid
Parts Needed:
- Master cylinder
- Master cylinder reservoir hoses (if current ones are damaged)
- Master cylinder reservoir hose plastic fittings (if current ones are damaged)
- Master cylinder reservoir (if current one is damaged)
Procedure
Caution:
- Brake fluid will damage paint.
- Do not spill any brake fluid on painted surface.
- After working with the brake lines or braking system, do not touch any of the paintwork with your hands before washing them.
- Wear rubber gloves and safety glasses to protect your skin.
- Your braking system will temporarily be disabled so work on a level surface and secure the car so it cannot roll away.
Step 1: Raise Car on Jack Stands
Raise your car on 4 jack stands using this procedure and remove all 4 wheels.
Step 2: Disconnect Brake Pedal and HVAC ducting
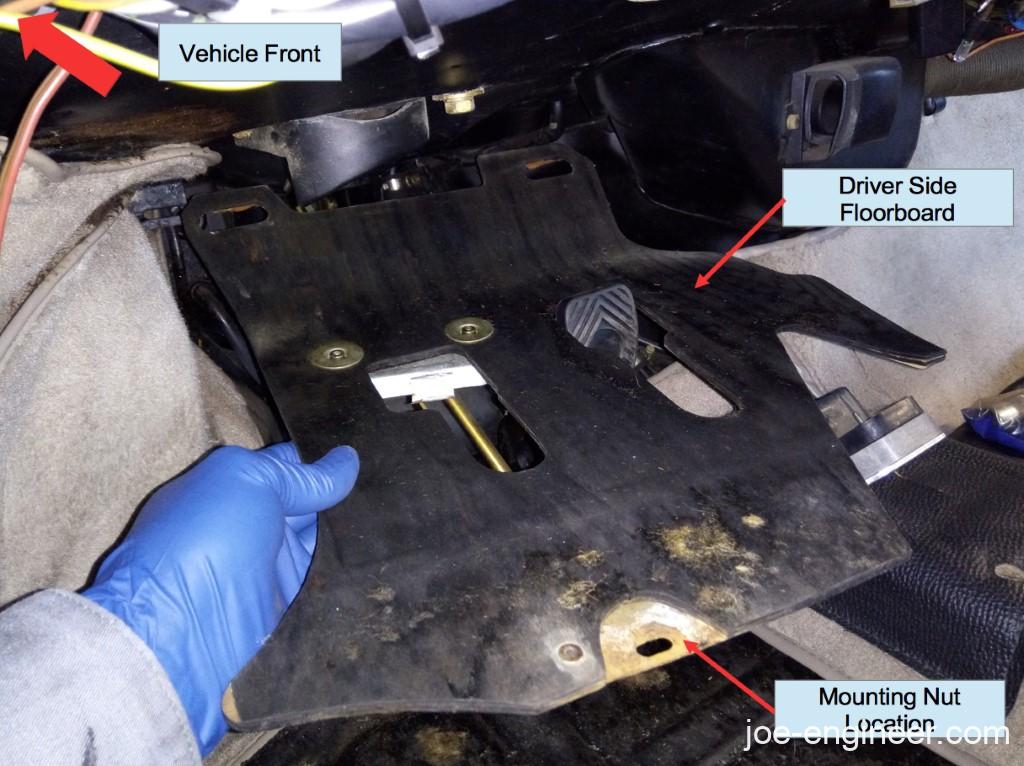
Remove the driver side floor mat and floor board around the pedals. There is a single nut at the bottom of the floor board holding it in.
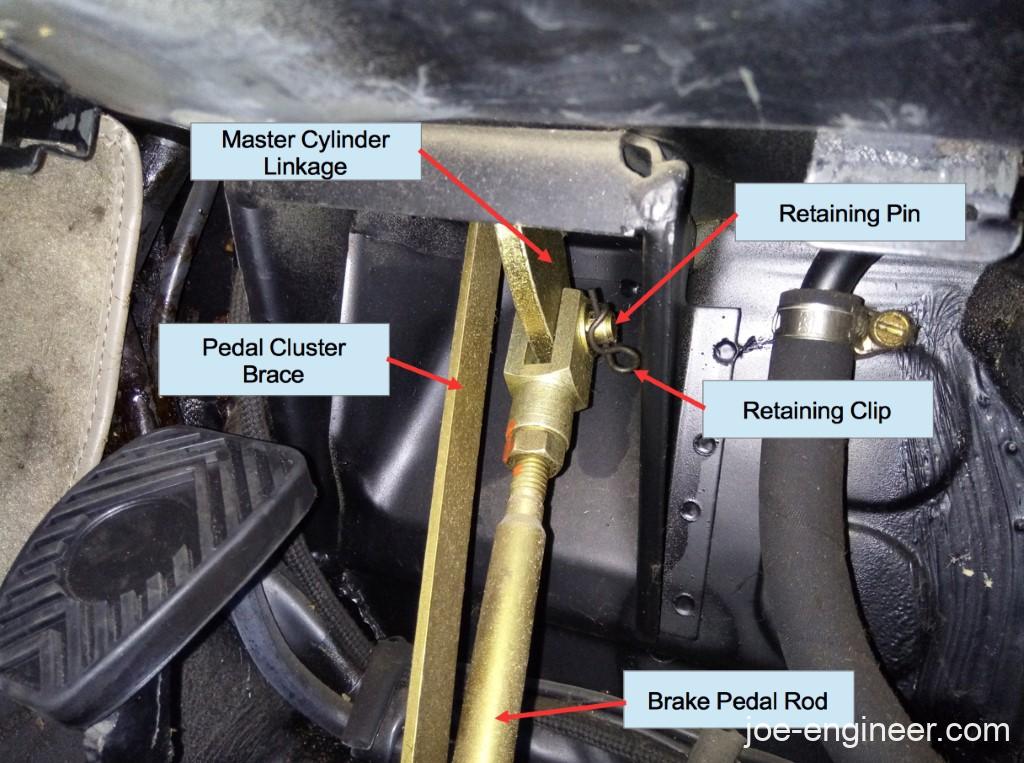
Behind the brake pedal you will see a long rod that travels from the base of the brake pedal up to a cavity along the back wall, directly above the pedals. The top of the rod is attached to the master cylinder linkage via a retaining clip and pin. Remove the retaining clip and pin and save these for re-installation later. Let the rod rest against the back wall and move up to the front trunk.
Step 3: Remove Master Cylinder Booster Assembly
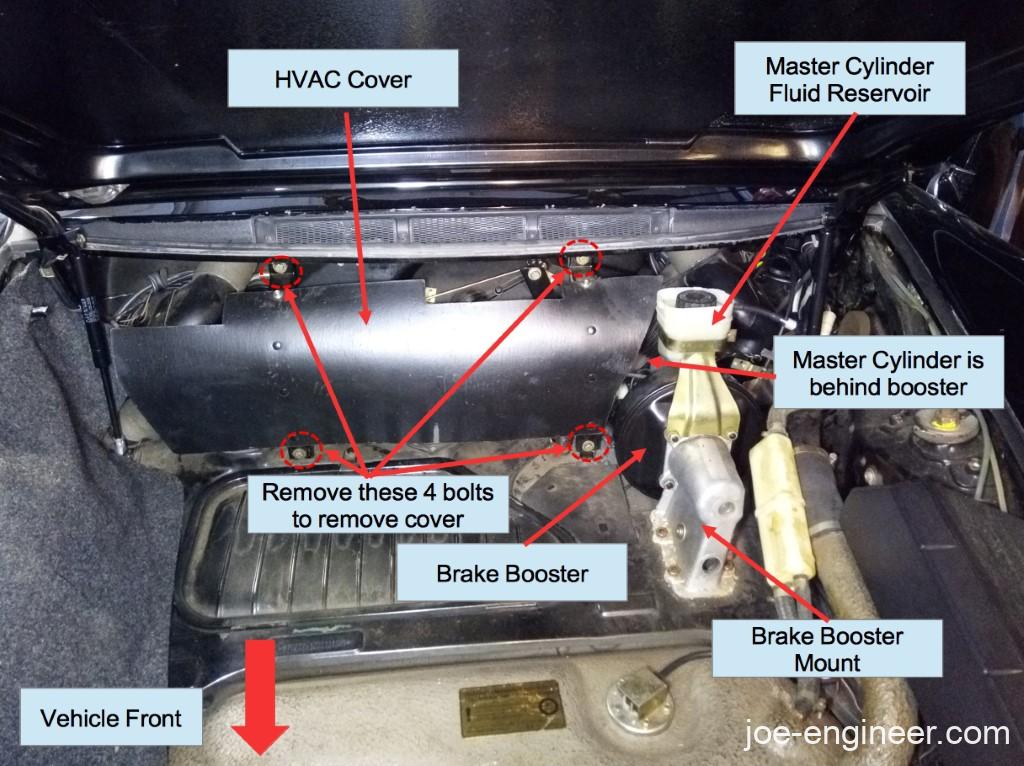
Working in the front trunk, locate the master cylinder booster assembly. The master cylinder is hidden behind the larger round booster can, under some HVAC hoses.
In pre-1977 cars, the master cylinder is directly connected to the brake pedal (with no booster), on the other side of the front bulkhead where the pedal assembly is mounted. This is accessible from underneath the car just behind the front suspension, at about the same height as the pedals. To gain access you must first remove the belly pan as described in Step 2 of this procedure.
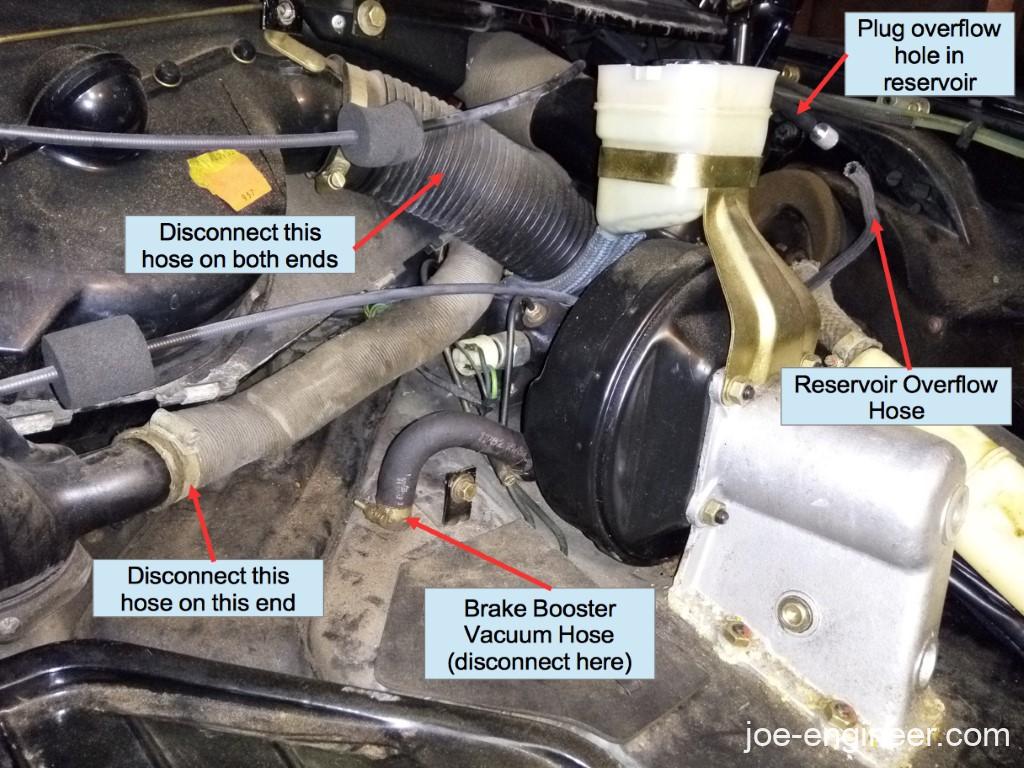
Drain the brake fluid from the reservoir in the front trunk and plug the overflow hole if it has one.
In pre-1977 cars the reservoir has 1-2 long lines that run from the front trunk down below to the master cylinder. Disconnect all reservoir hoses at the master cylinder to fully drain them into an empty container.
Unbolt the HVAC cover and locate the small hose that runs over the master cylinder. Disconnect the hose at the plastic duct on the right side of the trunk. Remove the short plastic accordion hose directly above the master cylinder at both ends. There is a large diameter, short vacuum hose that is connected from the back of the booster can to a port on the trunk floor. Loosen the hose clamp on the body side connection and pull the vacuum hose off.
At this point you should be able to lift up the disconnected hose and unplug the 2 brake warning light switches attached to the side of the master cylinder. The switch plugs are the same on early cars.

There is a heater control cable that runs directly over the master cylinder. Follow the cable to the right side of the trunk where it connects to a flapper valve.
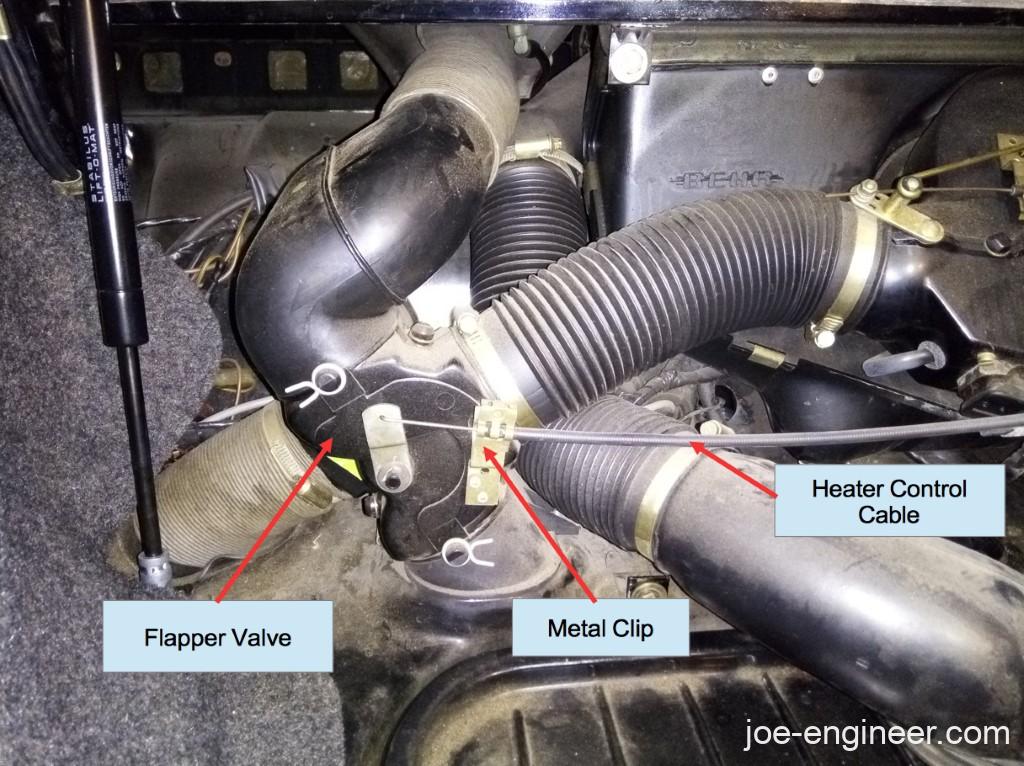
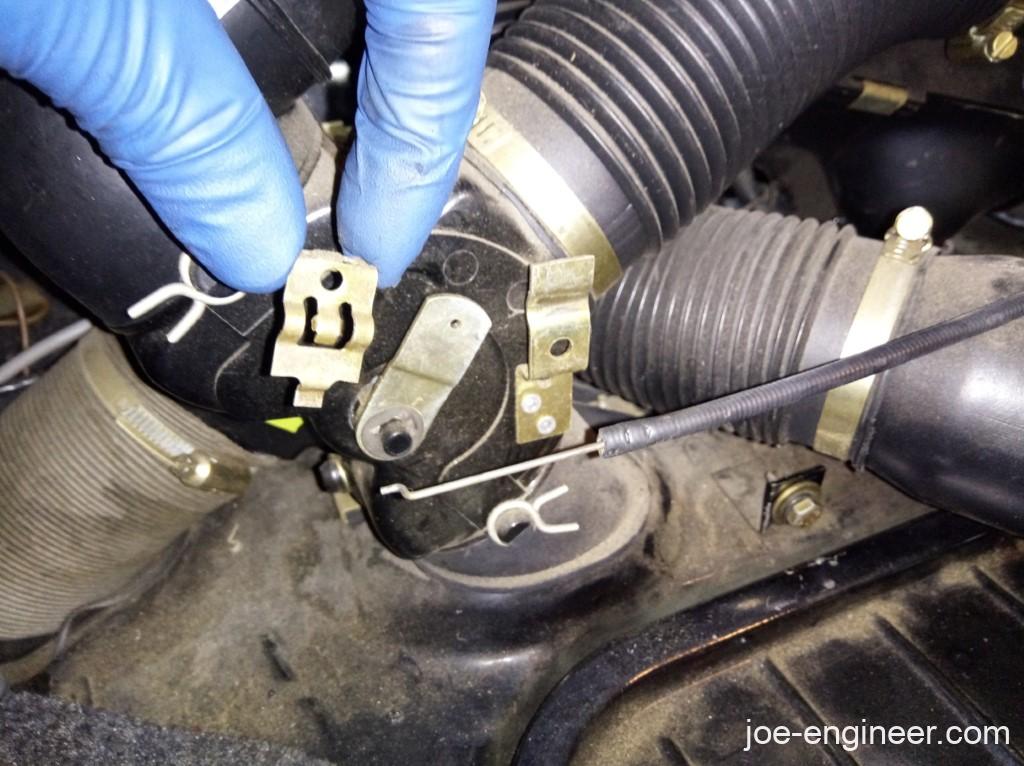
Remove the metal clip attached to the cable and carefully unhook the end of the cable from the flapper valve arm. Save the metal clip for later reuse.
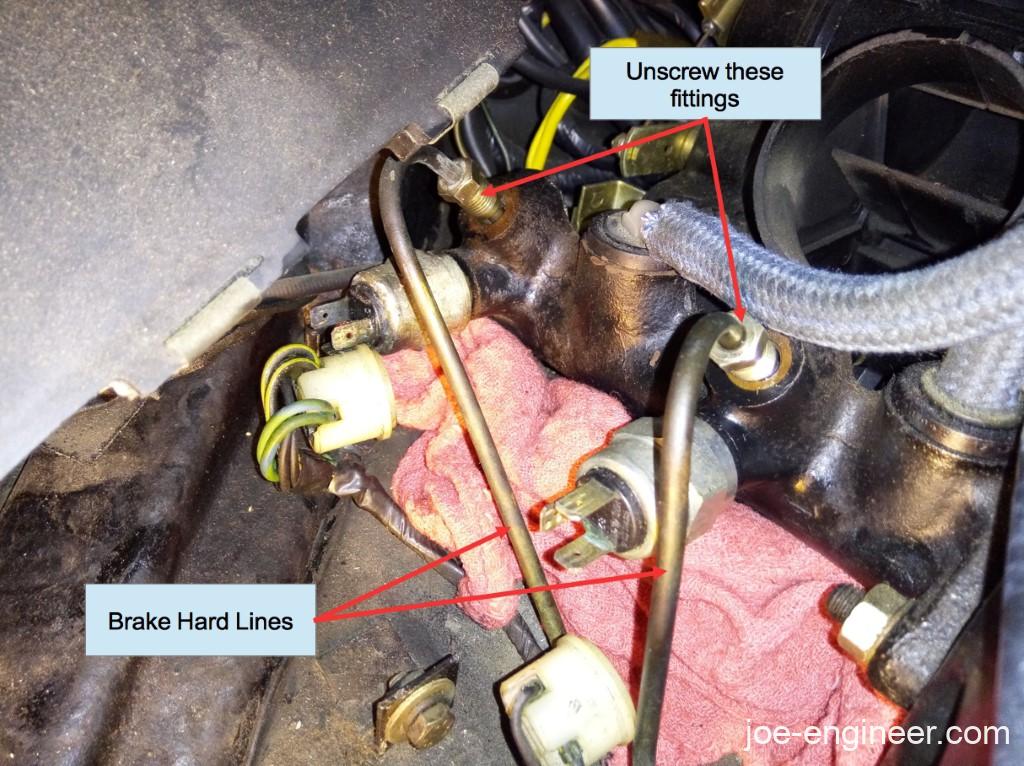
Place one or two rags directly underneath the master cylinder to catch any brake fluid drips and keep another one close by to wipe up any spills. Using a flare nut wrench carefully unscrew the hard brake line fittings from the master cylinder until both lines are free. Again keep a close eye on any spilled brake fluid and wipe it up immediately. The process is the same on early cars.
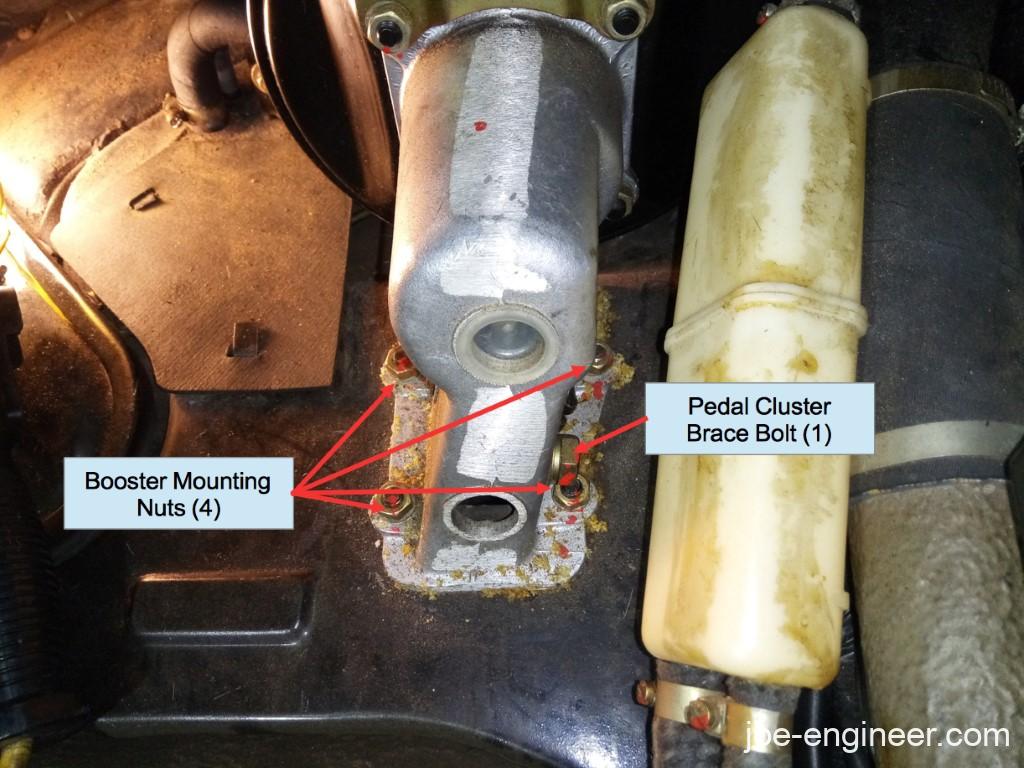
The large aluminum mount attached to the front of the brake booster can has 4 nuts holding it to the trunk floor and a large bolt at the front left that connects to a brace that runs down to the pedals. Remove those 4 nuts and the large bolt. The master cylinder and brake booster assembly is now free to move.
In pre-1977 cars simply remove the 2 nuts holding it to the front bulkhead and it should now come free.
Remove the cylinder booster assembly from the car by carefully tilting it towards the right side of the vehicle, clearing the hard brake lines and lifting it up toward the right until the heater control cable slides out from between the master cylinder and reservoir. Try to keep it as upright as possible to prevent any fluid from spilling out from the top of the cylinder holes.
Your master cylinder booster assembly is now free and you can walk it to a safe place on the work bench.
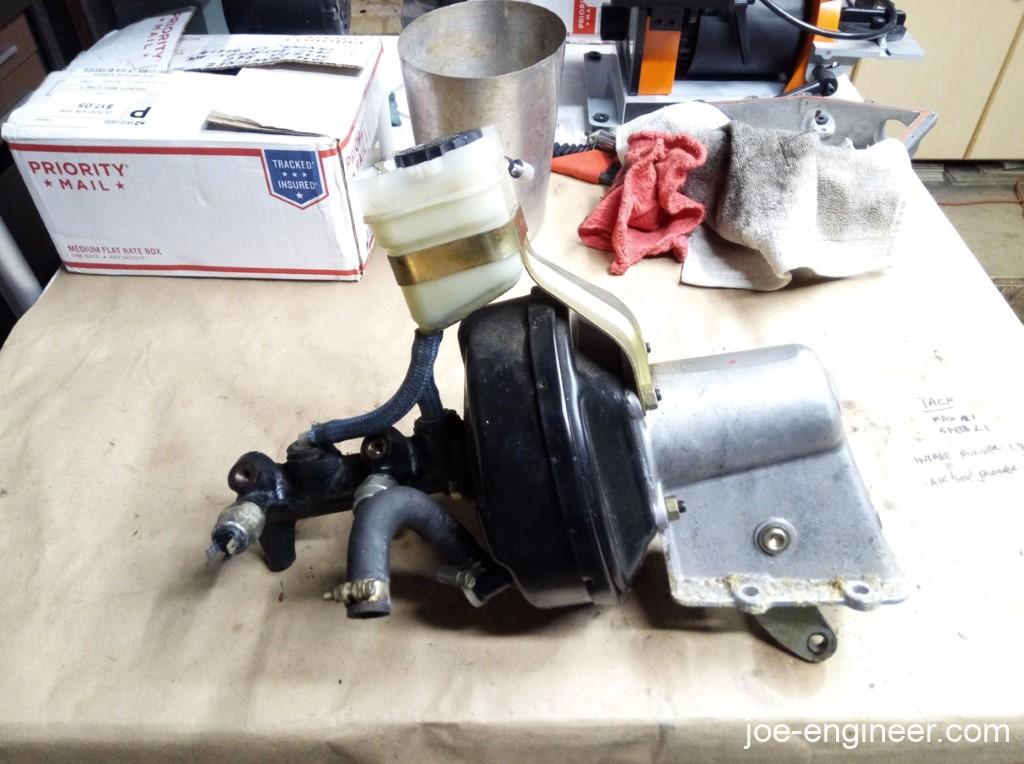
Step 4: Strip Master Cylinder
Before taking the master cylinder and brake booster assembly apart, do a visual inspection for prior brake fluid leakage. Fluid usually leaks on bottom surfaces of the brake booster can, down to the area in the front trunk where the master cylinder usually sits, and possibly runs down the bar and rod that connect down to the pedal assembly. Any painted part in that flow path could be affected.

Keep the assembly upright to reduce the amount of brake fluid leakage. Have rags or paper towels nearby to wipe up any spills.
Take note of the blue brake reservoir hoses and the orientation of their connections. Pull off the blue hoses from the reservoir, then grab the hoses and pull off the plastic connectors and the hoses from the grommets at the top of the master cylinder. Be patient as this operation may require a lot of force.
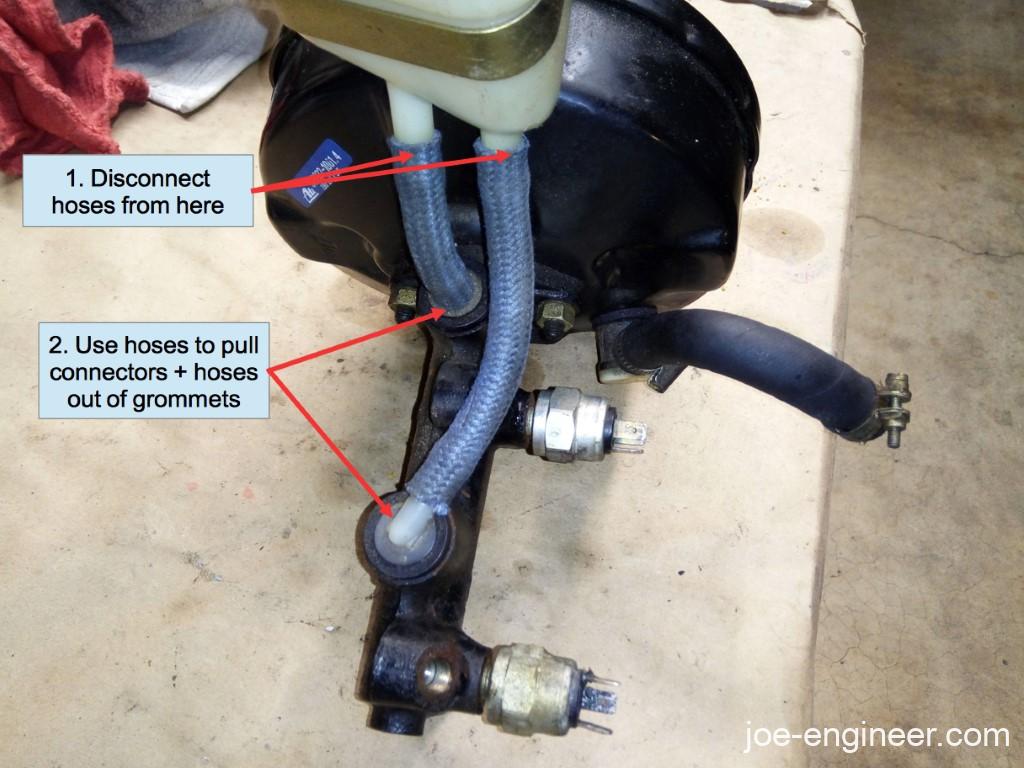
On early cars you will simply remove the plastic connectors out of the grommets by themselves. There is no need to disconnect the hoses from the reservoir in the trunk.
Once they are all out, inspect both the hoses and fittings for damage. Replace any that are damaged. Unclamp the reservoir from its bracket and clean out any debris inside of it. Dish soap and water works well then allow it to dry completely. On early cars, if the reservoir is dirty, remove it from the hoses and wash it out.
Remove the 2 nuts holding the master cylinder to the booster and remove the cylinder. Be careful to not get any debris inside the booster can. Fully inspect the booster can for external paint damage.
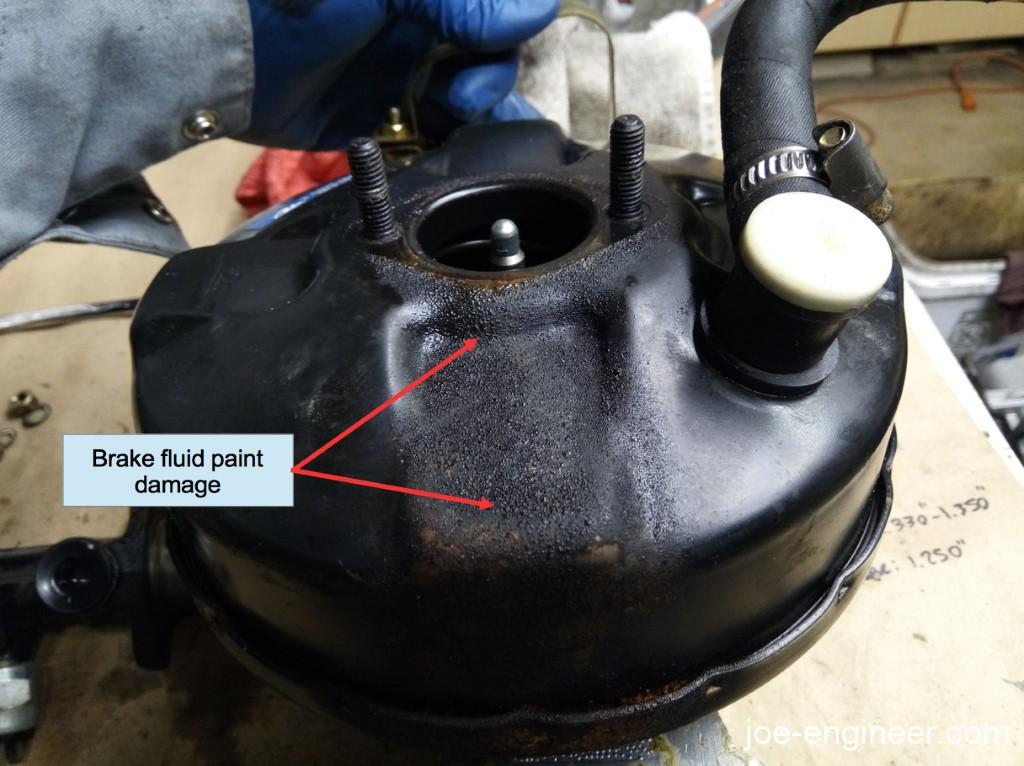
Step 5: Reassemble Master Cylinder Booster Assembly
If your brake booster can has minor brake fluid paint damage, now is a good time to touch it up. If it is severely damaged, it may be time to replace it.
Your new master cylinder should come pre-loaded with new brake warning light switches, reservoir line grommets, and a replacement O-ring that goes over the end that bolts to the booster. If it does not, replace all those items and install them on the new master cylinder.
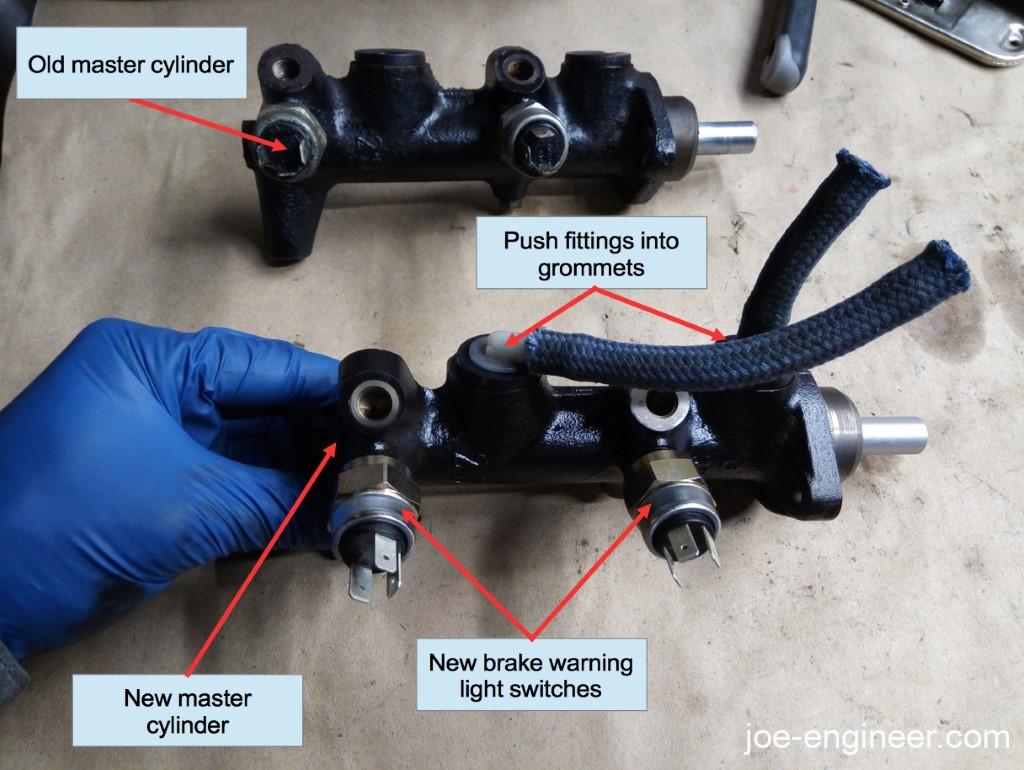
Install the O-ring and bolt the master cylinder to the brake booster. Carefully torque the nuts to 25 N-m (19 ft-lbs). Do not over-torque these as the brake booster can be damaged. Lube the reservoir line fittings with a bit of brake fluid and press them into the grommets at the top of the master cylinder in the same orientation as they were originally installed. These may take a bit of force to install so be patient.
Connect the top end of each blue reservoir line to the fluid reservoir and clamp the reservoir into its bracket. On early cars you will do this once the master cylinder is bolted into place.

On early cars you will skip all the brake booster steps and simply press the new plastic reservoir line fittings into the grommets on top of the master cylinder.
Step 6: Reinstall Master Cylinder Booster Assembly
Master cylinder and booster assembly reinstallation is the reverse of the disassembly from Step 3.
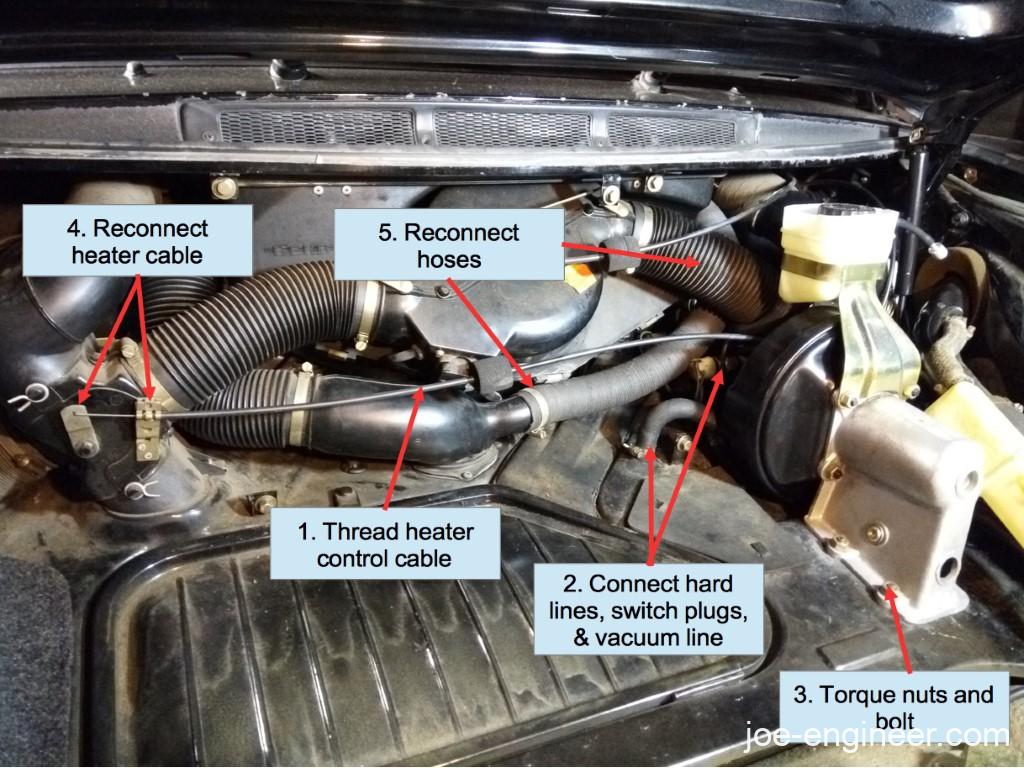
Begin by threading the disconnected heater control cable between the master cylinder and reservoir lines, with the booster facing forward. Slide the master cylinder and booster assembly back along the cable towards its original location. Position the disconnected air hose loosely over the master cylinder as it was before. Carefully seat the assembly in its original location and thread the hard line fittings by hand into the master cylinder. Reconnect the booster vacuum hose. Plug the brake warning light plugs back onto the new switches and tighten the hard line fittings taking care not to strip them. Reinstall the 4 nuts on the brake booster mount and torque to 25 N-m (19 ft-lbs). Reinstall the bolt on the side of the booster mount to reconnect the pedal brace. Torque to 46 N-m (35 ft-lbs).
On early cars, simply install the new master cylinder back on the front bulkhead from underneath the car. You may need a helper to assist with guiding the brake pedal pushrod from inside the cabin. Install the nuts hand-tight and reconnect the brake hard lines. Tighten carefully and do not strip the soft fittings. Torque the master cylinder mounting nuts to 25 N-m (19 ft-lbs) and push the reservoir lines onto the plastic fittings.
Reconnect the heater control cable to the flapper valve arm. Reconnect the air hose to the plastic duct and the accordion hose but leave the HVAC cover off and the reservoir overflow plugged until after the brake bleeding is complete.
Step 7: Porsche 911 Brake Bleeding
Flush the air out of the braking system using one of the three brake bleeding procedures covered here.
Note that on pre-77 cars, bleeding may take longer than usual because the long reservoir lines may contain a lot of air that will need to be bled out. Just be patient and follow the same procedure as the later cars.
Once bleeding is complete and you have verified that there are no fluid leaks around the master cylinder or booster, reinstall the HVAC cover and reconnect the reservoir overflow hose. On early cars you may now re-install the belly pan per Step 7 in this procedure.
Step 8: Reinstall Wheels and Test Drive
Before putting the wheels back on, press on the brake pedal. It should be very firm. Do one last check around the master cylinder, pedal assembly, floor, and at all four calipers to make sure there are no brake fluid leaks. Reinstall wheels and put the car back on the ground. After completing a few stops in your driveway, take the car for a short, low speed test drive to test brake function.
Your master cylinder is now ready to give you years of trouble-free performance.