
DIY: Brake Line Replacement and Bleeding on an Air-cooled Porsche 911
All Porsche 911s have excellent brakes from the factory. However even the newest air-cooled one is at least 24 years old. Its a good idea to replace your rubber brake lines to maintain top braking performance.
Note: The following information is for educational use only. Before proceeding please read my disclaimer page.
Disclosure: This post contains links to Amazon products and other trusted vendors. As an Amazon Associate I earn from qualifying purchases.
All 911s up to 1989 use flexible rubber brake lines connecting the hard lines from the chassis to the short hard lines at each wheel hub. They are very straightforward to replace and bleeding the fluid afterwards is a snap. Complete both tasks with this DIY.
Model Years Applicable:
All Porsche 911 models up to 1989.
Tools Needed:
- Floor jack
- 4 Jack stands
- Metric flare nut wrench set
- Channel lock or slip joint pliers
- Drip pan
- Rags
- Rubber gloves
- Safety glasses
- Penetrating oil
- Optional for brake bleeding: pressure bleeder tank or Speed Bleeder bleed screws
- Clear bottle or jar to catch used brake fluid
- Short piece of 5mm clear vinyl tubing long enough to reach the top bleed screw at each caliper and the bottom of the catch container (approximately 18 inches long)
Parts Needed:
- Set of 2 front brake lines
- Set of 2 rear brake lines
- Flat spring clips (if any are damaged)
- Cup-shaped retainer springs (if any are damaged)
- 2 liters of DOT 3 or 4 brake fluid
Procedure
Caution:
- Brake fluid will damage paint.
- Do not spill any brake fluid on painted surface.
- After working with the brake lines or braking system, do not touch any of the paintwork with your hands before washing them.
- Wear rubber gloves and safety glasses to protect your skin.
- Your braking system will temporarily be disabled so work on a level surface and secure the car so it cannot roll away.
Step 1: Raise Car on Jack Stands
Raise your car on 4 jack stands using this procedure and remove all 4 wheels. If you are only replacing the front or rear lines at this time, you will still be required to bleed all 4 corners of the system each time so it is recommended you replace all 4 at once.
Step 2: Replace the Front Brake Lines
- Locate the flexible rubber line located just behind the front shock absorber. You should be able to access the line fully from outside the car, as if you were changing a front tire.

- Place a drip pan below the rubber line to catch any brake fluid spills.
- Spray some penetrating oil at each threaded connection and let it sit for a while.
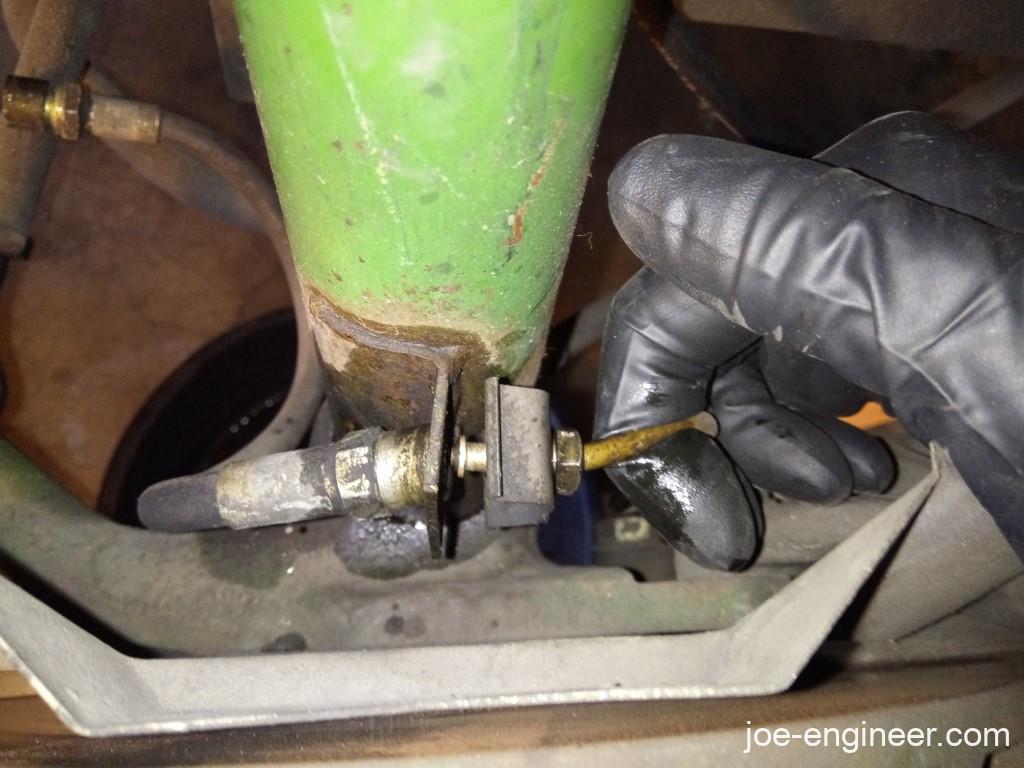
- Pull out the flat spring clip at the hose connection closest to the body. Dirt and corrosion may make it difficult to remove. If necessary spray some penetrating oil to free it up. Save it for re-use later.

- Use two flare nut wrenches to loosen each end of the brake line. Do not use normal open-ended wrenches as you risk stripping the soft hex fittings on the lines.
- Hold each rubber end hex fitting stationary and slowly unscrew the hex fitting on the hard line until they are separated. You may see a small amount of brake fluid spill at this point. Wipe up any spilled fluid so it does not contact the paint.
- As you remove the old rubber line, save the cup-shaped retainer spring at the front connection
- Starting at the front connection, re-install the cup-shaped retainer spring between the hard line hex fitting and the mounting tab on the shock body in the same orientation as it was removed.
- With your hands, thread in the front end of the new rubber line to the hard line hex fitting. Engage as many threads as you can by hand to prevent cross-threading with tools.
- Finish tightening the connection with the flare nut wrenches and hand-tighten slowly and carefully to prevent stripping the soft hex fittings.
- Bend the new rubber line to reconnect with the rear hard line fitting and engage the threads by hand. This may be difficult because the new rubber lines are straight and not S-shaped as in their installed position.
- Finish tightening the connection with the flare nut wrenches and hand-tighten slowly and carefully to prevent stripping the soft hex fittings.
- Slide the flat spring clip into the groove at the rear fitting of the rubber line.
- Repeat steps 1-13 on the opposite side front brake rubber line.
Your front brake lines are now finished.
Step 3: Replace the Rear Brake Lines
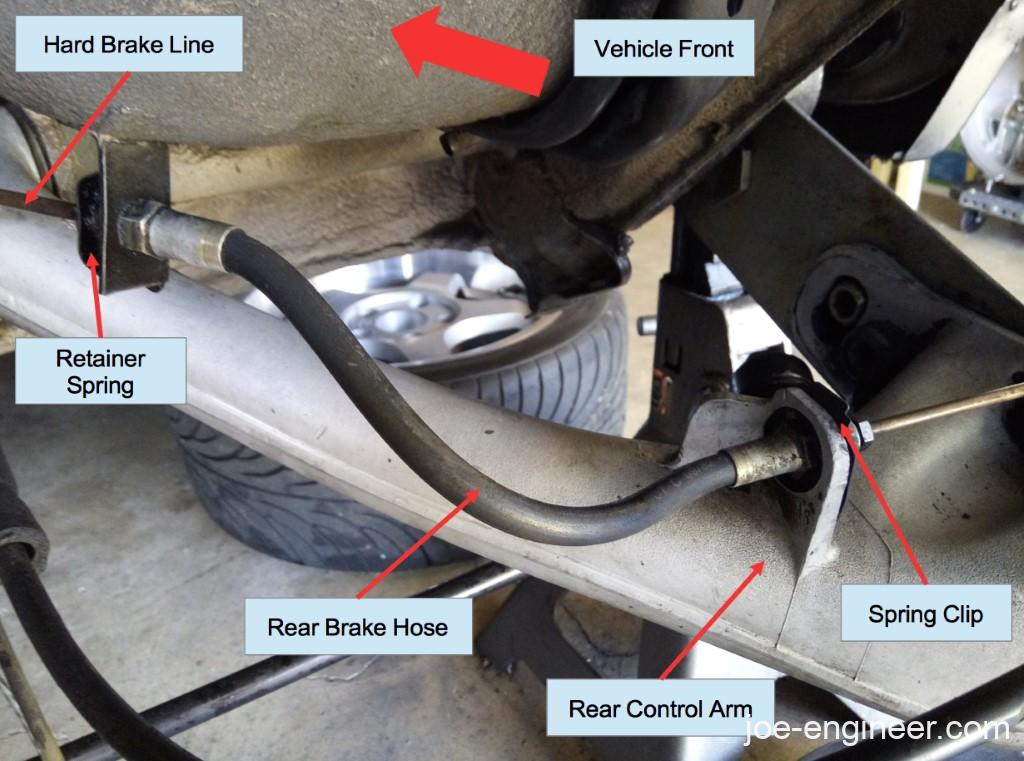
- Locate the flexible rubber line located just above the rear suspension trailing arm. You should be able to access the outer end of the line fully from outside the vehicle, as if you were changing a rear tire but the inner end might require you to get underneath the car to get wrenches on it.
- Place a drip pan below the rubber line to catch any brake fluid spills.
- Spray some penetrating oil at each threaded connection and let it sit for a while.
- Pull out the flat spring clip at the outer mounting point on the control arm. Dirt and corrosion may make it difficult to remove. If necessary spray some penetrating oil to free it up. Save it for re-use later.
- Use two flare nut wrenches to loosen each end of the brake line. Do not use normal open-ended wrenches as you risk stripping the soft hex fittings on the lines.
- Hold each rubber end hex fitting stationary and slowly unscrew the hex fitting on the hard line until they are separated. You may see a small amount of brake fluid spill at this point. Wipe up any spilled fluid so it does not contact the paint.
- As you remove the old rubber line, save the cup-shaped retainer spring at the inner connection.
- Starting at the inner connection, re-install the cup-shaped retainer spring between the hard line hex fitting and the mounting tab on the body in the same orientation as it was removed.
- With your hands, thread in the inner end of the new rubber line to the hard line hex fitting. Engage as many threads as you can by hand to prevent cross-threading with tools.
- Finish tightening the connection with the flare nut wrenches and hand-tighten slowly and carefully to prevent stripping the soft hex fittings.
- Bend the new rubber line to reconnect with the outer hard line fitting and engage the threads by hand. This may be difficult because the new rubber lines are straight and not curved as in their installed position.
- Finish tightening the connection with the flare nut wrenches and hand-tighten slowly and carefully to prevent stripping the soft hex fittings.
- Slide the flat spring clip into the groove at the outer fitting of the rubber line.
- Repeat steps 1-13 on the opposite side rear brake rubber line.
Your rear brake lines are now finished.
Step 4: Porsche 911 Brake Bleeding
You are now required to bleed the air out of the braking system. There are numerous ways to do this but here are 3 easy DIY-friendly methods. In all 3 methods remember a few general rules:
- Fill the brake fluid reservoir with fresh brake fluid and keep an eye on it so it never runs dry otherwise the system will suck in air and you will have to start all over again.
- Bleed all 4 brakes in order from the corner furthest away from the master cylinder to the closest. For example, in a left-hand drive car the order is Rear Right, Rear Left, Front Right, Front Left
- Always use fresh brake fluid from a newly opened container, as fluid that has been sitting in a previously opened container will absorb water from the air and cause brake fade when the fluid gets hot.
Step 4A: Traditional 2-Person Bleeding (Easy)
This method requires very clear communication between you at each brake caliper and a helper in the driver seat pressing the brake pedal per your command.
- Fill the brake fluid reservoir to the max line with fresh brake fluid and screw the cap onto the reservoir.
- Install the clear vinyl tubing over the top bleeder screw and place the other end in a catch bottle or jar.
- Tell your helper to press on the brake pedal and maintain pressure on it until you say to let go. Notify them that the pedal will sink to the floor and to let you know when it does so.
- Open the top bleed screw ¼ turn until fluid and air starts flowing. The brake pedal will start to sink to the floor as fluid is displaced out of the system.
- When your helper says the pedal is on the floor, close the bleed screw and keep the lower end of the tubing submerged in brake fluid.
- Tell your helper to let go of the pedal and it should return back up to normal position. At the same time the system will drain the brake fluid reservoir by some amount.
- Walk over to the reservoir, do a visual fluid level check, and top off fluid if necessary.
- Repeat steps 2-7 with as many cycles as needed until the fluid coming out of the bleed screw is clean and has zero bubbles.
- Securely tighten the bleed screw and place rubber cap over the end.
- When finished with that caliper, move to the next closest caliper and repeat steps 1-9.
- As you complete bleeding each caliper, the brake pedal will gradually get firmer and firmer.
- After bleeding the fourth caliper, the brake pedal should be very firm.
- Check fluid level one last time, top off, and tighten the reservoir cap.
Brake bleeding is now complete.
Step 4B: 1-Person Pressure Bleeding (Easier)
You can do this method by yourself but you do require a pressure bleeder, which is a bottle which can be filled with fresh brake fluid, connected to the brake fluid reservoir via the cap, and pumped with pressurized air to force the new fluid into the system.
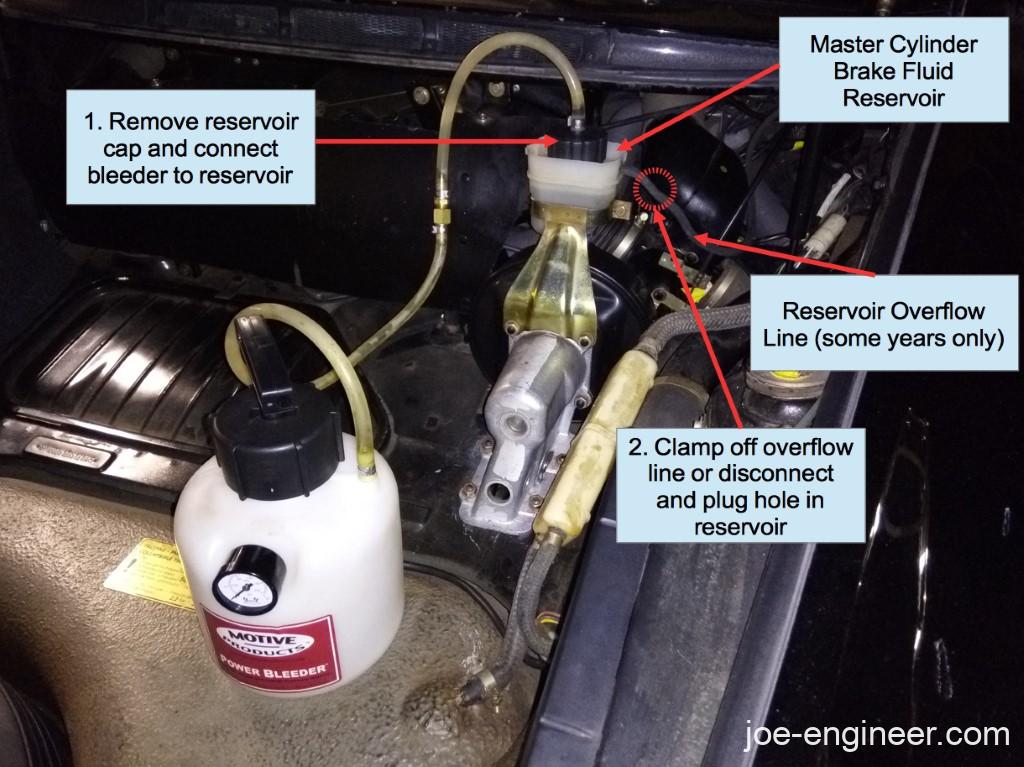
- Fill the brake fluid reservoir and the pressure bleeder per the pressure bleeder instructions with fresh brake fluid and screw the adapter cap onto the brake fluid reservoir.
- If your brake fluid reservoir has an overflow line, clamp it shut or disconnect it and plug the hole in the reservoir otherwise fluid will spill out of it during bleeding.
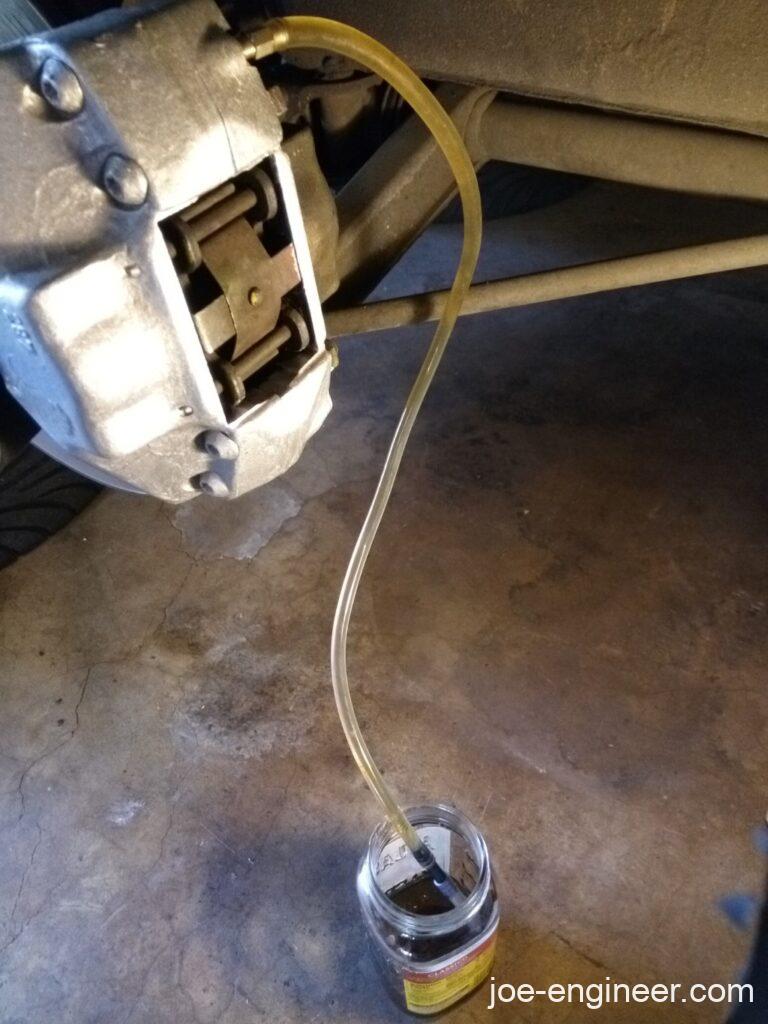
- Install the clear vinyl tubing over the top bleeder screw and place the other end in a catch bottle or jar.
- Pump the pressure bleeder until the gauge reads the recommended pressure setting to begin bleeding.
- Open the top bleed screw ¼ turn until fluid and air starts flowing. There is no need to touch the brake pedal during this process.
- When the fluid and bubbles stop flowing, close the bleed screw and keep the end of the tubing submerged in brake fluid.
- Walk over to the pressure bleeder, do a visual fluid level check, and top off fluid in the bleeder if necessary to prevent it from running dry. You will need to release the pressure in the bleeder per its instructions before opening the cap to fill it with more fluid. There is no need to do anything to the fluid in the master cylinder fluid reservoir at this point.
- Pump the pressure bleeder again per step 4, and repeat steps 5-7 as needed until there are no more bubbles present in the fluid flowing out of the bleed screw.
- Securely tighten the bleed screw and place rubber cap over the end.
- When finished with that caliper, move to the next closest caliper and repeat steps 1-9.
- As you complete bleeding each caliper, the brake pedal will gradually get firmer and firmer.
- After bleeding the fourth caliper, the brake pedal should be very firm.
- Release pressure on the pressure bleeder and carefully remove the adapter cap from the top of the brake fluid reservoir.
- Check fluid level one last time, top off if required, and tighten the reservoir cap.
- Remove clamp or reconnect reservoir over flow line.
Brake bleeding is now complete.
Note: If you already have one of these pressure bleeders, be careful if the unit is old, as the natural rubber tubing could crack and spray brake fluid everywhere (ask me how I know). Replace it with a newer unit with vinyl tubing or operate it empty. To operate it empty you just pump it full of pressurized air with no brake fluid, and the air will push the fluid in the reservoir through the brake lines and bleed the system. You just need to keep refilling the reservoir with fresh fluid if it runs low.
Step 4C: 1-Person Bleeding with Speed Bleeders (Easiest)
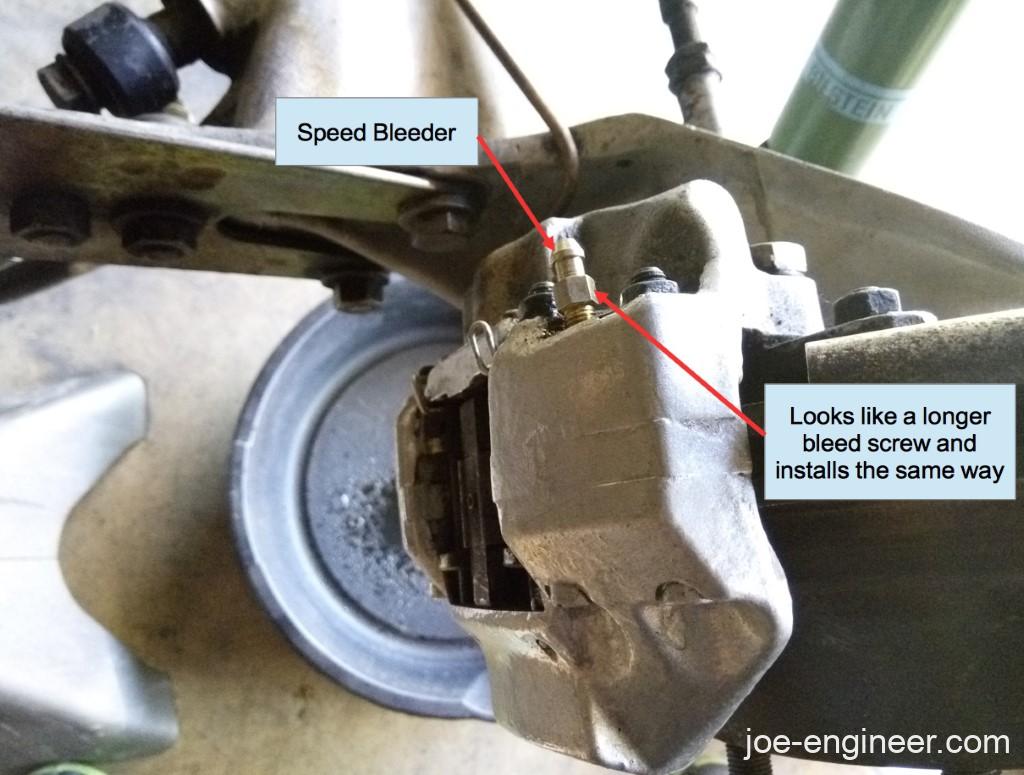
One of the easiest and fastest ways to bleed your brakes is to replace your worn out factory bleed screws with Speed Bleeders. They are essentially just bleed screws with a one-way check valve that lets fluid and air escape but prevents air from getting sucked back into the system. They allow you to bleed brakes quickly and by yourself and without having to carry any special tools or equipment. This is ideal for track use.
- Unscrew and replace your top bleeder screw with a Speed Bleeder. It installs exactly the same way as the factory bleed screw.
- Install the clear vinyl tubing over the Speed Bleeder and place the other end in a catch bottle or jar.
- Fill the brake fluid reservoir to the max level with fresh brake fluid and screw the cap on.
- Open the Speed Bleeder ¼ turn. A bit of fluid may start to flow out into the tube.
- Pump the brake pedal either with your hand or your foot. You will hear air and fluid expelling from the Speed Bleeder. Pump up to 5-7 times.
- Walk over to the reservoir, do a visual fluid level check, and top off fluid if necessary.
- Repeat steps 3-6 with as many cycles as needed until the fluid coming out of the bleed screw is clean and has zero bubbles.
- Securely tighten the Speed Bleeder and place rubber cap over the end.
- When finished with that caliper, move to the next closest caliper and repeat steps 1-8.
- As you complete bleeding each caliper, the brake pedal will gradually get firmer and firmer.
- After bleeding the fourth caliper, the brake pedal should be very firm.
- Check fluid level one last time, top off, and tighten the reservoir cap.
Brake bleeding is now complete.
Step 5: Reinstall Wheels and Test Drive
Before putting the wheels back on, press on the brake pedal. It should be very firm. Do one last check at all four calipers to make sure there are no brake fluid leaks. Reinstall wheels and put the car back on the ground. After completing a few test stops in your driveway, take the car for a short, low speed test drive to test brake function.
Your brake lines are now ready for years of late braking deep into the corners.