DIY: Fixing Common Oil Leaks on a Classic Air-Cooled Porsche 911
If your air-cooled Porsche 911 doesn’t leak oil, its probably out of oil. Let’s identify where those leaks are coming from and fix them.
Note: The following information is for educational use only. Before proceeding please read my disclaimer page.
Disclosure: This post contains links to Amazon products and other trusted vendors. As an Amazon Associate I earn from qualifying purchases.
Your air-cooled Porsche 911 has a huge quantity of engine oil for lubrication and cooling purposes. Unfortunately due to the modular nature of the engine there are many places where it can spring oil leaks. If your car has not had regular maintenance you may be facing a very dirty engine and have no idea where to begin diagnosing leaks. Fortunately most of them are quite easy to trace and fix. Keep reading to find out how.
Model Years Applicable:
All Porsche 911 cars 1989 and earlier. Major differences will be due to the different fuel systems used and 1972 cars with their unique oil tank location. The photos shown here are on a 1983 911SC.
Tools Needed:
- Jack stands
- Floor jack
- Jack pad adapter tool (available from any European parts supplier)
- Rubber gloves
- Safety glasses
- Degreaser
- Paper towels
- Open ended box wrenches
- Socket set
- Ratchet
Parts Needed:
- Depends on the leak diagnosis. If they are not listed below, search the online catalogs of your favorite European parts suppliers for the specific parts you may need.
Note: There are many potential oil leak areas and it is important to not get overwhelmed with them, especially if you have a very dirty engine and do not know where to start. Use the following strategy to tackle oil leaks one by one.
- Clean the engine as much as possible to help spot leaks.
- Address the most serious leaks first, to avoid running the engine low on oil.
- Fix minor leaks at the top of the engine first, as they commonly drip down to the bottom of the engine and appear to be different leaks. Then work your way down to the bottom of the engine as you fix them.
- If you spot a leak and are not sure if the root cause is a simple or difficult fix, try the simple fix first.
- Always clean the area around an oil leak you just repaired, that way you can quickly spot if it leaks again.
Items Accessible Without Engine Removal
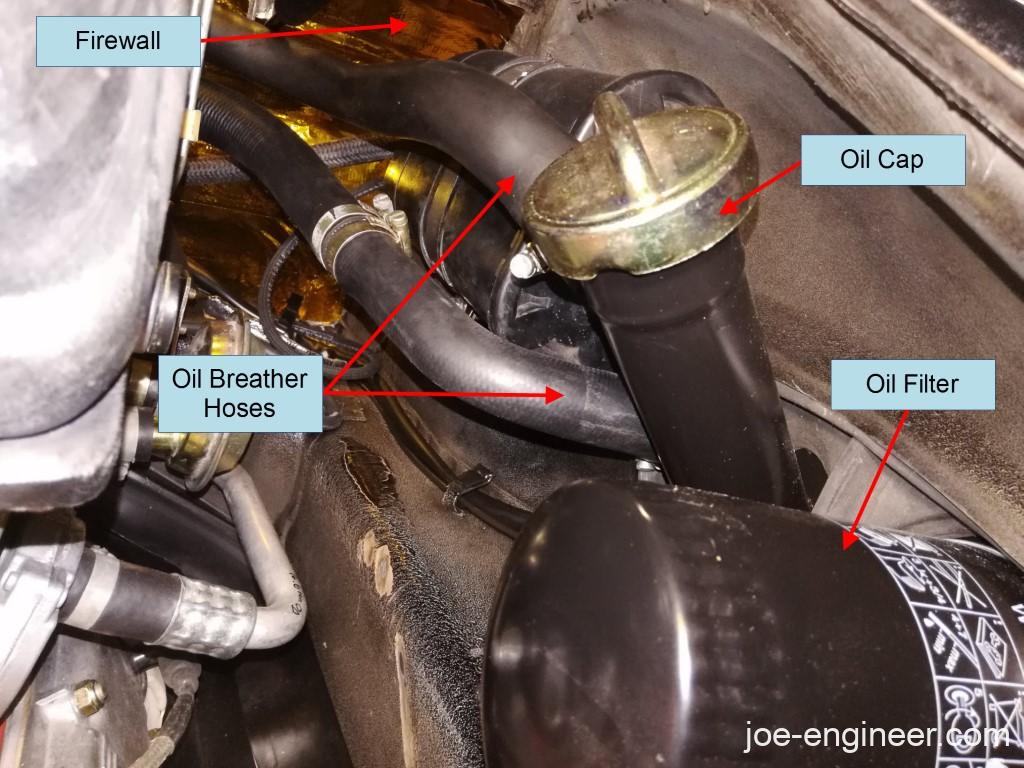
1. Oil Cap and Breather Hoses
These are very easy to check on the oil tank side in the engine compartment. There will be one or more oil breather hoses attached to the oil tank and attached to the front of the engine near the firewall. If any are detached from the oil tank, oil and vapors will leak out. If they are detached from the front of the engine near the firewall see item 12 further down this list.
The oil cap has a replaceable gasket underneath.
2. Valve Covers
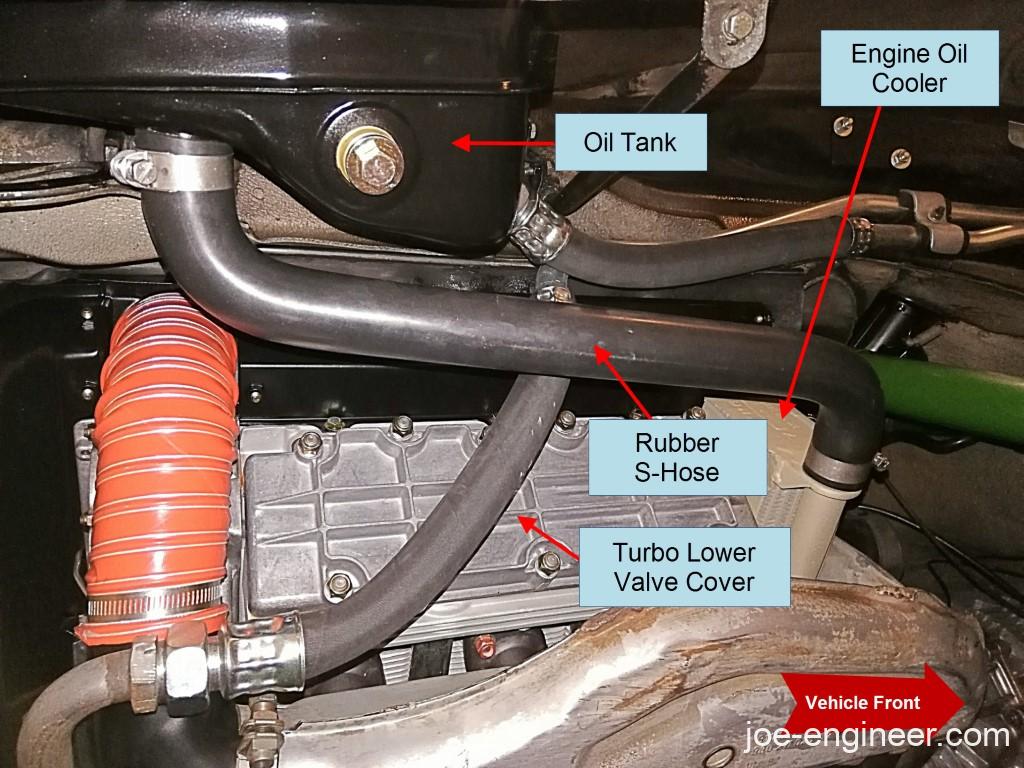
Early cars had magnesium covers that commonly warp and leak. Later cars had aluminum ones that are stiffer and seal better. Turbo lower valve covers are aluminum and heavily reinforced to eliminate warping.
A quality valve cover gasket set with new sealing washers and lock nuts will help keep oil inside where it belongs.
3. Oil Cooler to Oil Tank Rubber S-Hose
This hose is all rubber and can crack and start to seep oil. If this hose fails it will cause an immediate loss of oil pressure. It is cheap insurance to replace it to prevent leaks and catastrophic engine failure. Make sure to drain the oil before removing it.
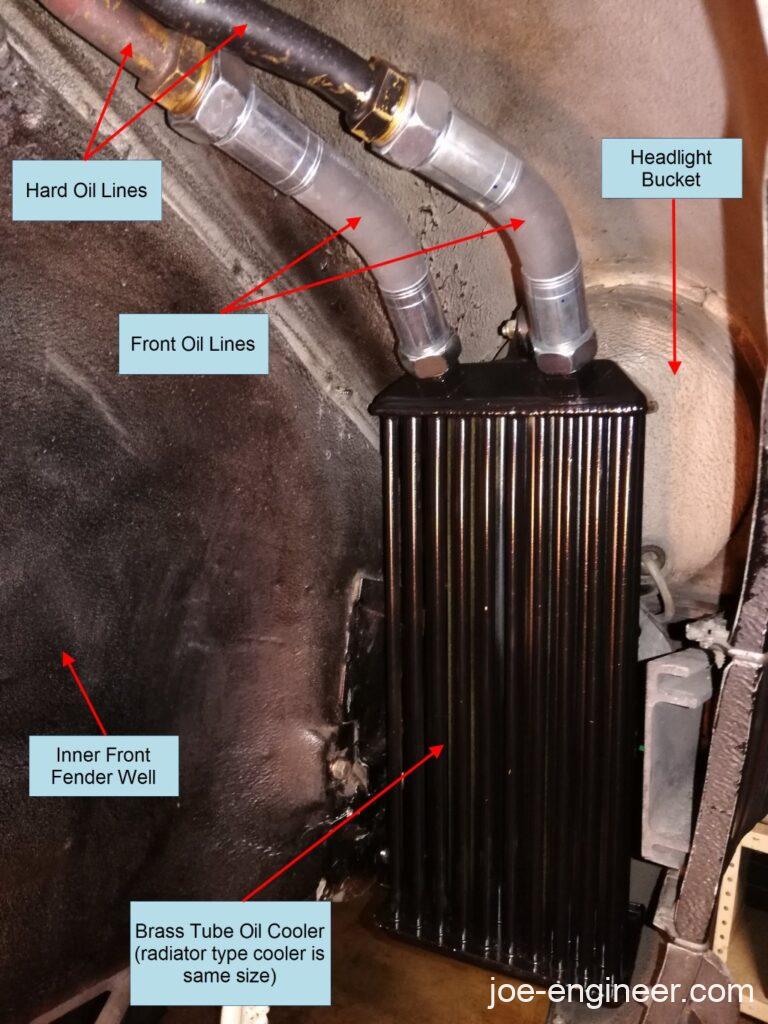
4. Front and Rear Oil Cooler Hoses
The lines coming off the oil tank have rubber sections crimped onto the hard lines that connect to the external thermostat. Those crimps get loose over time and will slowly start to seep oil. Replace the rear oil cooler lines using this procedure.
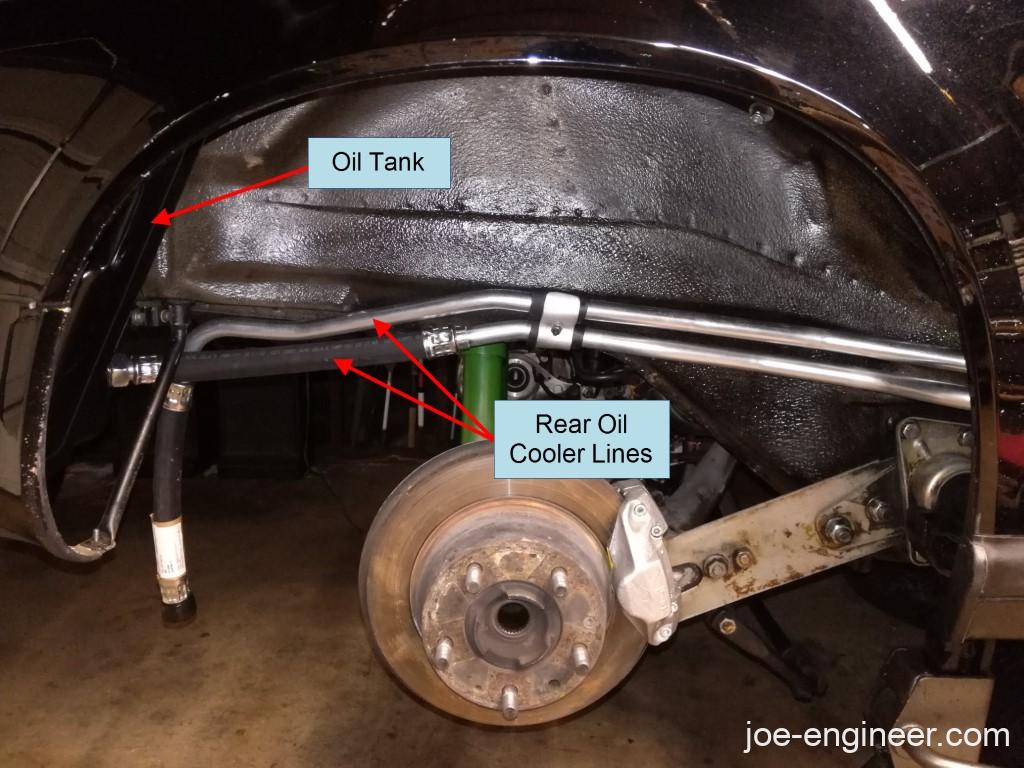
The two short rubber lines at the front, connecting the hard lines to the front oil cooler also leak in a similar fashion. Replace the front oil cooler lines using this procedure.
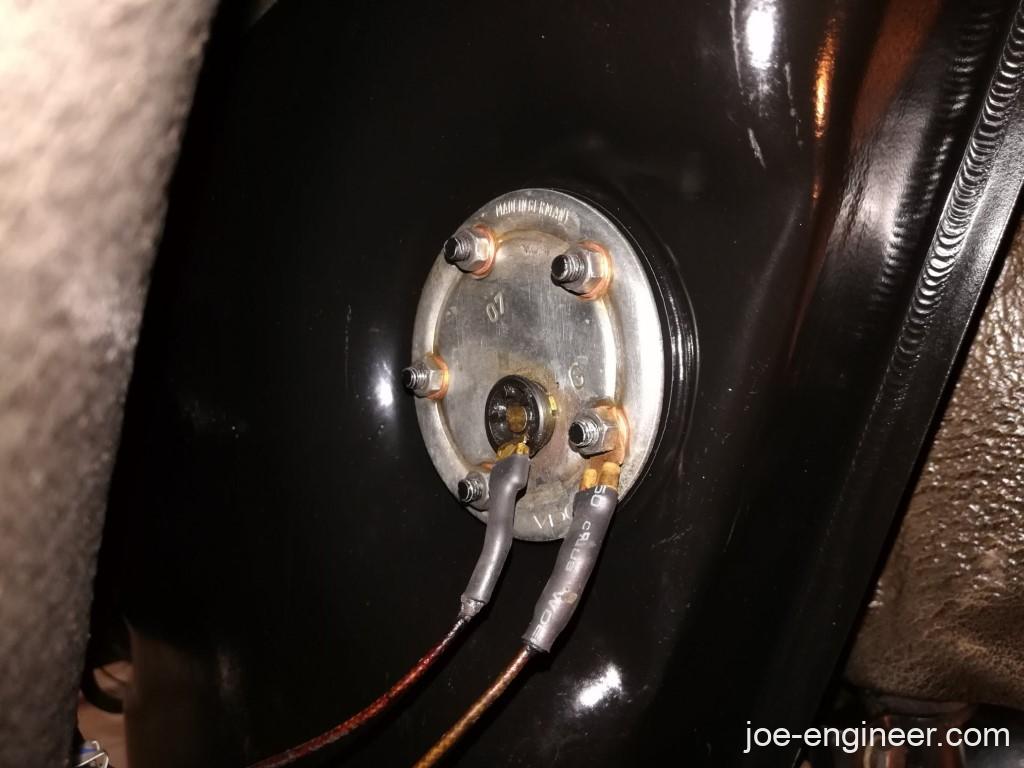
5. Oil Tank Level Sender Gasket
This one is easily accessible from the right rear wheel well. If your oil tank and wheel well are grimy, its likely this gasket has failed. Replace it using this procedure.
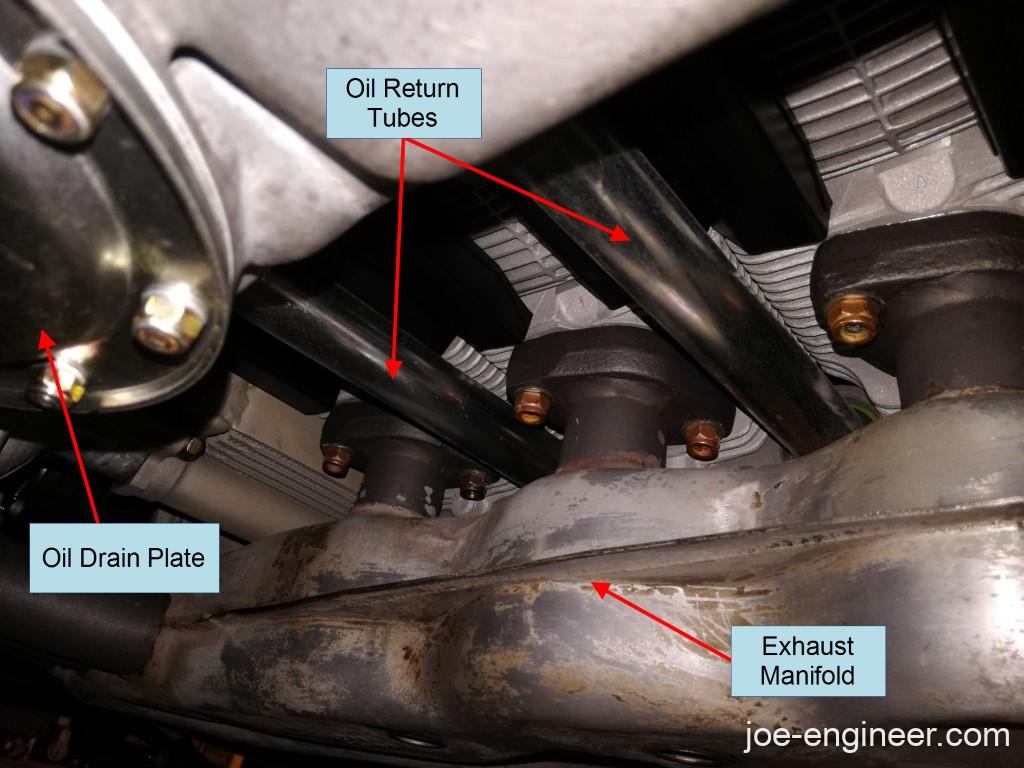
6. Oil Return Tubes
These can start to leak from the O-rings that seal against the case and the cam towers. After removing the exhaust manifold the original single-piece ones can be removed with the engine in place and replaced with collapsible ones that extend into position. Replace these individually only if you are sure they are leaking. Make sure you drain the oil before replacing these.
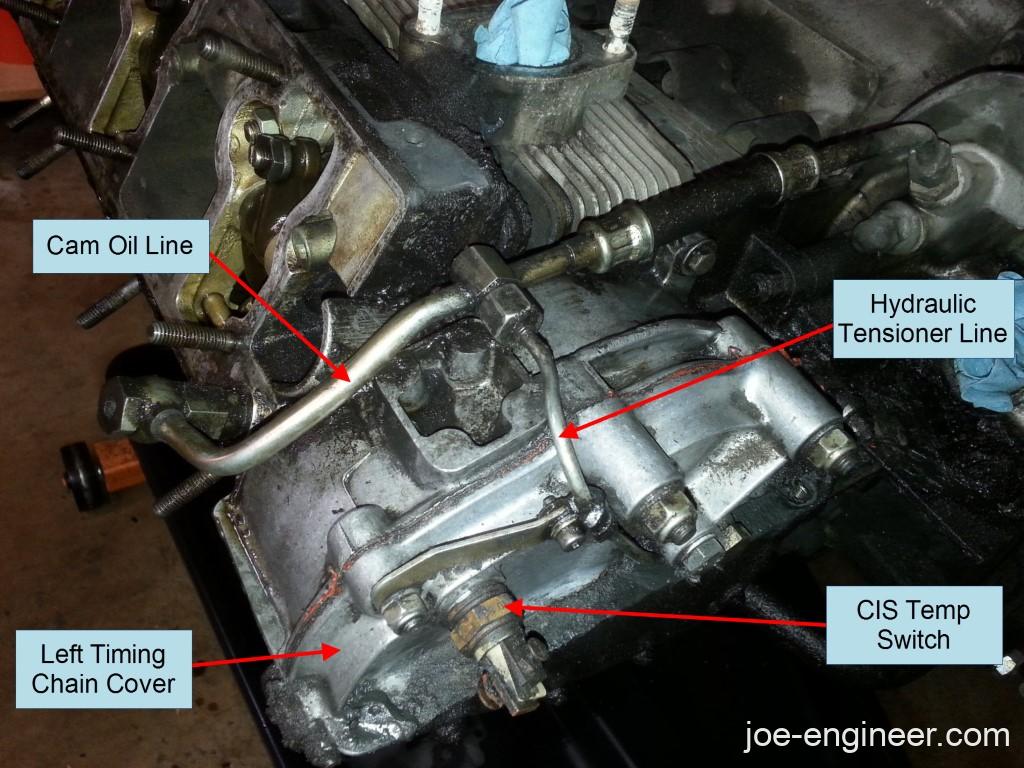
7. Cam and Hydraulic Tensioner Oil Lines, Sensors, & Timing Chain Covers
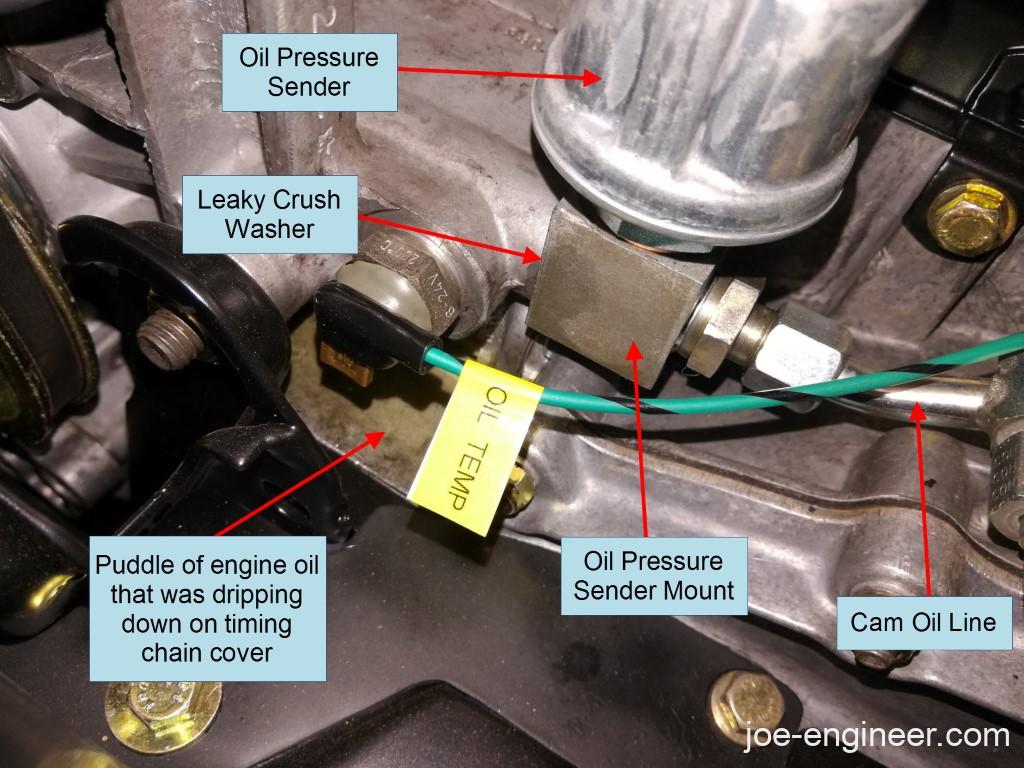
All the sensors at the rear of the engine, the cam oil lines, and if equipped, the hydraulic tensioner oil lines are all sealed with copper or aluminum sealing washers. Any of these will seep oil if they are not torqued properly or if washers have been reused. If you remove any of these parts you must always re-use new sealing washers. Don’t overtorque any of the sensors as they could break. Be especially careful with the hollow bolt that holds the square oil pressure sender mount to the case.
The cam oil lines themselves also begin to leak around the crimps between the hard line and the rubber section, similar to the oil cooler lines. Replace them as needed.
The timing chain covers have thin paper gaskets that seal to the chain housings, and many times they are re-installed without gaskets and glued together. If these are leaking around the perimeter, remove the muffler and rear engine tin to access the nuts to remove the covers and replace the gaskets.
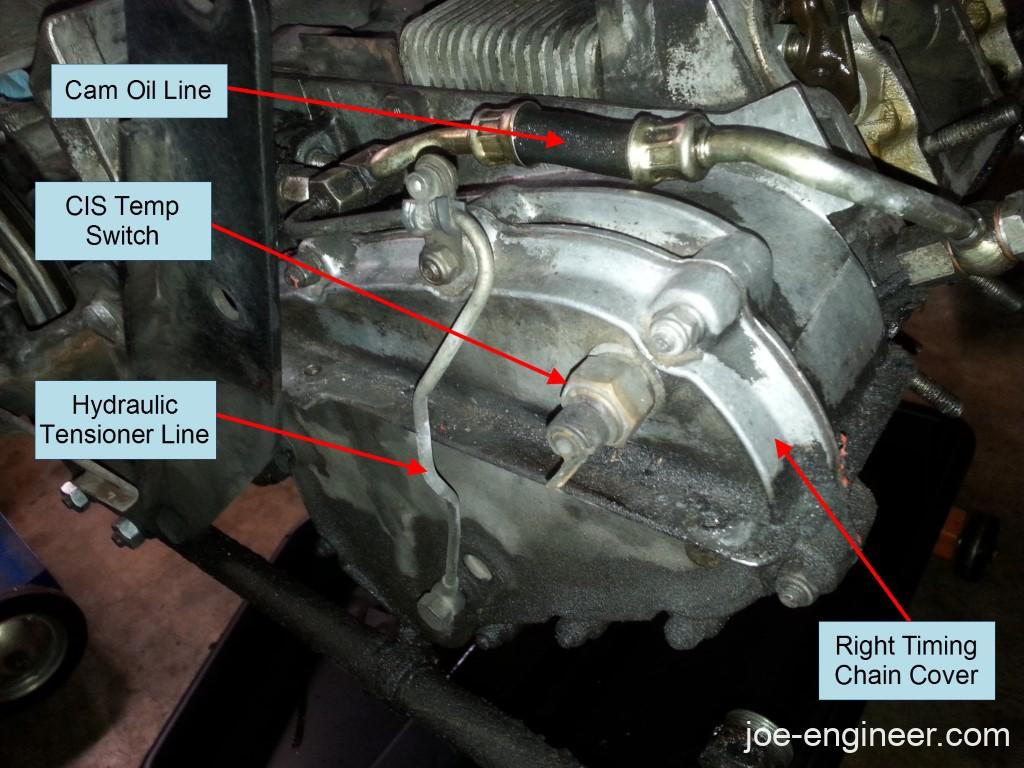
Note: Often these are a very easy fix that at first may appear like a much more serious problem. For example, after a full engine rebuild I once had a steady stream of oil dripping off of the bottom of the right side timing chain housing cover. I thought I would have to at the very least, reseal the timing chain cover, or worst case, drop the engine and remove the chain box housing to reseal it, along with re-doing all the cam seals and cam timing. Eventually I traced the leak upstream to a loose oil pressure sender sealing washer, and after a few minutes I was leak free again.
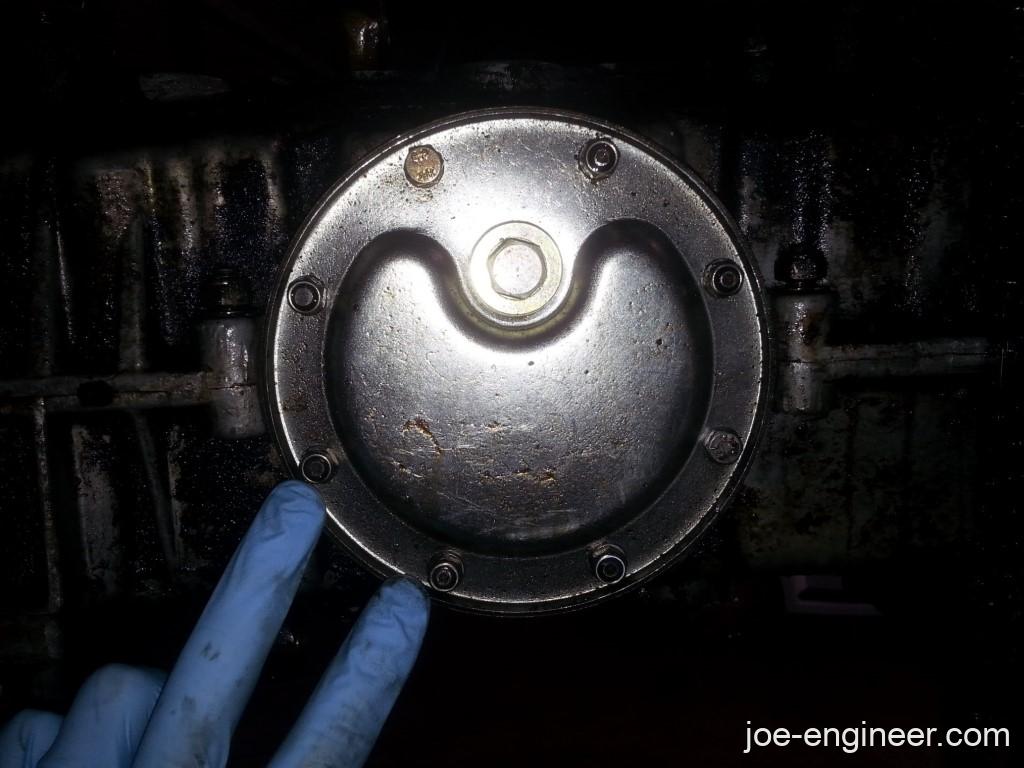
8. Oil Strainer Plate and Drain Plugs
The oil drain plate commonly leaks when someone left out a gasket on either side of the oil strainer or doubled gaskets on one side. Replace the little sealing washers with new ones every time. Same goes for the sealing rings on the oil drain plugs in the oil strainer plate and oil tank. Find out how to replace these items and what parts to use using this oil change procedure.
Items Best Serviced with Engine Out of the Car
The following items are much easier to service with the engine out of the car. Follow this procedure to learn how easy it is to drop your engine and gearbox. In many cases a partial engine drop will get you enough clearance to service something quickly and put the engine back in.
9. Crankcase Breather Area
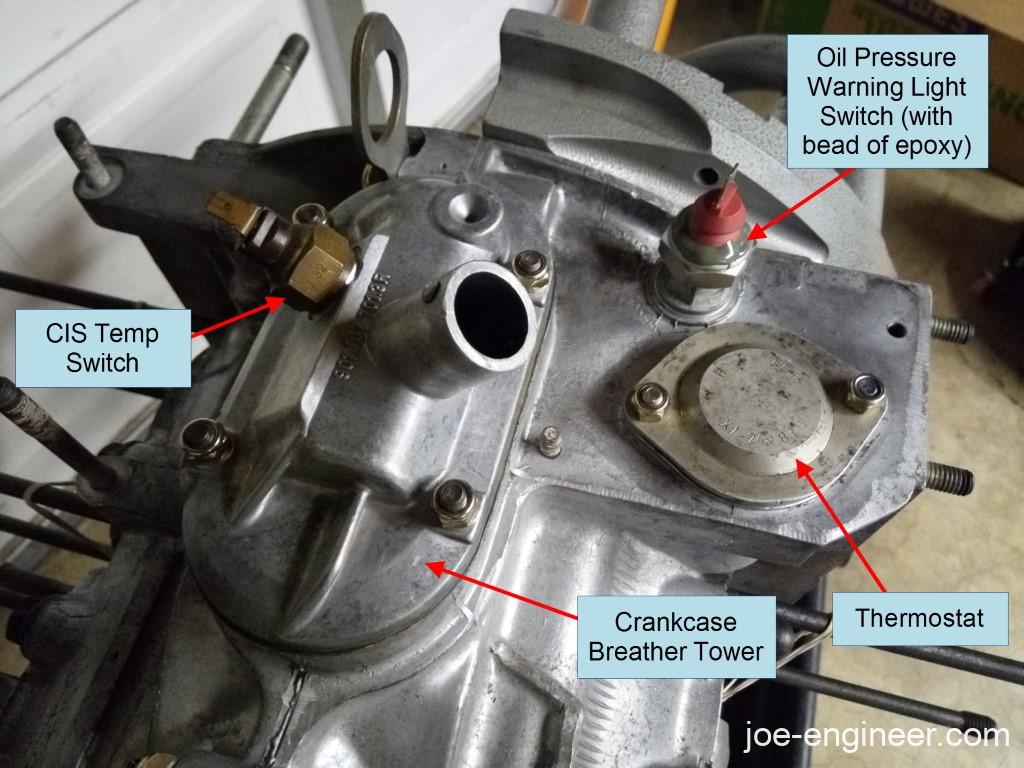
The crankcase breather tower gasket, thermostat O-ring, and oil pressure warning lamp switch are known as the “Triangle of Death” on some Porsche forums due to their propensity to leak oil from the highest point of the engine and distribute it randomly anywhere on the bottom. On late CIS cars, oil temp sensor in the breather tower can also leak. These are easy to replace once you get access to the front of the engine.
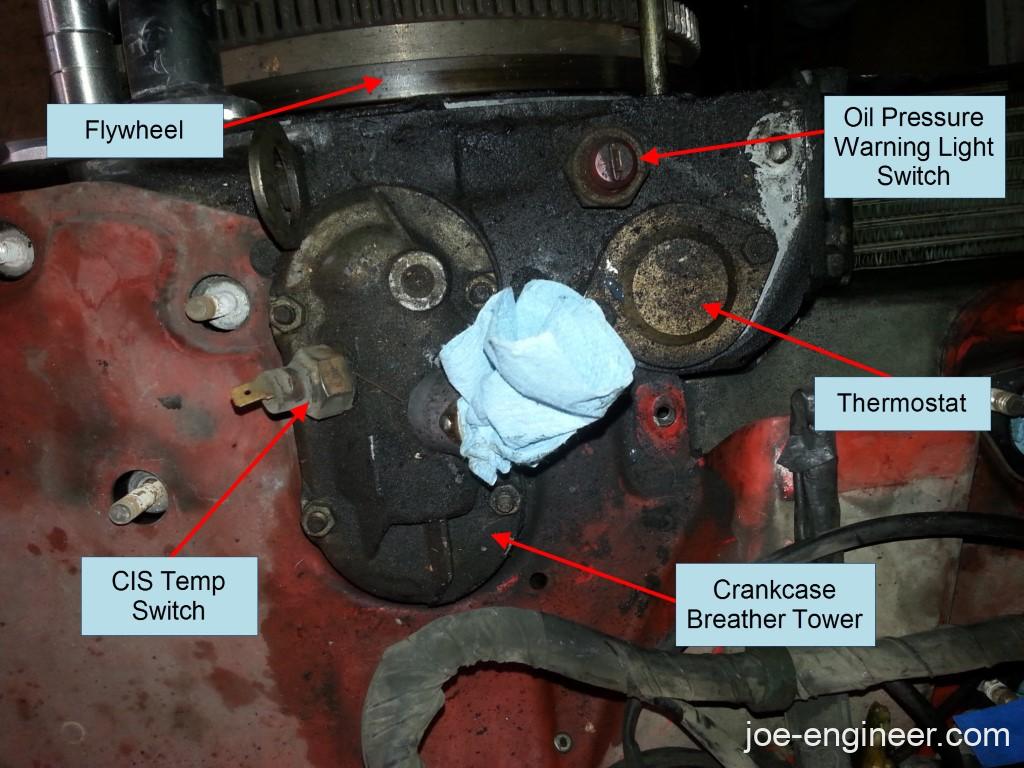
Sometimes the oil pressure warning lamp switch will leak oil from the seam in between its metal crimp and the inner plastic body. In order to prevent having to drop the engine again to fix a leaky switch, one can spread a bead of 2-part epoxy or JB weld over that seam to seal it shut.
10. Rocker Arms
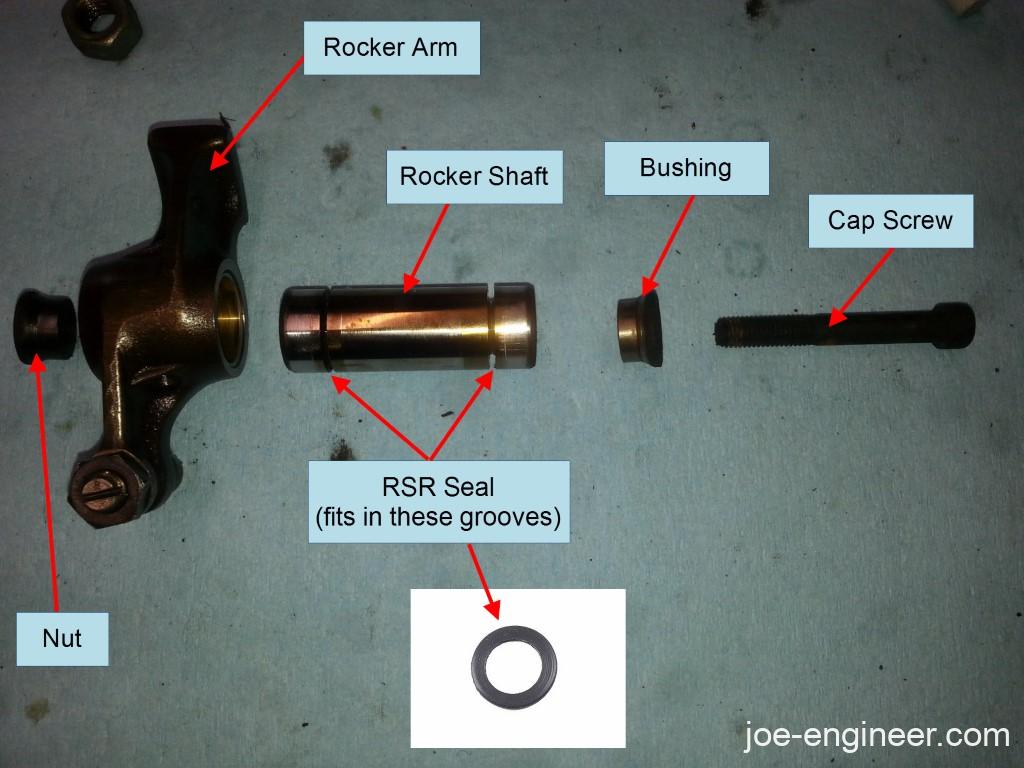
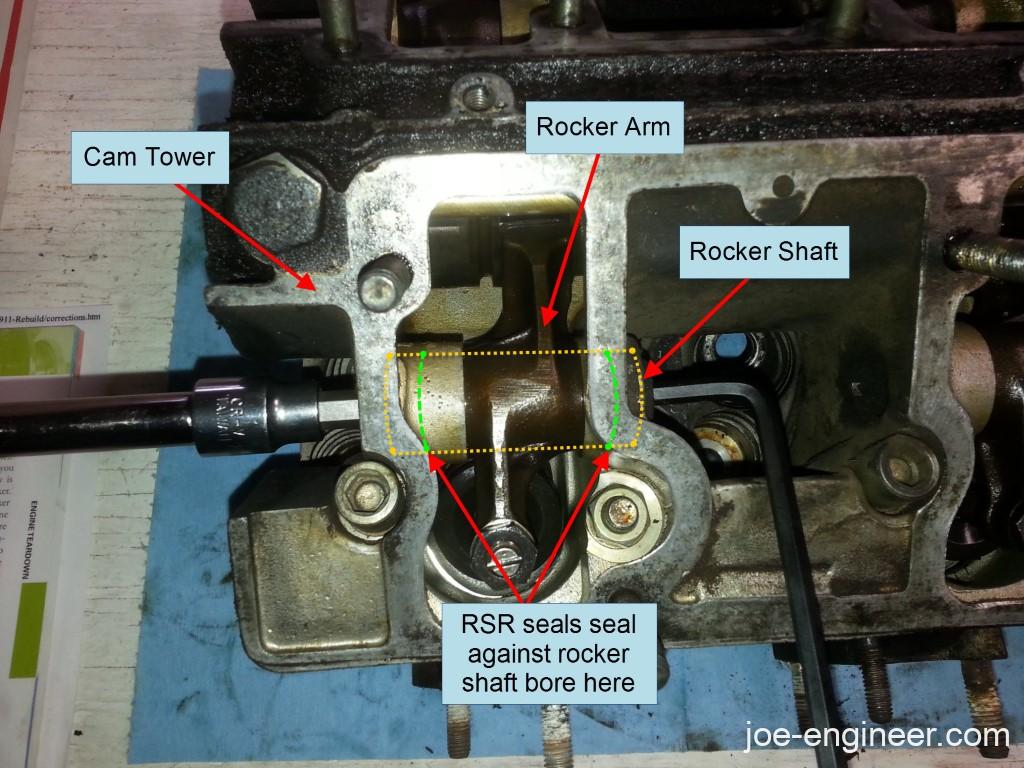
These will commonly leak oil into the valve cover area, causing it to pool up more than usual and eventually seep out through the gasket. Some Porsche motorsport parts called RSR seals are little flat o-rings that install at each end of the rocker shaft and help prevent this kind of leakage. The rocker shafts can be removed, seals installed, and shafts re-installed with the engine in the car, but this job is easiest to do with the engine out.
11. Engine Oil Cooler
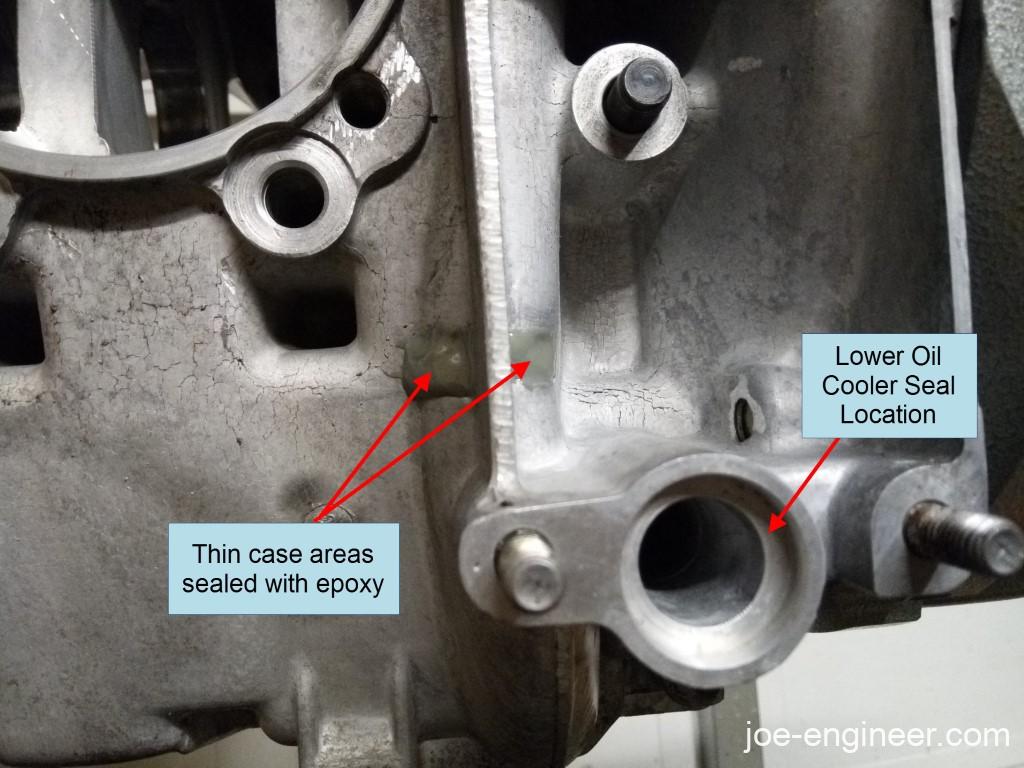
The 3 cylindrical oil cooler seals are another common leak source. Under the oil cooler a thin area on the engine case near the bottom of the cooler also has a tendency to seep oil. There is an official Porsche bulletin that addresses this concern.
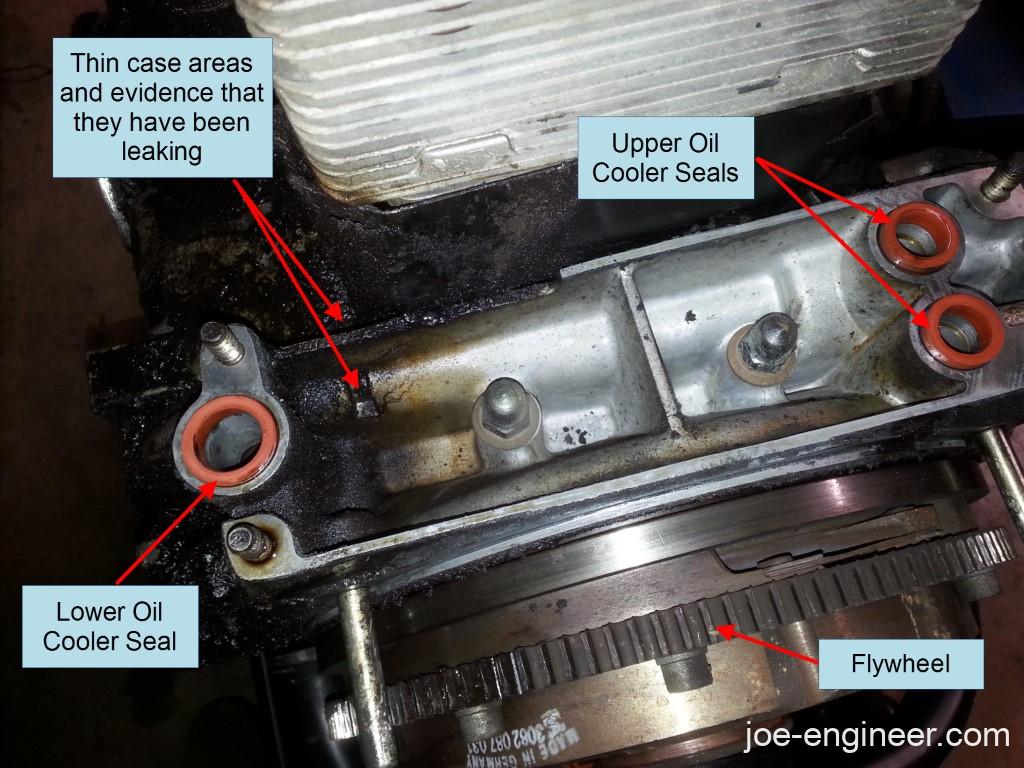
Once you unbolt the oil cooler, clean the area underneath the cooler and wipe with solvent. Then seal the thin case area at the bottom of the cooler with a 2-part epoxy or JB Weld. After the epoxy cures overnight replace the 3 oil cooler seals with new ones and bolt the oil cooler back on.
12. Oil Breather Hoses in Front of CIS
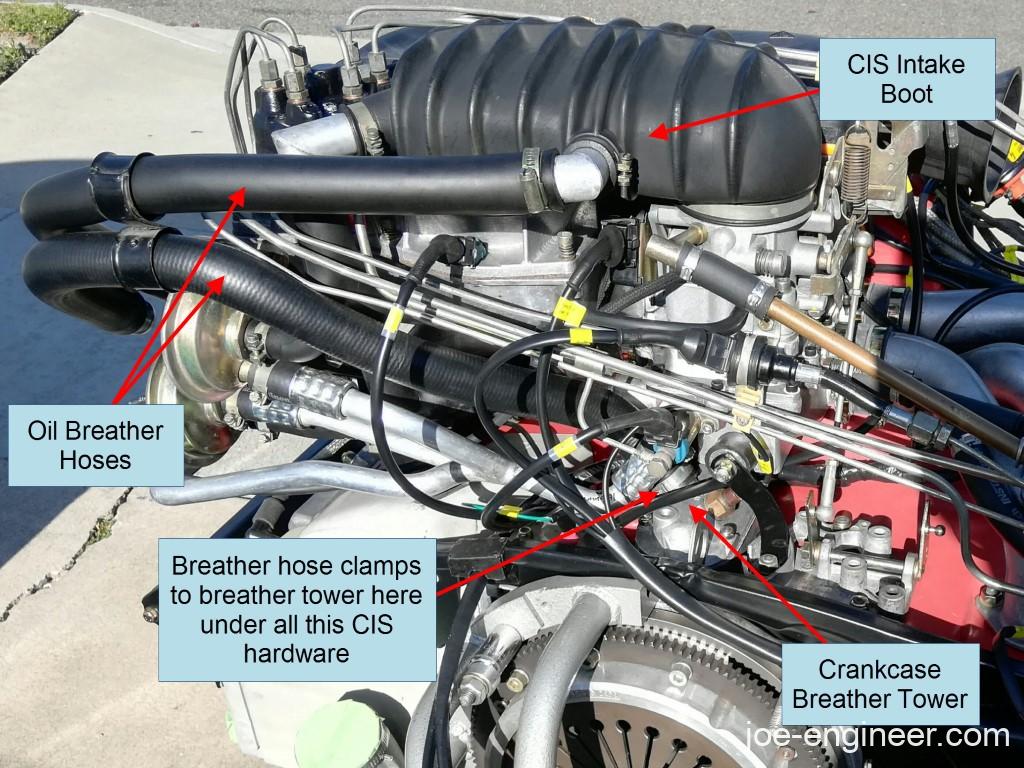
The oil breather hoses connect in front of the CIS (near the firewall) and are impossible to see with the engine and fuel injection system in place. If you grab the breather hoses near the front of the engine and find that any are cracked or dangling loose, you have discovered a big source of oil vapors coming out of the case which have probably already created a big oil mess back there not to mention a huge vacuum leak.
13. Flywheel Crankshaft Seal
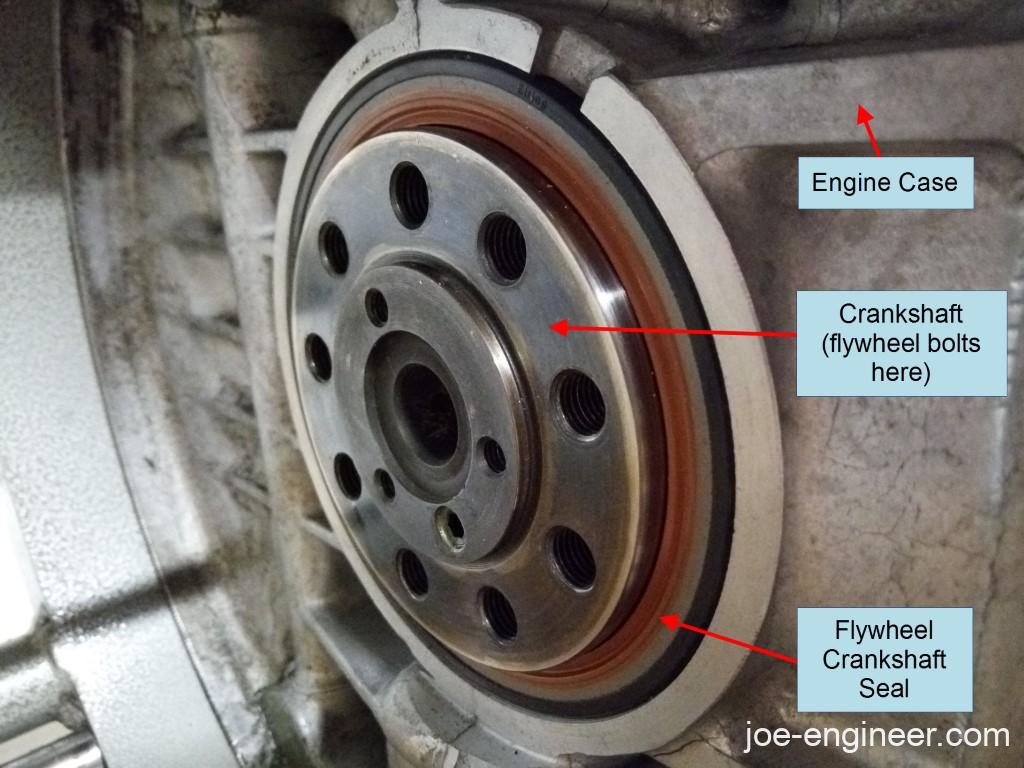
This one does not leak as often, but when it does, it requires removal of the engine, clutch assembly and flywheel to access the seal. It can be gently pried out, and using a special tool, a new one can be pressed or tapped back in place.
14. Crankshaft Pulley Seal
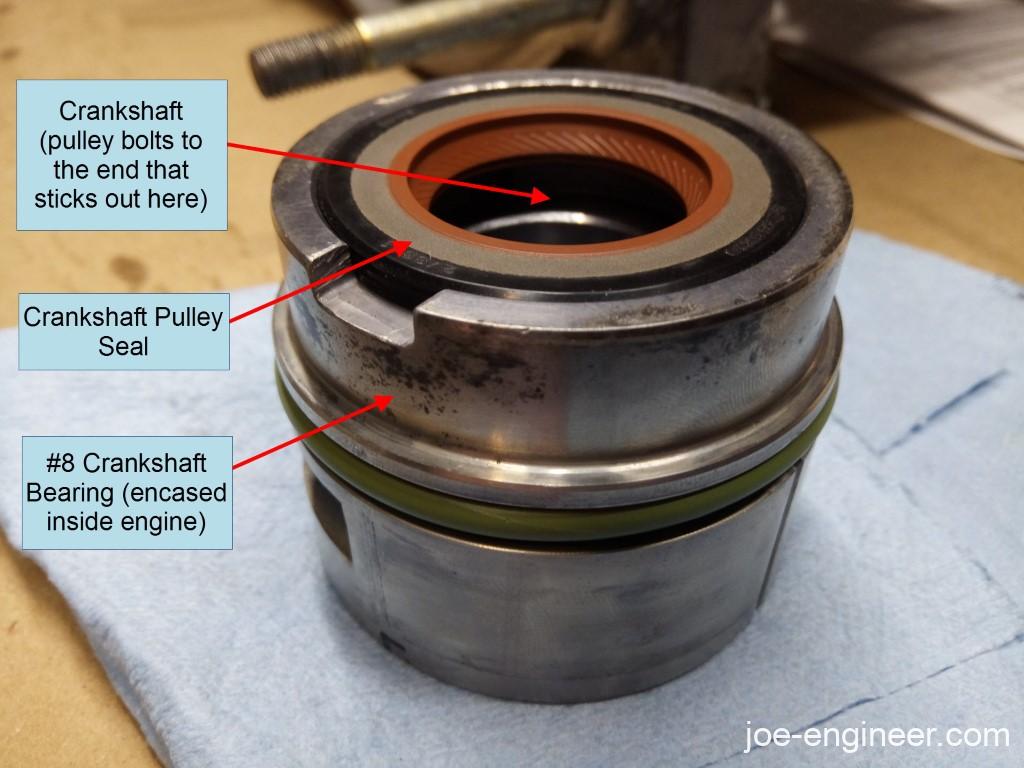
This one is at the interface between the crank and the #8 crank bearing at the rear of the engine, behind the crank pulley. It is a smaller version of the flywheel seal and is replaced in a similar way. You have to remove the rear engine crossbar, the crossbar mount off the case, and the crank pulley to get to it.
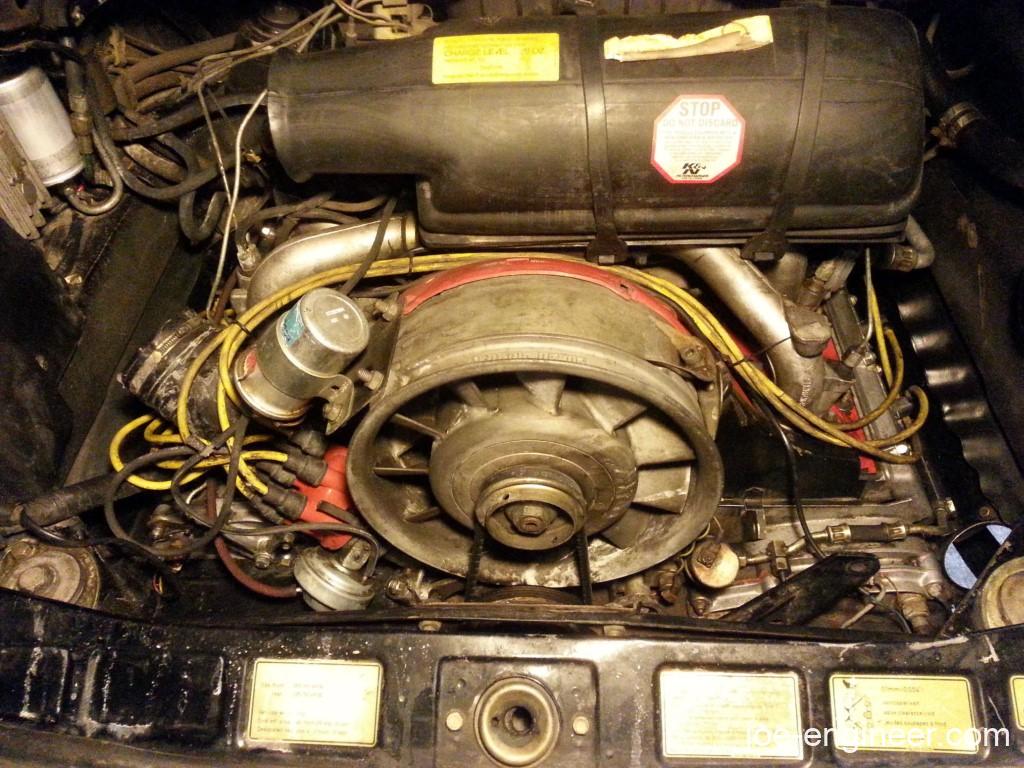
This is by no means a complete list of oil leak areas, rather a list of many common ones that high mileage Porsches will encounter. If your car has several of these leaks, tackle them one at a time at your own pace and something as bad as the engine below can eventually look like the one at the top of this article.
