
DIY: How to Replace The Rear Oil Cooler Lines on an Air-cooled Porsche 911
Oil drips emerging underneath your engine every time you park it? Replace your rear oil lines and eliminate one common source of oil leaks.
Note: The following information is for educational use only. Before proceeding please read my disclaimer page.
Disclosure: This post contains links to Amazon products and other trusted vendors. As an Amazon Associate I earn from qualifying purchases.
Your air-cooled Porsche 911 has a built-in oil cooler bolted to the engine case under the fan shroud. As engine displacement grew the factory eventually added an auxiliary oil cooler under the right front fender well, with some long oil lines and an external thermostat connecting it to the oil tank and engine. If your car has a significantly oily right rear wheel well, this procedure will fix a common oil leak in that area.
Model Years Applicable
Porsche 911 cars 1974-1989 as well as earlier cars that have had a 1974+ style front oil cooler and thermostat added. They are virtually the same with slight differences in the pressure hose due to exhaust differences. We are covering a 1978-1983 installation here.
Note: 1973 and earlier cars had several different styles of external oil coolers and oil lines that will not be covered here.
Tools Needed
- Floor jack
- Jack pad adapter tool (get one from any Porsche parts supplier)
- 4 Jack stands
- 2 Wheel chocks
- 2 Oil drain pans
- Shop rags or paper towels
- Rubber gloves
- Safety glasses
- Penetrating oil
- Degreaser spray
- Big open-ended wrenches (36mm and 30mm)
- Propane torch (optional)
- Fire extinguisher (if using propane torch)
- Small wire brush
- Anti-seize paste
Parts Needed
- Pressure hose (engine to thermostat)
- 1974 911: 91110772910
- 1975-83 911, 1976-77 Turbo: 91110774312
- 1986-89 Turbo: 91110774310
- 1984-1989 911: 93010774315
- Return hose (thermostat to tank)
- 1974-1989 911 and Turbo: 91110773011
- 12 quarts of engine oil (if performing oil change)
- 1 oil filter (if performing oil change)
- 1-2 oil drain plug gaskets
Caution:
- Oil is carcinogenic so wear rubber gloves, long sleeves, and safety glasses to protect your skin.
- Work in a well-ventilated area with no sources of heat, spark, or open flame when using a propane torch. Keep a fire extinguisher within reach.
Procedure
Step 1: Lift Car on Jack Stands
It is recommended you lift the entire car up on jack stands using step 2C of this procedure. The reason is that you will need as much wrench clearance as possible around the external thermostat which is located near the floor of the car. Additionally it should be lifted fairly level to ensure all engine oil can drain towards the back of the car. Remove the right rear wheel.
Step 2: Locate External Oil Thermostat and Rear Oil Lines
Locate the 2 oil lines sitting against the right rear wheel well. If you follow them towards the rear of the car, one will end at the oil tank and one will end at the engine.
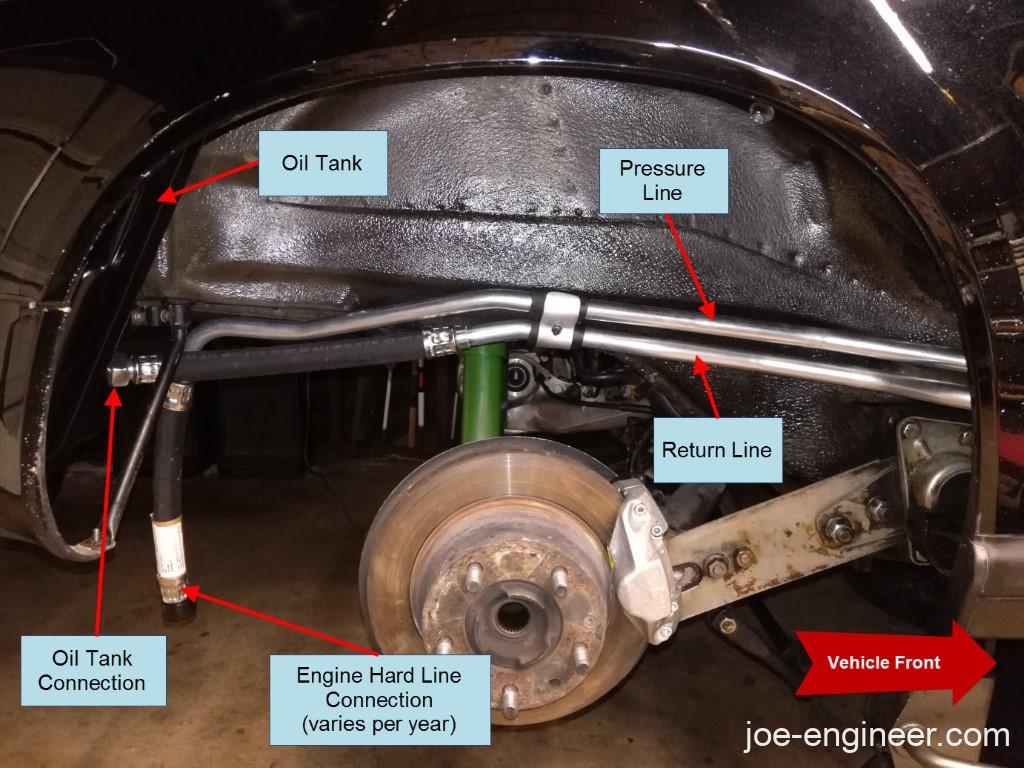
If you follow them towards the front of the car, both should terminate at the external thermostat tucked in the front lower corner of the wheel well.
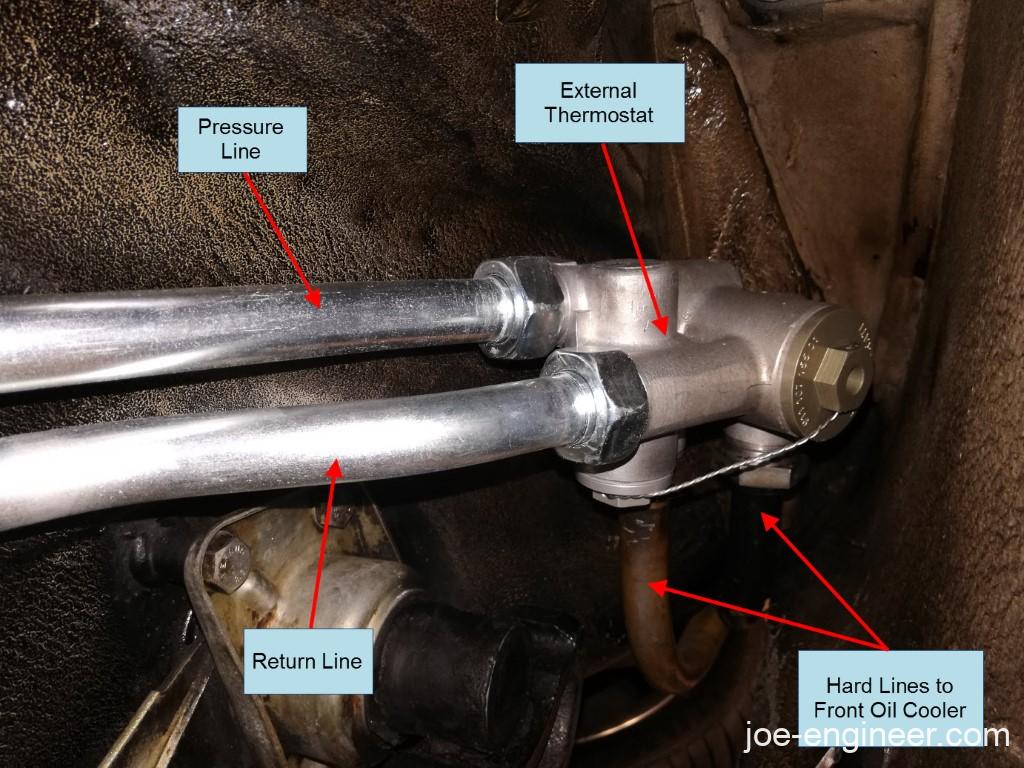
The pressure line goes from the thermostat connection to the engine hard line. The return line goes from the outer thermostat connection to the oil tank. Take note of this so you re-install the new lines correctly. Label each line and connection with a piece of tape and a permanent marker to help you remember how they go.
Both of these rubber lines commonly leak around any of the crimped connections.
Step 3: Apply Penetrating Oil
If you can afford to wait a day or two, apply penetrating oil on the large hex nuts on each end of the rear oil lines and let it soak into the connections. It will help make loosening them much easier, especially on the thermostat end. These are large fasteners that likely have not been touched since the car left the factory. Spray a little on once every few hours.
Step 4: Drain Engine Oil
You are required to drain the oil tank so you might as well do a complete oil change and fully drain all engine oil. Follow steps 1-4 of this procedure to drain your oil and change your oil filter. If you have recently performed an oil change and still have fairly new oil, you will still need to fully drain your oil tank and store the oil in a clean covered container to re-use again.
Since we are working with oil lines connected to the thermostat, it is important to fully drain the oil while the engine is fully warmed up to ensure the thermostat is open and all the oil in the hard lines and oil cooler fully drains out.
Empty the 2 oil pans because you will need them again when disconnecting the oil lines.
Step 5: Disconnect Oil Lines at Thermostat
Place an empty oil drain pan under each end of the oil lines to catch any drips. We will first try to disconnect the lines at the thermostat as these connections are usually the ones most likely to be stuck. Clean the outer surface of the thermostat and oil lines with degreaser to prevent grease or debris from contaminating the inside of the thermostat. Put a wrench on the outer nut and firmly but slowly apply torque to loosen.
If it is stuck and you have previously applied penetrating oil, you may need to carefully heat the nut with a propane torch and allow it to cool several times. This will expand and contract the nut enough to break the seal between the nut and thermostat threads. This often loosens even rusty components and is a great alternative to using cheater bars or brute strength which can damage parts and be dangerous. Patience is key here to avoid damaging or catching anything on fire!
Once the outer nut is disconnected, repeat the same process to loosen the inner oil line nut now that you have access to it. Make sure you have an oil drain pan underneath to catch any drips emerging from inside the oil lines.
Step 6: Disconnect Oil Lines at Oil Tank
Moving back to the rear end of the oil lines, loosen the oil line nuts on the oil tank and the end connecting to the engine hard line. These will be tight but are less likely to be stuck like the thermostat connections. Hold the engine hard line steady with a second wrench so it does not get bent.
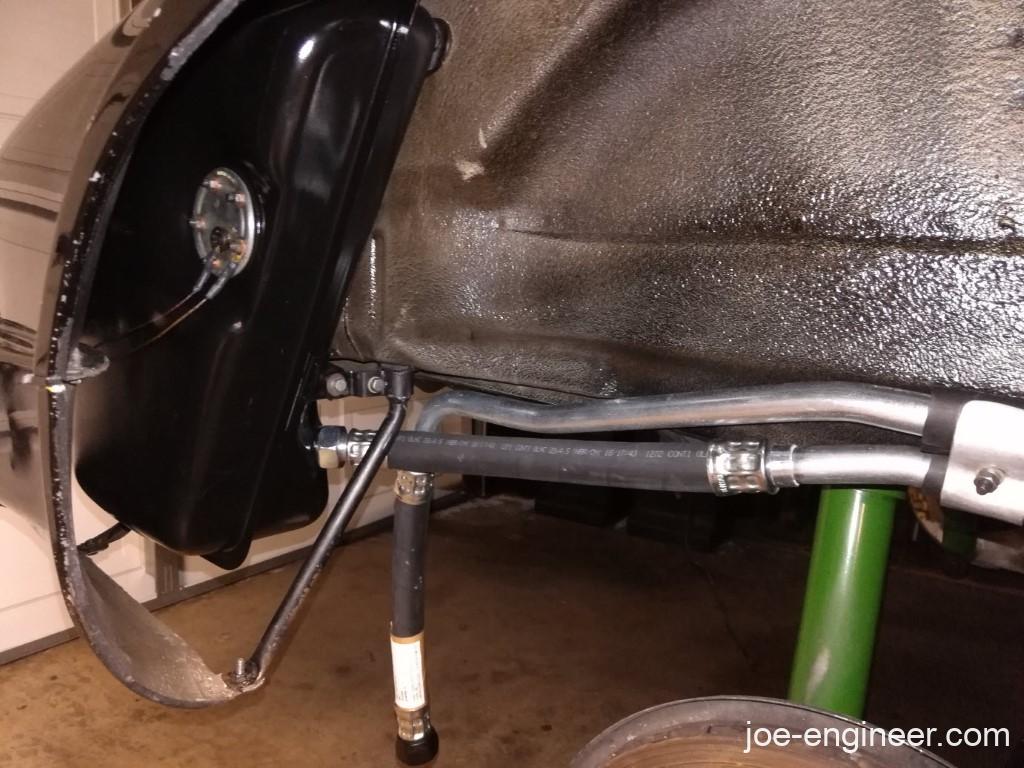
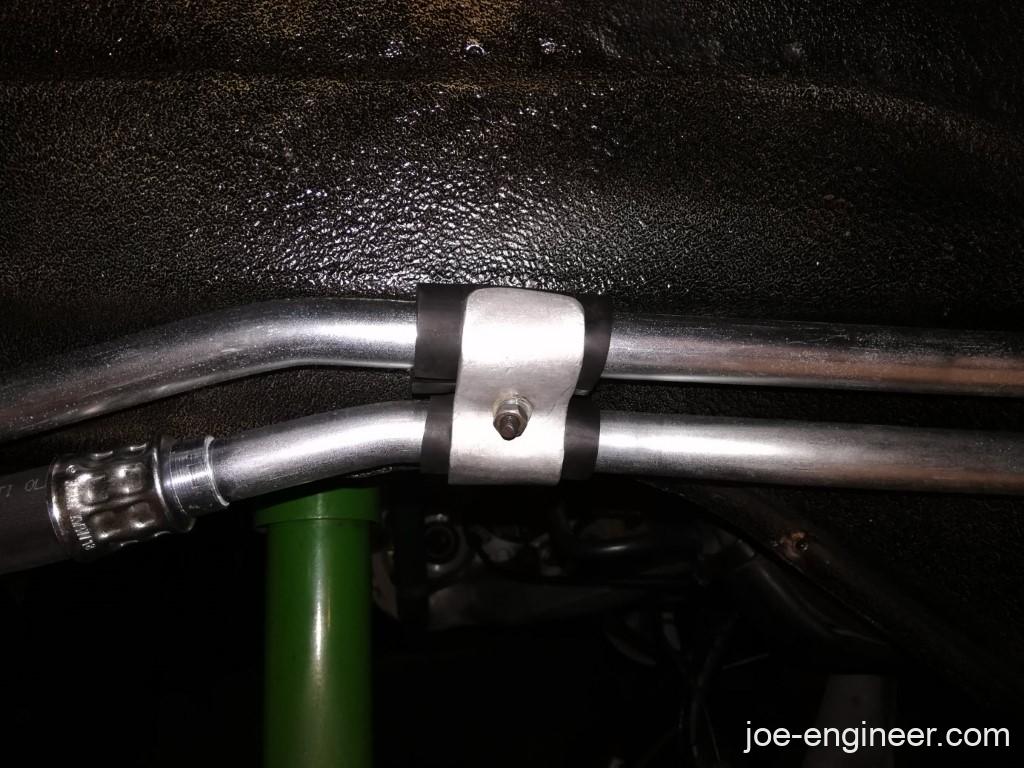
Once all 4 oil line nuts are loosened, remove the clamp in the center securing the oil lines to the inner wheel well and the 2 rubber pads. Save these for later re-use.
The oil lines can now be removed. As you remove them watch for any excess oil draining from the connections at both ends and catch it with the drain pans.
Inspect the male threads at the tank, engine, and thermostat for damage or dirt. Clean them off with a wire brush and paper towels as needed. The threads and the tapered sealing surface should be clean so the new oil lines can seal correctly. Now is a good time to clean the inner fender well surface where the oil lines normally sit.
Step 7: Reconnect New Oil Lines
Apply a small amount of anti-sieze to each threaded connection and re-install the new lines in the same orientation as before.
Install all four connections finger tight. Loosely install the clamp and rubber pads to allow the oil lines to move around a bit. At each connection hold the hose steady with one hand as you tighten each nut with the wrench to prevent the hose from twisting. Tighten as much as you can by hand.
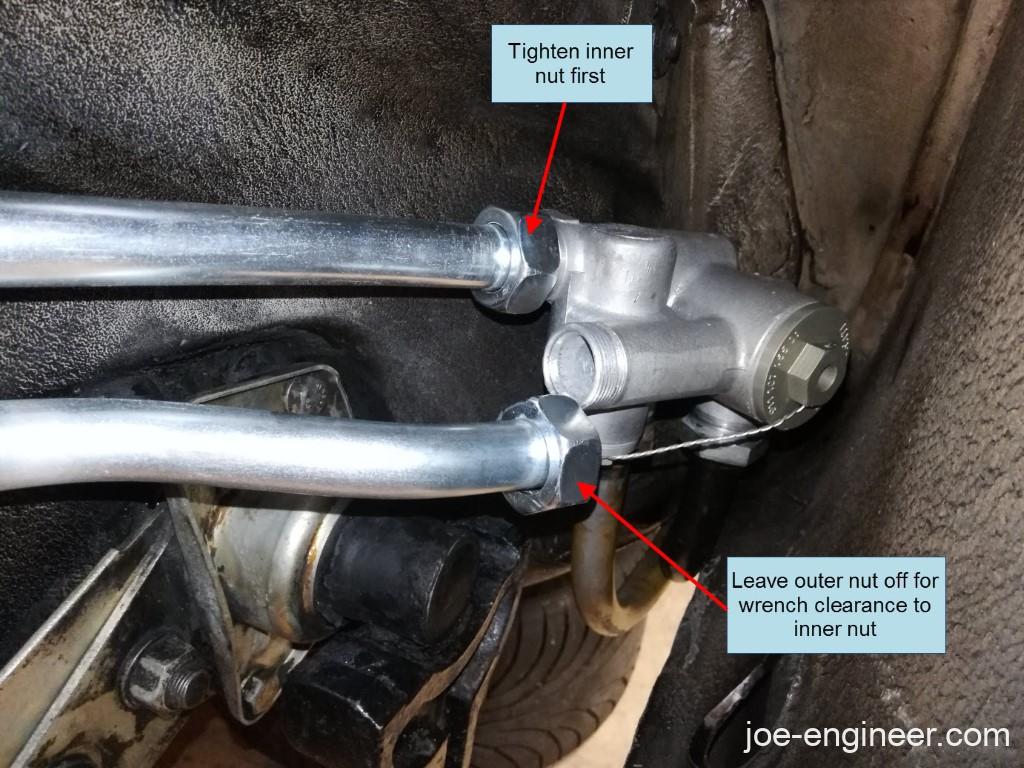
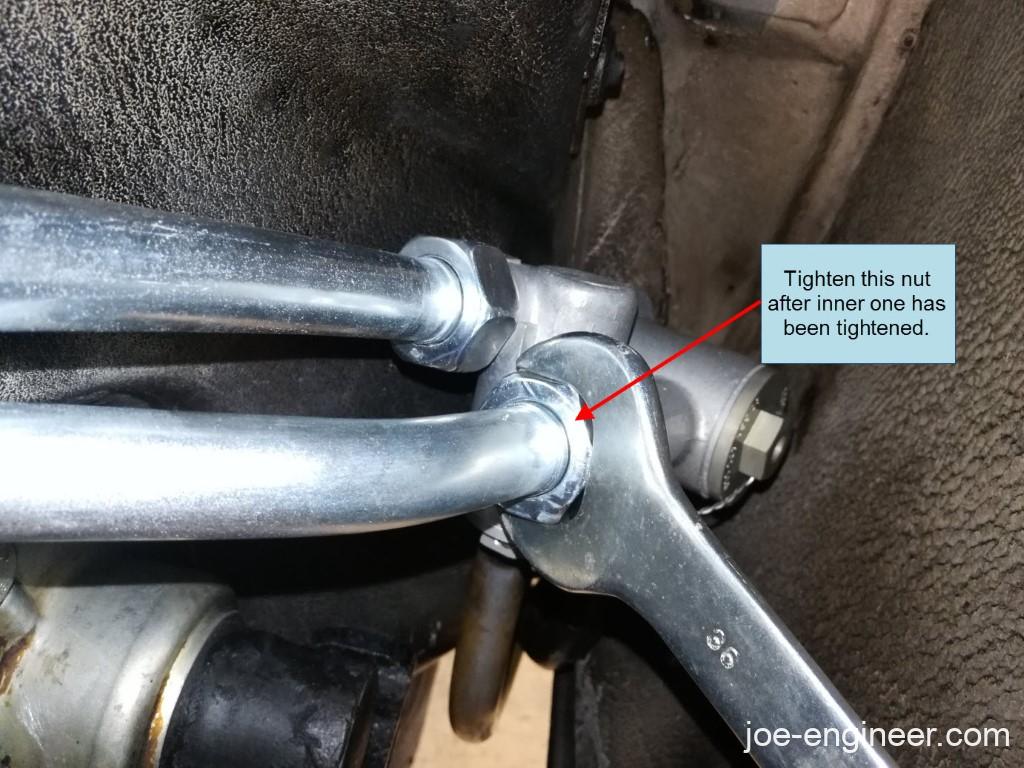
At the thermostat you will need to tighten the inner (upper) line before you can connect and tighten the outer (lower) line. Hand tighten the clamp nut once all four oil line connections are tight.
Step 8: Refill with Oil and Check Oil Level
Follow steps 5-6 of this procedure to refill your engine oil and check the oil level. Since the right rear wheel is still off check for leaks around any of the oil line connections. If you see a drip from any of them you can snug down the oil line nut a bit more. Be careful as the oil lines and exhaust will be hot at this time.
Re-install the right rear wheel and lower the car back on the ground.
Rear oil line replacement is now complete and you have one less oil leak to worry about.