
DIY: Valve Adjustment on a Classic Air-Cooled Porsche 911
Along with changing your oil and filter, one of the most vital regular maintenance tasks that must be done on the Porsche 911 is adjustment of the intake and exhaust valves. It can be expensive for a Porsche specialist to do this for you, but fortunately it is a very simple DIY job.
Note: The following information is for educational use only. Before proceeding please read my disclaimer page.
Disclosure: This post contains links to Amazon products and other trusted vendors. As an Amazon Associate I earn from qualifying purchases.
The air-cooled Porsche 911 has adjustable swivel feet on its rocker arms to push the ends of the valves open and closed. They have to be manually set at a gap of 0.1mm (.004 in) on a regular basis. If this gap is too small, the valves will not close all the way and performance will suffer. If the gap is too large, the valves will not open all the way, performance will suffer, and they will be loud and clattery. This is a very easy job that can be done at the same time as an oil change. Read on to learn how.
Model Years Applicable:
All Porsche 911 cars through 1989. The photos and parts shown here are on a 1983 911SC but the general procedures apply to all years within this range.
Tools Needed:
- Jack stands
- 1 floor jack
- Jack pad (available at any European parts supplier)
- 2 oil drain pans
- Gloves
- Safety glasses
- Paper towels
- Socket set (1/4”, 3/8”, and 1/2” drive)
- Ratchet (3/8” and 1/2” drive)
- 1/4” drive torque wrench
- Pry bar
- 24mm socket and ratchet (or 24mm wrench from factory tool kit)
- 13mm box end wrench
- Flat screwdriver (the shorter the better)
- Valve adjustment tool with short 0.1mm (.004 in) feeler gauge
- Service manual for your car’s model year
Parts Needed:
- Qty 1 valve cover gasket set
- Qty 1 oil filter
- Qty 12 quarts of engine oil
- Qty 2 oil drain plug seals
- Because this procedure covers an extensive model year range it is recommended that you search the Porsche PET or your favorite parts supplier’s catalog for your car’s specific parts.
Replacement Procedure
Step 1: Drain Engine Oil
Warm up the engine and drain the engine oil using steps 1-3 of this procedure.
Step 2: Raise Car on Jack Stands
Raise the rear of the car on jack stands using this procedure. Put the gearbox in neutral.
Note: Let the car cool down overnight. The engine must be stone cold before performing the valve adjustment.
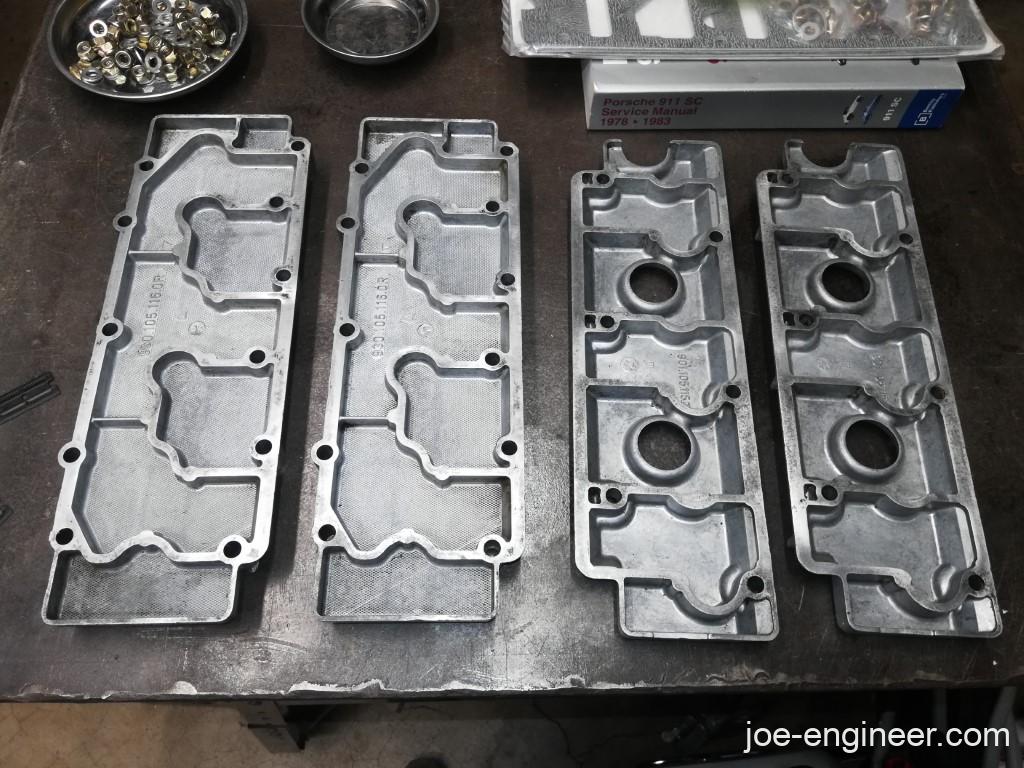
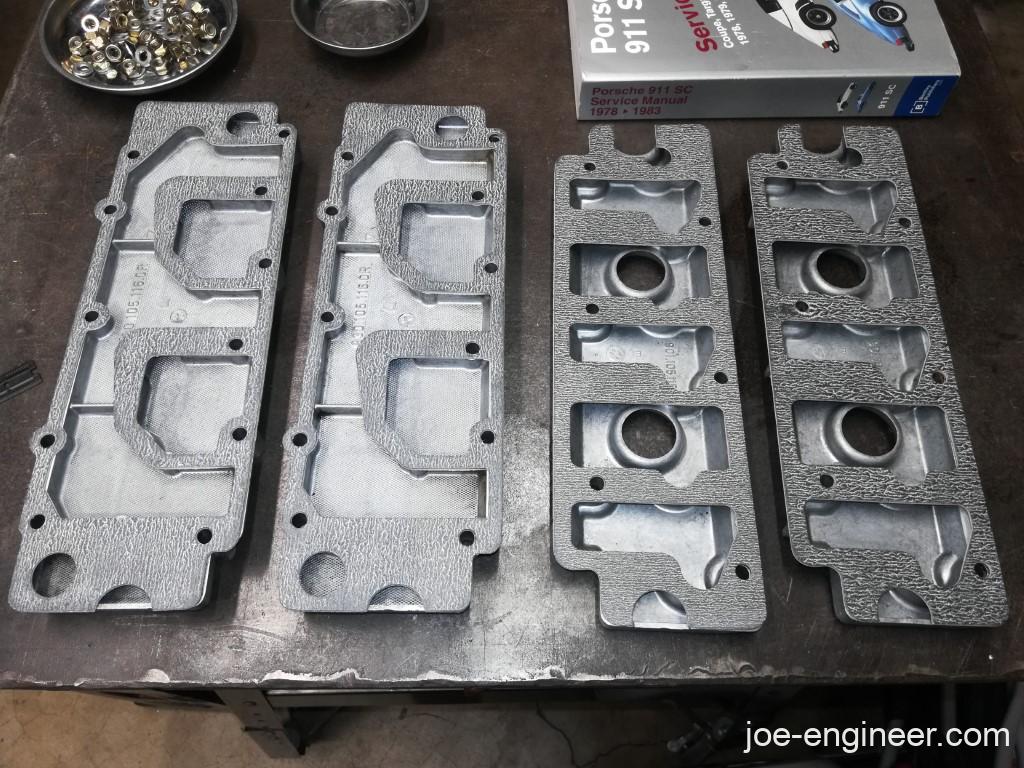
Step 3: Remove Valve Covers
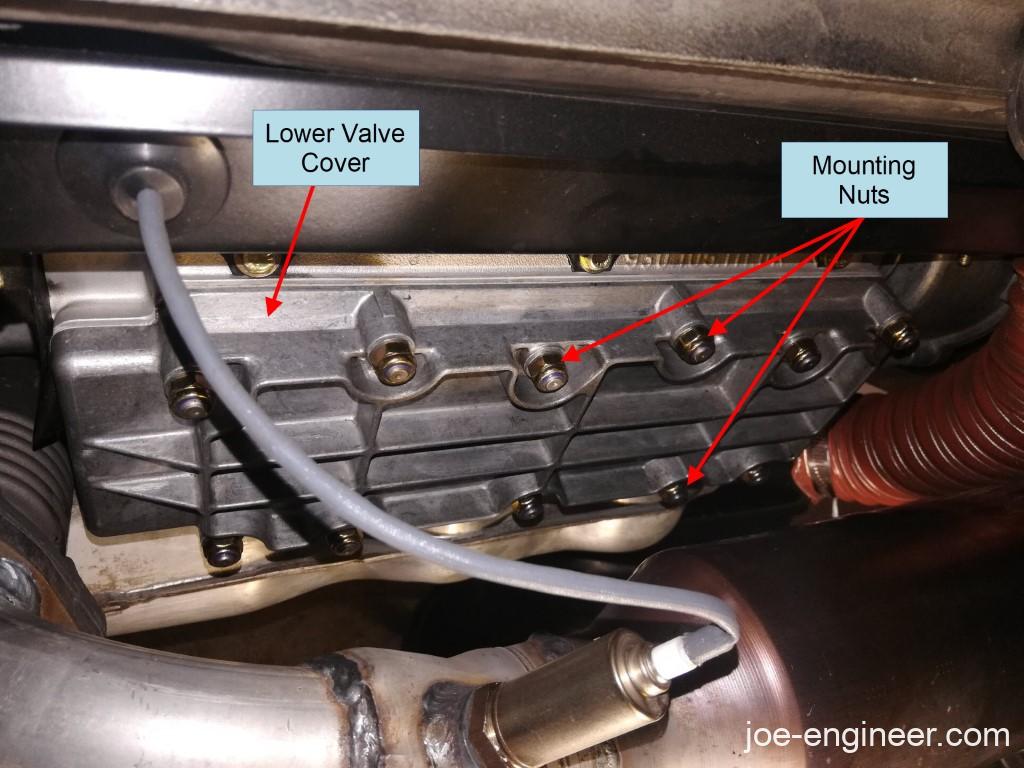
Pull the spark plug wires off the plugs and move them aside in the engine compartment. Remove the 2 upper and 2 lower valve covers by removing the exterior nuts and washers and pulling each cover off. On the SC the upper covers have 6 nuts and washers each and the lowers have 11 each. The upper covers are accessible from inside the engine bay and the lowers from underneath the car. Place an oil drain pan under each lower valve cover to catch any drips.
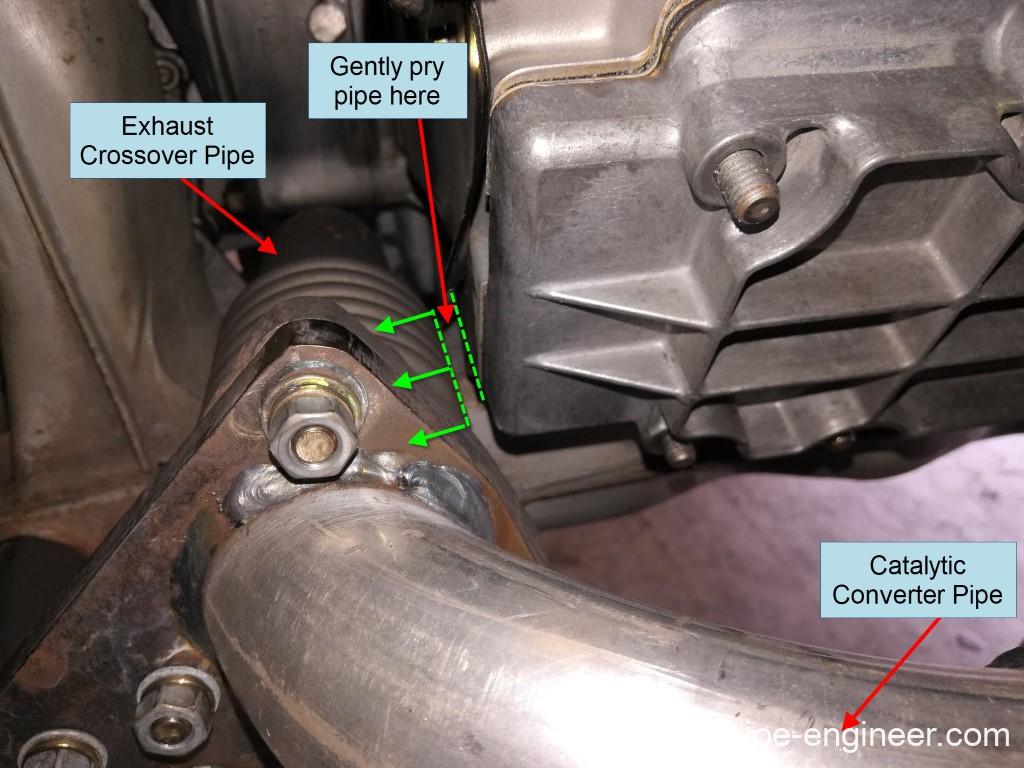
They may be stuck on the cam towers if the previous person who serviced the car used some kind of sealant on them. If that is the case, try to pry them off with a wedge shaped plastic trim removal tool or tap them off with a rubber mallet. Do not use any kind of metal tool because you will damage the valve covers and sealing surfaces resulting in a permanent oil leak. Pull off the gaskets underneath the valve covers. On the 1978 and later cars there is a crossover exhaust pipe that bolts to the catalytic converter that may prevent the lower left valve cover from being pulled off the mounting studs. If this is the case, loosen the 3 bolts that mount the crossover pipe to the catalytic converter and using a pry bar between the crossover pipe and the cam tower (directly behind the valve cover), gently flex the pipe forward out of the way so the valve cover can be removed.
Once you have all four valve covers off, set them aside on a bench making sure not to damage their sealing surfaces. Inspect the sealing surfaces on the cam towers. If they have little bits of gasket or sealant on them you will have to clean them at the end before installing new gaskets otherwise they will leak oil.
Step 4: Turn Engine to Top Dead Center (TDC) Cylinder #1
Remove the distributor cap so you can see which way the rotor is pointing. Using your 24mm socket and ratchet or the 24mm wrench from the factory toolkit, turn the engine over clockwise using the fan pulley nut until the notch on the bottom of the fan housing (and the split in the case) lines up with the notch on the crank pulley marked Z1.


Look at the distributor and make sure the rotor is pointing approximately at the notch on the distributor body.
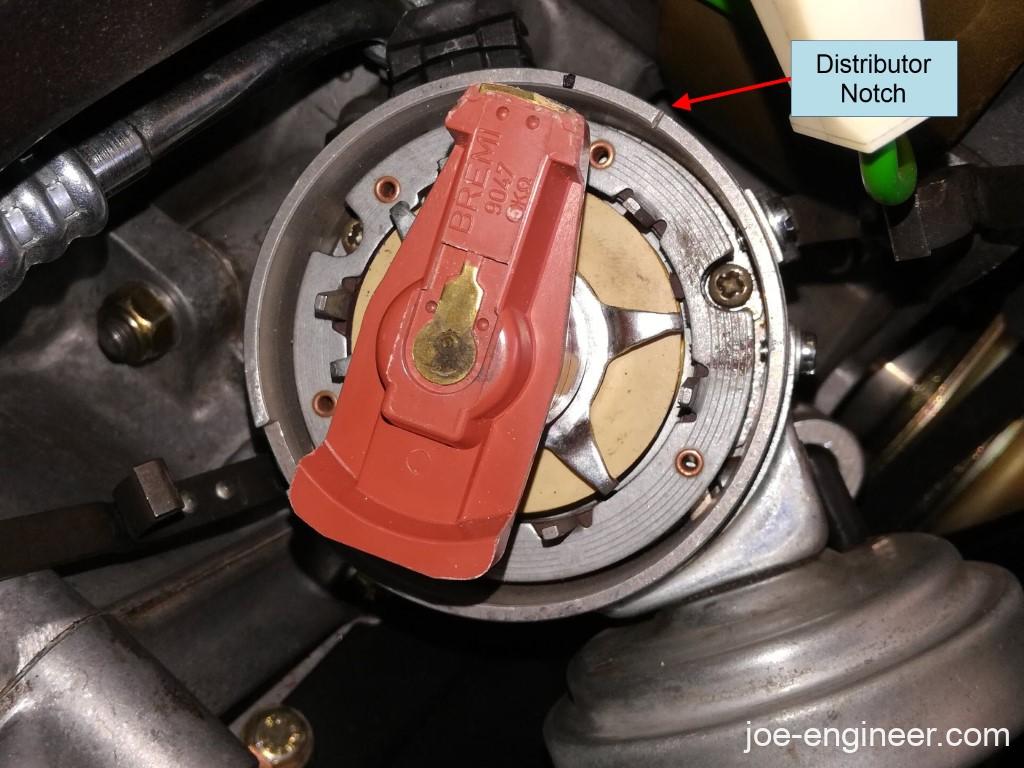
If the rotor is pointed the opposite direction then turn the engine over 360 degrees clockwise once more until the Z1 pulley notch likes up with the notch on the fan housing and the split in the case.
Note: Do not turn the engine counterclockwise or damage to the timing chains and timing chain components can occur. If you overshoot one of the notches, keep turning the engine over clockwise until the crank pulley notch and distributor rotor are where they need to be.
Your engine is now at top dead center (TDC) for cylinder #1 and both intake and exhaust valves are closed.
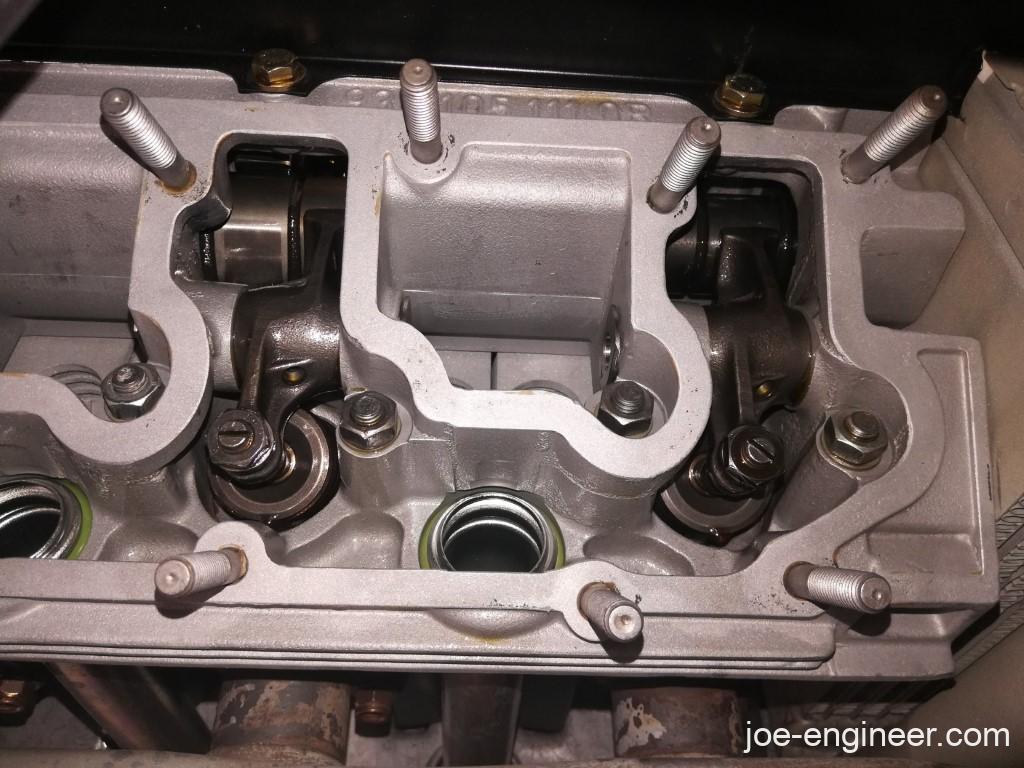
Step 5: Adjust Cylinder #1 Valves
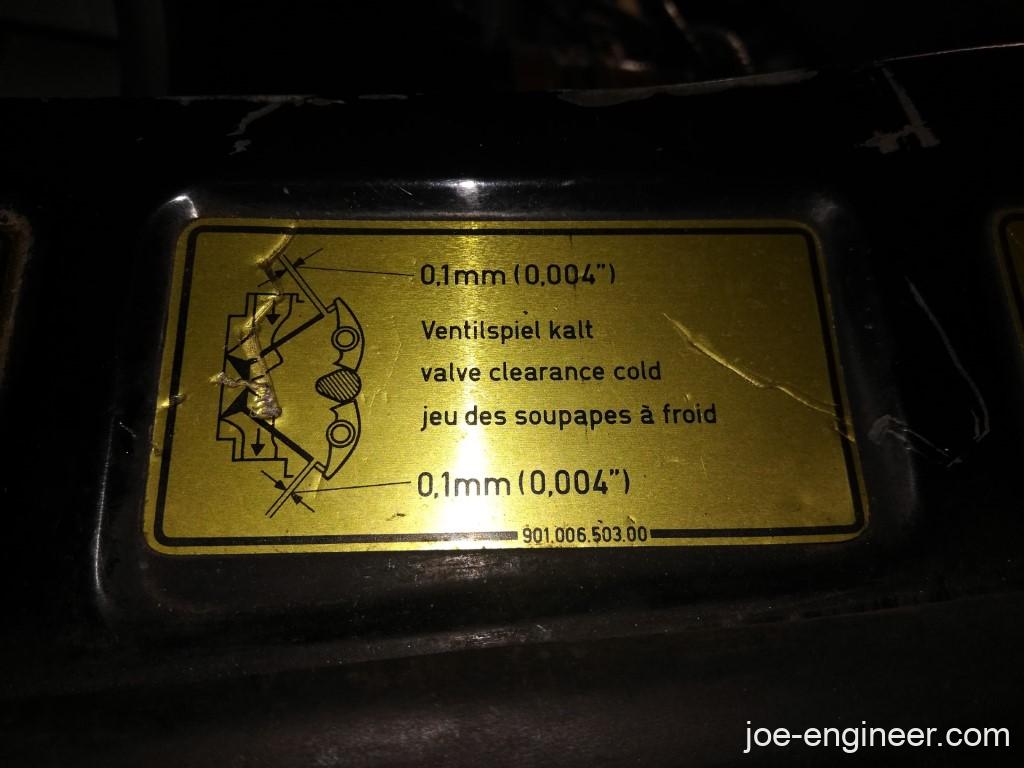
Look for the labels at the base of your engine compartment. You should see one indicating the valve clearance spec and another indicating the location of the cylinders and the firing order, 1-6-2-4-3-5.
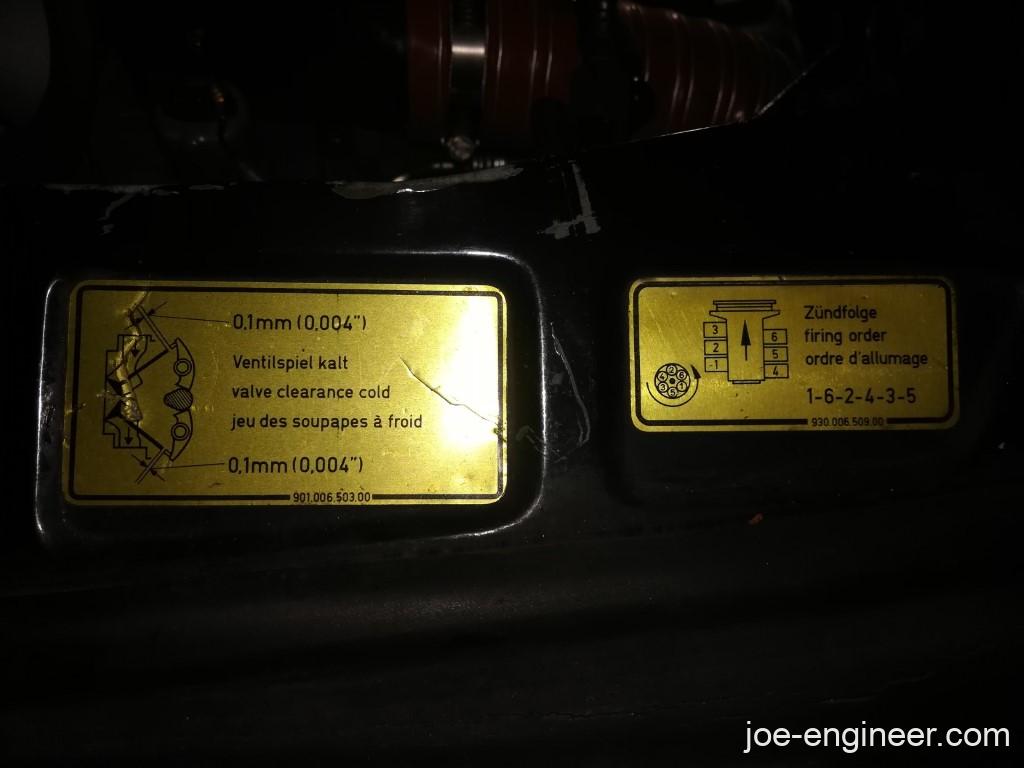
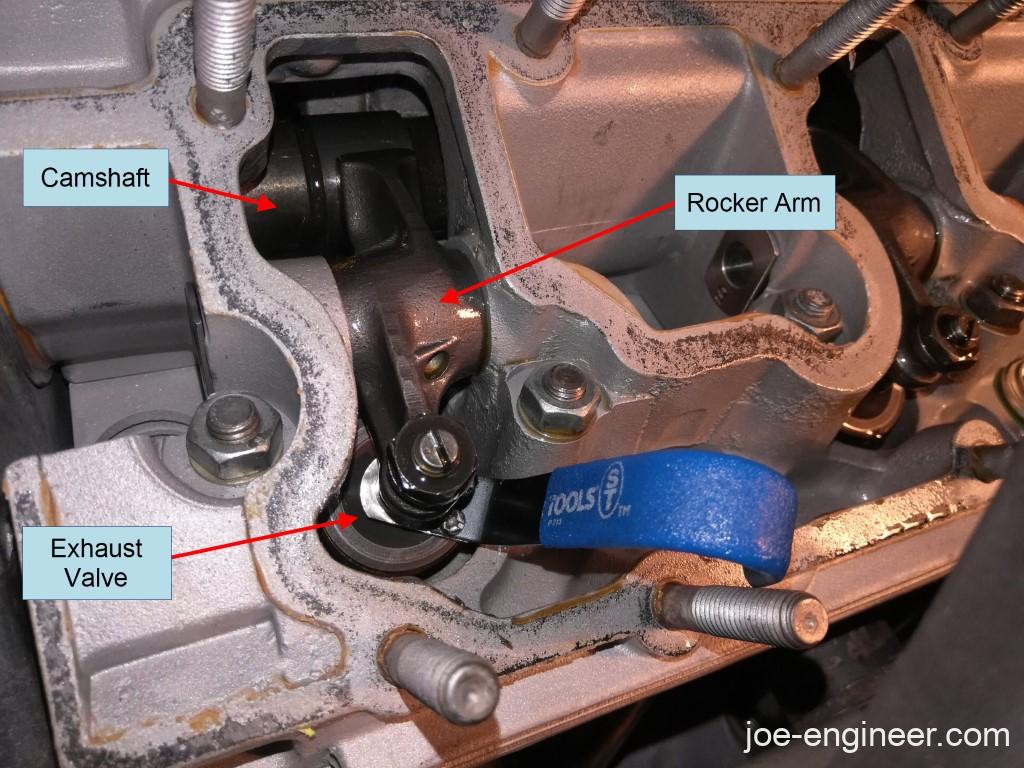
To better visualize what’s going on notice the diagram in the valve clearance spec label. It shows a cross-section view of the cam in the center with upper rocker arms actuating intake valves and lower rocker arms actuating lower exhaust valves.
With your engine at TDC for cylinder #1 you are ready to adjust both the intake and exhaust valves for the rear left cylinder.
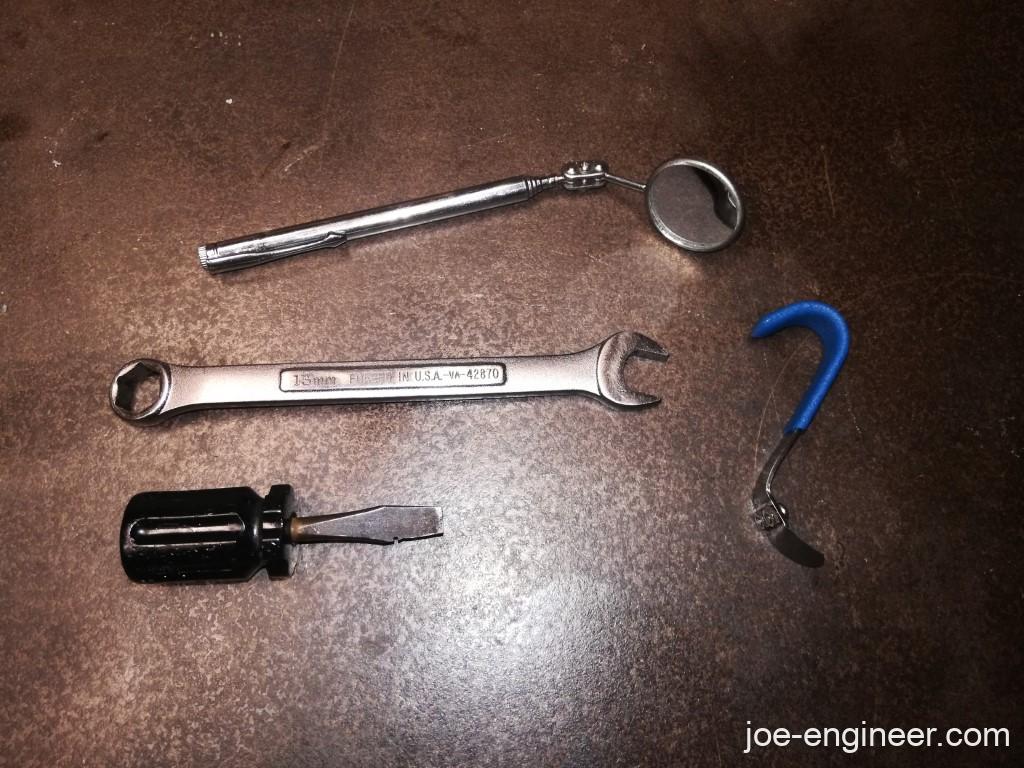
You will need the following tools to adjust the valves. A 13mm box wrench, a short flat screwdriver, and a feeler gauge tool with a short blade like the one below. An optional tool for looking at the intake valves closest to the front of the engine (near the firewall) is a small handheld mirror.
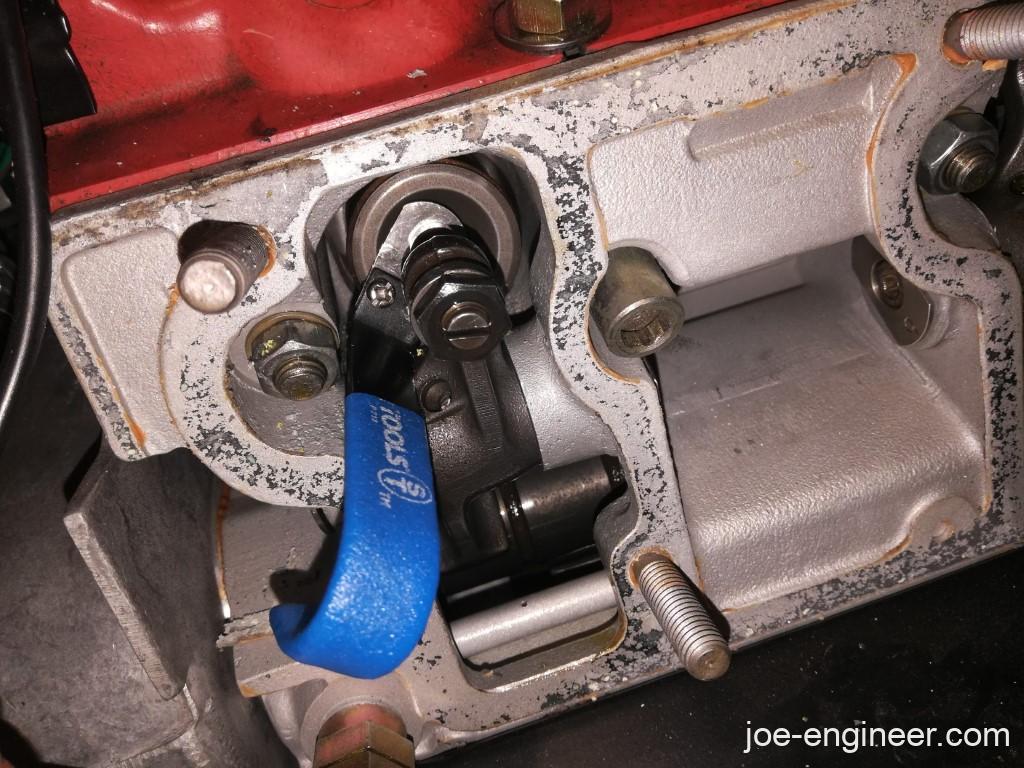
Note: These photos are not from cylinder #1 but are being shown for clarity. The valve hardware is the same for all cylinders.
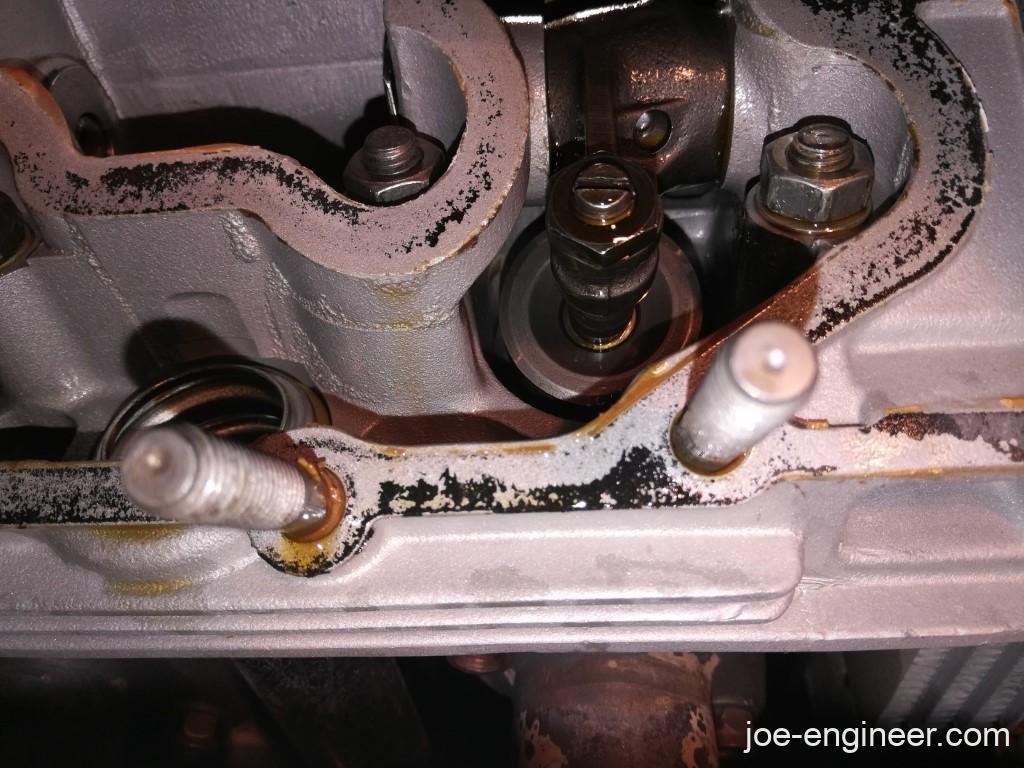
In the left side of the engine compartment, closest to the cooling fan is the cylinder #1 intake valve and rocker. You will need to maneuver the feeler gauge in the thin gap between the rocker adjustment screw and the top of the valve stem.
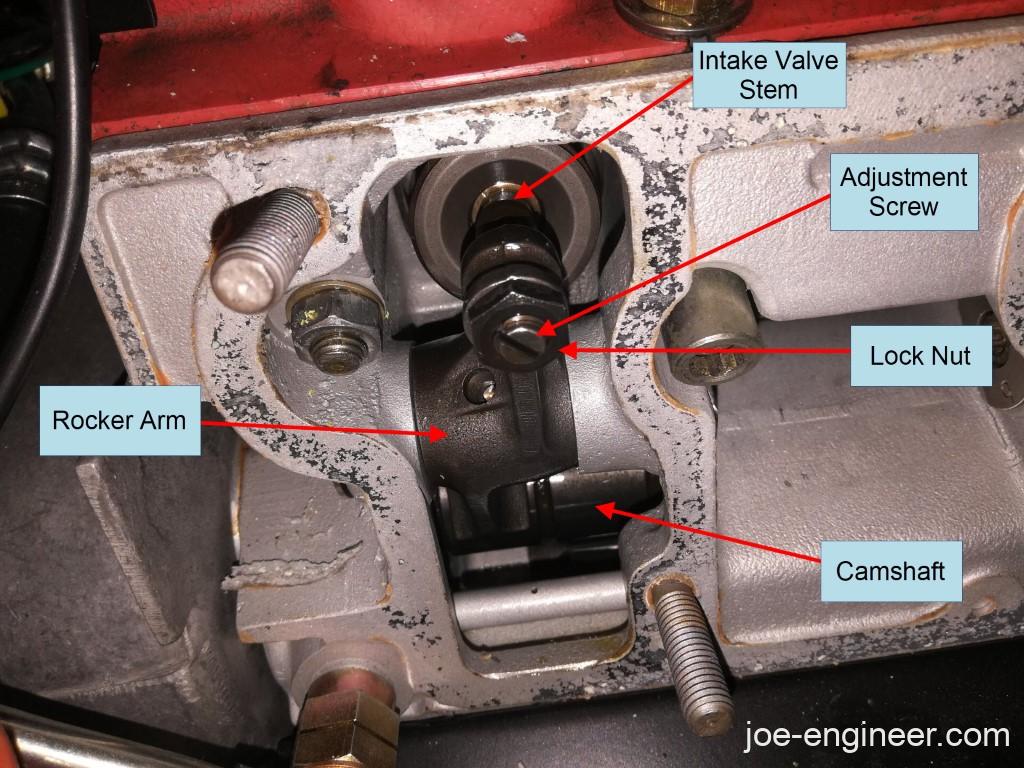
Push the rocker down onto the surface of the cam to open the gap at the valve stem. Slide the feeler gauge in as shown. Be gentle and don’t force or twist the feeler gauge as they are easy to break. A thin coat of oil on the feeler gauge blade helps it slide better.
Slide the feeler gauge within that gap to feel how tight it is. It should drag very slightly. With the feeler gauge in place loosen the lock nut with the 13mm wrench and loosen the adjuster screw with the flathead screwdriver to feel its effect on the gap. As soon as you loosen the screw you will feel the blade of the feeler gauge bang around in that extra space. If you tighten the screw too much you wont be able to move the feeler gauge at all. You want the screw to be tight enough to allow the feeler gauge to just slide within the gap. Once you set that gap, hold the position of the screw with the flathead screwdriver and tighten down the locknut hand tight. Remove the screwdriver and wrench and make sure the feeler gauge still just barely slides within the gap. Intake valve #1 is now adjusted.
Repeat the process on the exhaust valve directly below, on the left side of the car closest to the bumper. On the 911SC and Carrera the catalytic converter passes very close to the lower left valve cover, so this is where the short screwdriver comes in handy. After adjusting exhaust valve #1 you are finished with cylinder #1.
Step 6: Turn Engine 120 Degrees & Adjust Cylinder # 6 Valves
After finishing cylinder #1, turn the engine over clockwise 120 degrees and stop when the next notch on the pulley lines up with the fan housing notch and the split in the case.
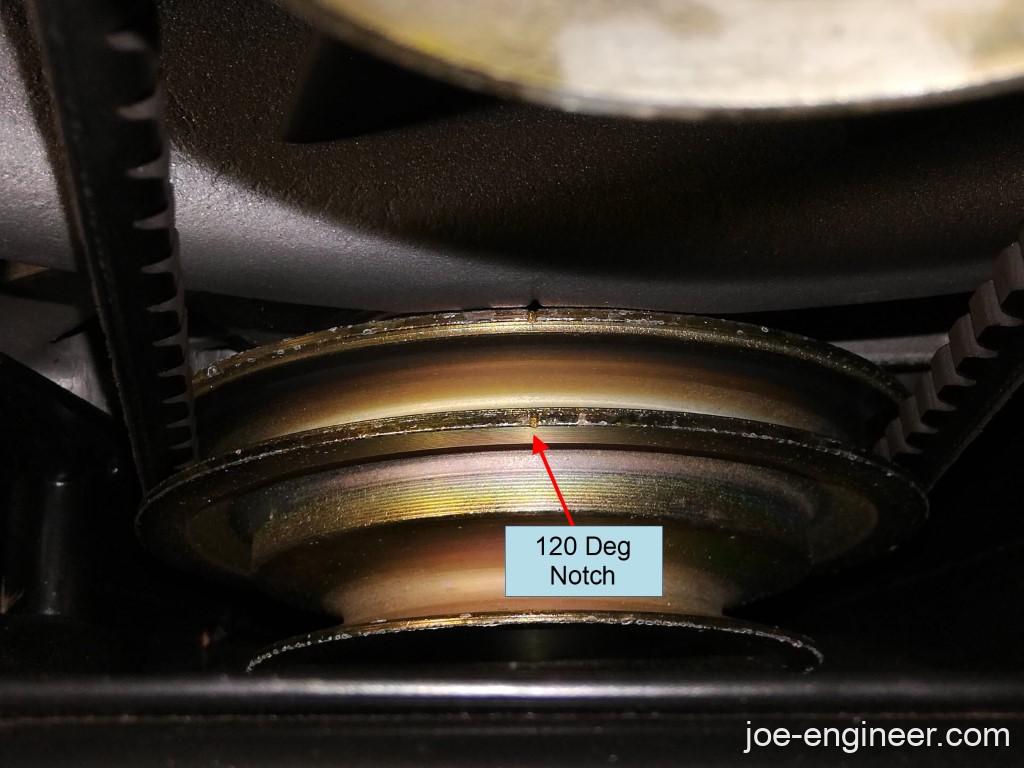
The engine is now set at TDC for cylinder #6 on the front right side. Repeat the same adjustment process of step 5 for both intake and exhaust valves for cylinder #6.
Step 7: Repeat Turning Engine and Adjusting Remaining Valves
Now turn the engine over 120 degrees one more time to adjust the valves for cylinder #2. After this rotate the engine 120 more degrees and you will end up at the Z1 notch on the pulley but this will be TDC for cylinder #4. If you look at the distributor, the rotor will now be pointing away from the notch on the distributor body.
Repeat the valve adjustment for cylinder #4, then rotate 120 more degrees to adjust cylinder #3 and then 120 more degrees for cylinder #5. You are following the valve adjustment in the firing order 1-6-2-4-3-5.
Step 8: Turn Engine to TDC Cylinder #1 and Re-Check All Valves
Now that you have the hang of it, repeat steps 4-7 and quickly re-check the gap on each valve. If any have changed adjust them as needed.
On cars older than 1978 they need to be adjusted approximately every 6,000 miles. On cars from 1978 and newer this interval is approximately every 10,000 miles. If you think your valves are getting a bit clattery it doesn’t hurt to check them sooner than that, just remember to drain your oil before you take the lower covers off.
Step 9: Replace Gaskets & Re-Install Valve Covers
Before re-installing the valve covers make sure the mounting surfaces on the cam towers and valve covers are absolutely free of any old gasket bits or glue residue. If necessary, use a solvent such as acetone or mineral spirits on a rag to get any stubborn debris off. Once again do not use any metal tools to scrape the mating surfaces or you will create an oil leak.
A valve cover gasket kit will have 4 new valve covers and new nuts and sealing washers to re-install the valve covers. Do not re-use any old hardware as that may result in an oil leak.

Lay the new gaskets on each clean valve cover so you get the orientations correct.
Re-install each valve cover and gasket into its respective location. Install the new sealing washers and carefully snug down the new nuts. After all the nuts on a valve cover are lightly snugged down, lightly torque them to 8 N-m (5.9 ft-lbs) in a criss-cross pattern. Don’t over-torque them as you may warp the valve covers and introduce an oil leak. If you find oil weeping a little once the engine is running you can always snug them down a bit more as needed. If you loosened the exhaust crossover pipe at the catalytic converter re-tighten those 3 mounting nuts. Re-install the spark plug wires in the correct order using the firing order decal in the engine compartment as a guide and re-attach the distributor cap back on the distributor.
Step 10: Change Oil Filter and Refill Oil
Install a new oil filter and drain plug gaskets, put the car back on the ground, and refill the engine oil using steps 5-6 of this procedure.
Step 11: Test Drive
Take the car out for a test drive. You should notice much quieter valves upon cold start and at operating temperature. You might even notice a slight power increase and an overall smoother running engine.
Your car is now ready to roll until the next valve adjustment interval.