
DIY: Air-cooled Porsche 911 CHMSL Third Brake Light Repair
Does your 911 have a busted third brake light? Mine sure did. If so here’s one way to fix it.
Disclosure: This post contains links to Amazon products and other trusted vendors. As an Amazon Associate I earn from qualifying purchases.
Several years of the 911 have this external third brake light that resembles a submarine periscope or ET’s head. Decades of baking in the sun, automatic car wash brushes, heavy car covers, and vandalism usually result in them breaking off at the base and dangling on the rear decklid. Mine was no exception, and since the wiring was still intact, I decided to fix it once and for all. Here’s how you can fix yours inexpensively and keep it looking original.
Materials
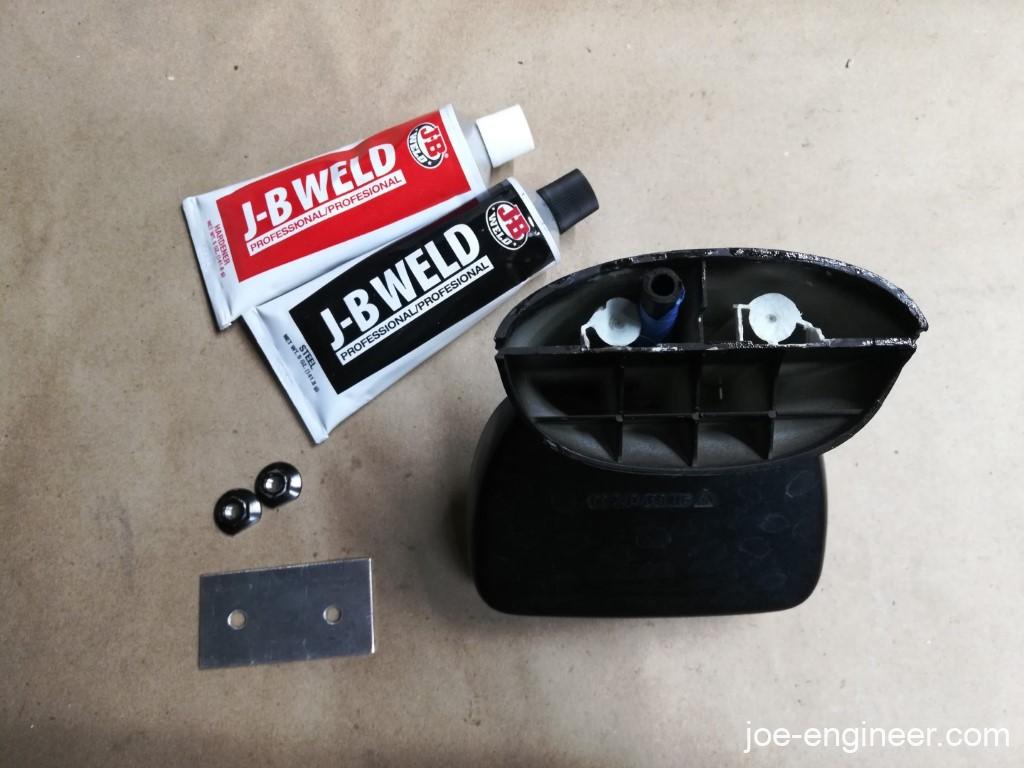
- JB Weld or similar 2-part epoxy (the overnight slow-cure kind)
- 2 M6 nuts with flanges on them.
- 2 M6 bolts, 25mm or longer
- Tin snips (straight cutting)
- Drill and 1/4” bit
- Small piece of thin sheetmetal, approximately 1”x3”
- Short piece of 1/8” or 3mm ID vacuum hose, about 12” long
- Masking tape
- Isopropyl alcohol (IPA) or acetone
- Cotton swabs
- Small rat tail file
- Bench grinder or bench vise and flat file
- Dremel tool with drum sanders and grinding rasps
- Emery cloth or sandpaper
- 12V bench power supply (optional)
Procedure
- Remove and Evaluate Damage
Removing the light is fairly straight forward. You can remove the top cover, remove the bulb, carefully pull out the spade connectors, and withdraw the wiring through the base of the housing and out the bottom of the decklid. Then you just unbolt the base from under the decklid.
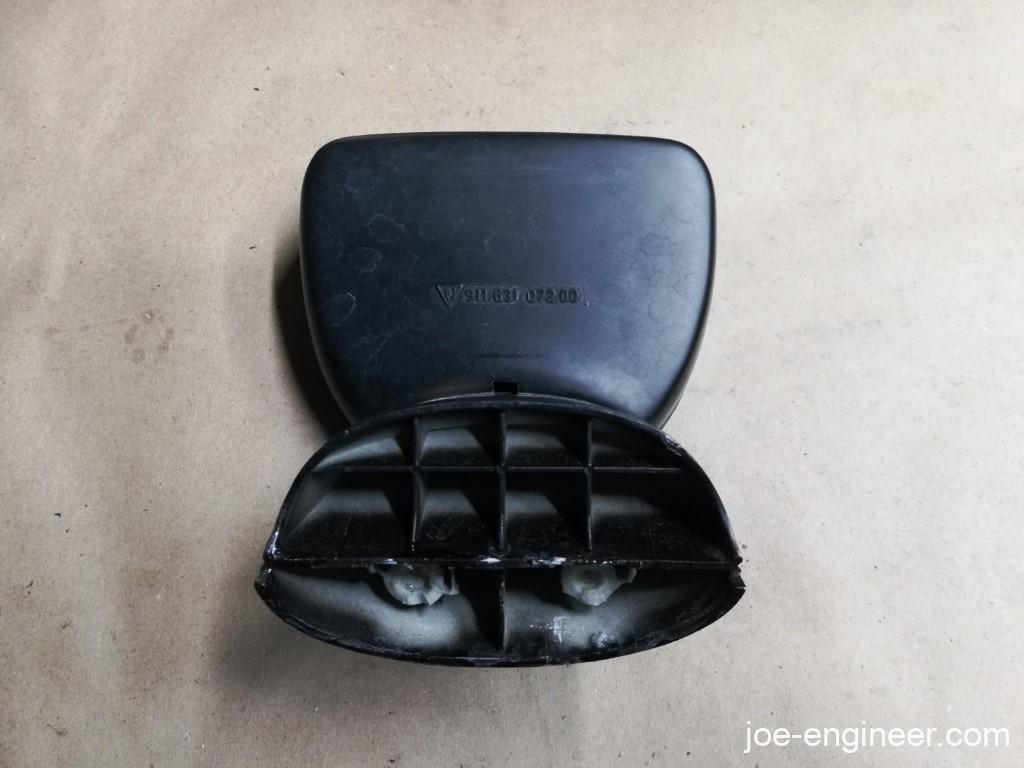
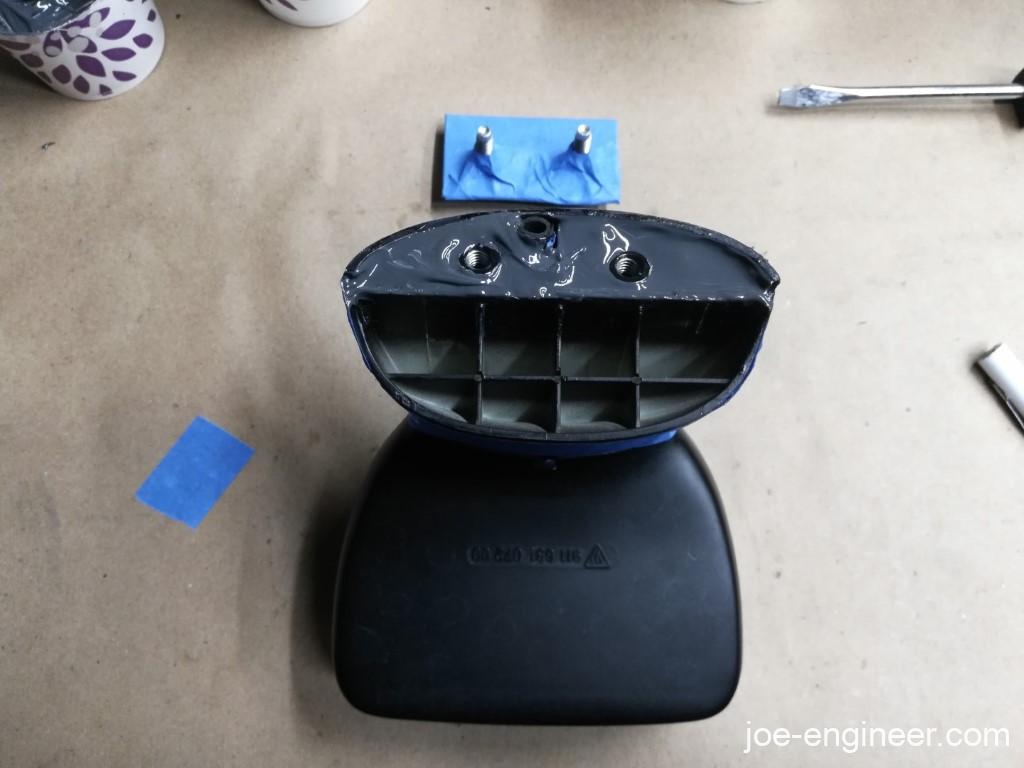
Here is my removed third brake light housing. This one has 2 busted lower threaded mounts and 1 upper threaded mount, which are the typical failure modes. You can see the failed plastic threaded bosses on the bottom. Simply gluing the broken bits together wont hold up for very long as the remainder of the plastic is still very brittle. We have to figure out how to add newer stronger threads to the bottom of this housing permanently.
2. Grind Out Damaged Material
My plan was to carefully use a Dremel to grind down the damaged threaded bosses and encase 2 steel flange nuts into the base with the flange side down so they cant pull out.
Grind down the damaged plastic bosses deep enough to sink the flange nuts flush or just below the bottom edge of the housing. Using a bench grinder or a file and bench vise, you may have to grind a flat edge on each nut so the nut centers line up with the original bolt hole centers. This has an added benefit of becoming an anti-rotation feature so the nuts don’t spin in place as you turn the bolts.
3. Prepare Cavity for Bonding
If you can get your fingers in there, roughen up the insides of the surrounding cavity with a bit of sandpaper to give the epoxy a surface to bite into. You are going to fill that entire cavity where the threaded bosses were, with JB Weld. Blow out any dust and wipe the inside surfaces of the cavity with some IPA alcohol for bond preparation. No, not India Pale Ale!
4. Plug Wiring Hole and Mask Housing
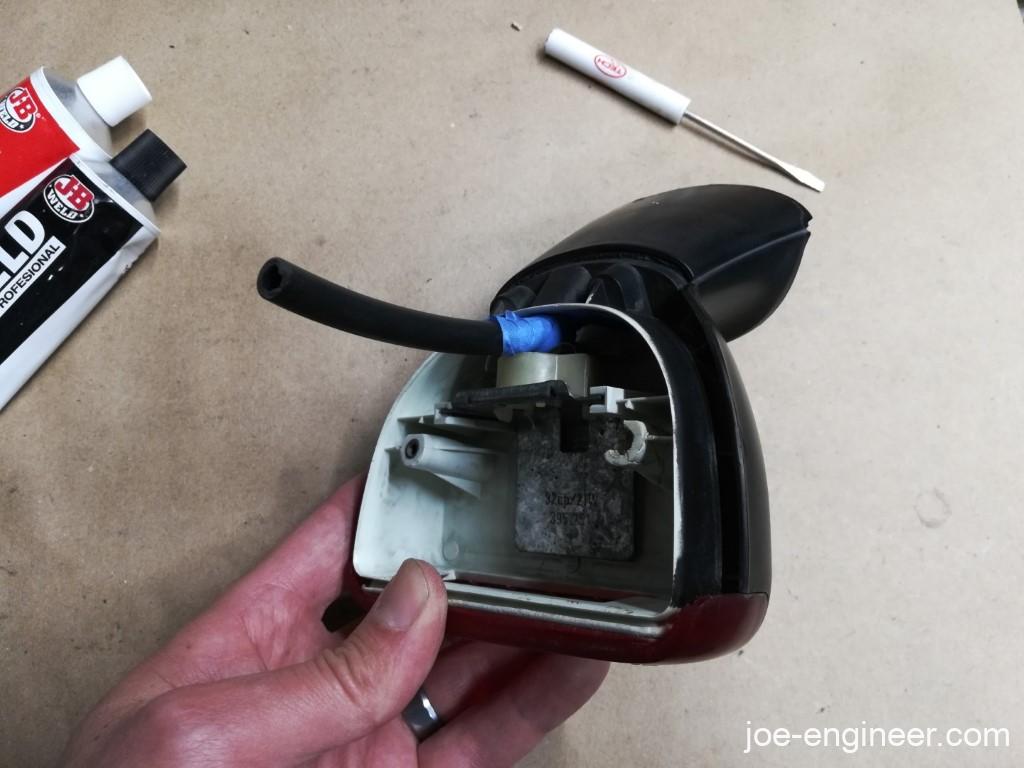
The light wiring travels through a hole in the housing that must stay open. A short piece of vacuum hose should keep the hole clear of epoxy. I trimmed it so I could pull it out from the top once the adhesive cures but you could pull it out from either direction. Some masking tape on the vacuum hose surface should prevent the JB Weld from sticking to it. Mask the exterior surface of the housing (nearest to the bottom) with tape so you don’t get any epoxy on it.
5. Make Jig Plate
I cut a scrap piece of aluminum and drilled 2 1/4” holes in it the same distance apart as the lower mounting holes on the base. You can double check the hole centers’ distance on your decklid for the right measurement. Put 2 M6 bolts through the jig plate holes and thread the flange nuts onto the bolts so the ends of the bolts are flush to the flange surfaces. Put masking tape on the bottom of the nut flanges to keep the exposed ends of the bolts from sticking to the JB weld. This assembly will keep the nuts approximately parallel to each other and perpendicular to the light housing bottom while the JB Weld cures.
6. JB Weld Time
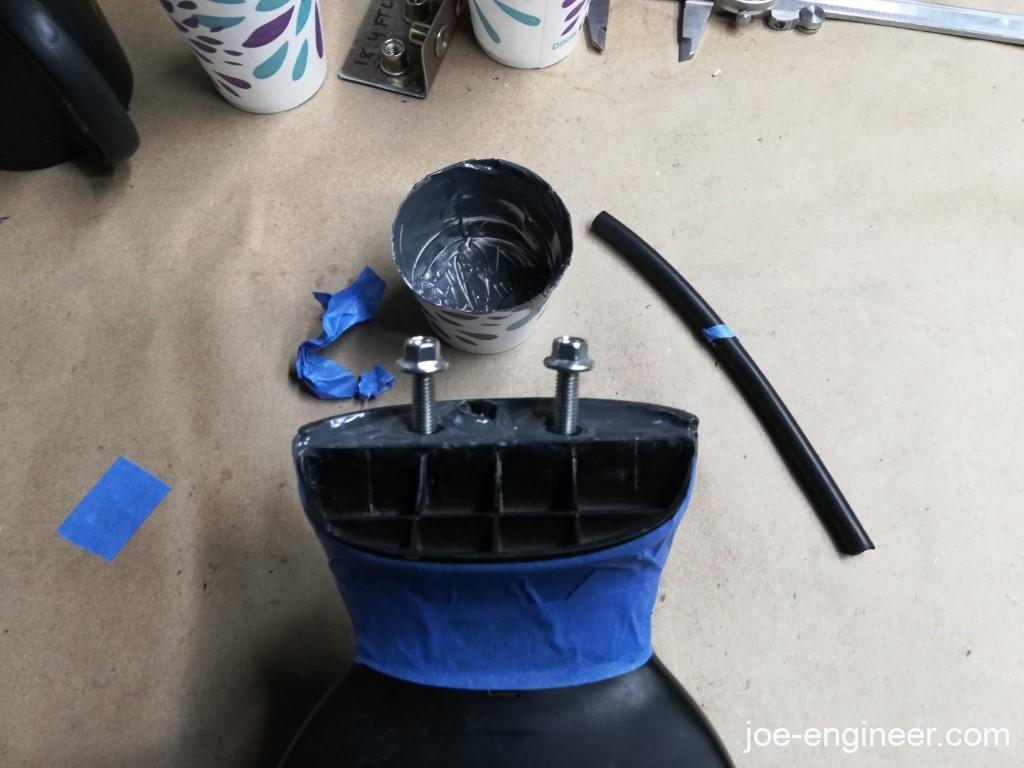
Mix a nice generous batch of good old JB Weld, the kind that cures slowly overnight, not the 5 minute kind. I like to use a paper cup to mix it up, then start to fill the light housing cavity with it. It will be fairly runny and start to make its way to the bottom of the cavity. This is a good time to prop the third brake light housing upside down so the epoxy starts to level out. The reason you want to use the slow-cure JB Weld is that it gives you plenty of working time to get the nuts, bolts, and jig all set up in the correct position. It also allows the epoxy to stay runny and completely fill the cavity and let any air bubbles rise to the top. Lastly, if you smear any on the outside of the light housing, you have time to wipe it off with acetone or alcohol.
7. Insert Flange Nuts in Epoxy
With the nuts and bolts assembled on the jig, lower the bolts into the JB Weld with the flanges facing down and the ground flat spots on the flanges against the wall as close to the original threaded locations as you can. You want to submerge the flange nuts completely but do not let any JB Weld stick to the bolt threads or you wont be able to get them off once its cured. You can use masking tape to help prop the bolts and sheetmetal jig in their final position while the JB Weld cures.
This is a very crude way of keeping the potted flange nuts approximately in the correct position. You may even get away with using a piece of cardboard instead of the sheetmetal. If you want to get exact, you could cut a thick piece of plastic or wood and drill two holes in it with a drill press, that way the bolts and nuts will be perfectly parallel to each other axially.
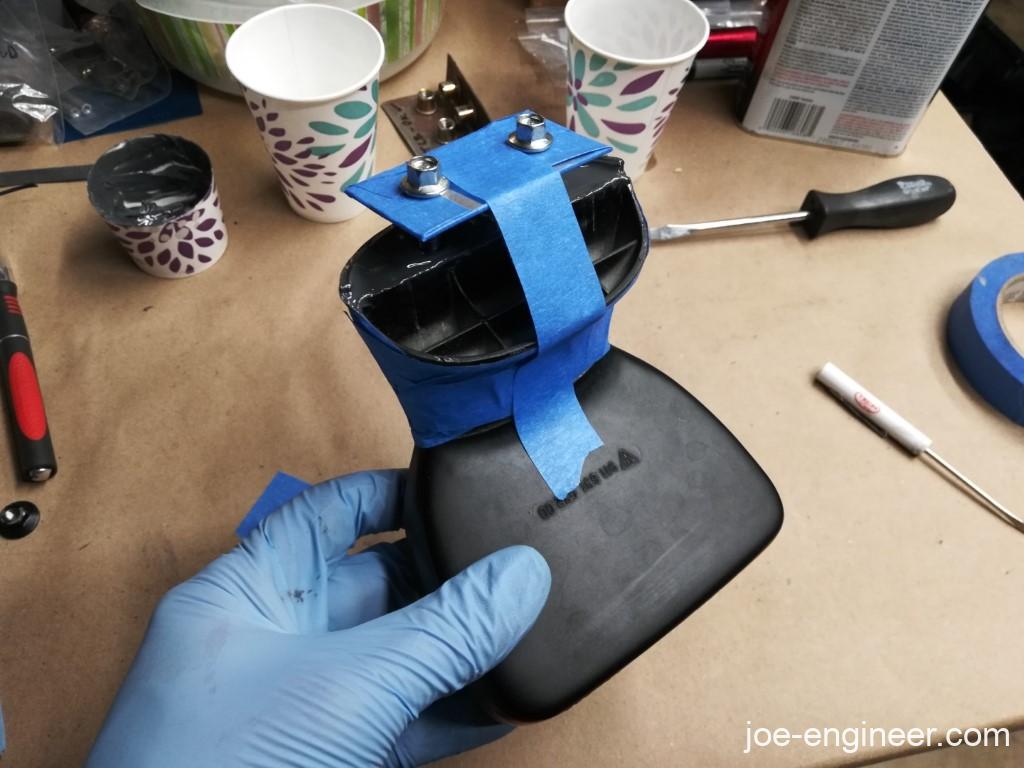
Prop it so the bolts are perpendicular to the bottom face of the housing and the adhesive stays level and let it cure overnight.
8. Remove Bolts & Vacuum Tube
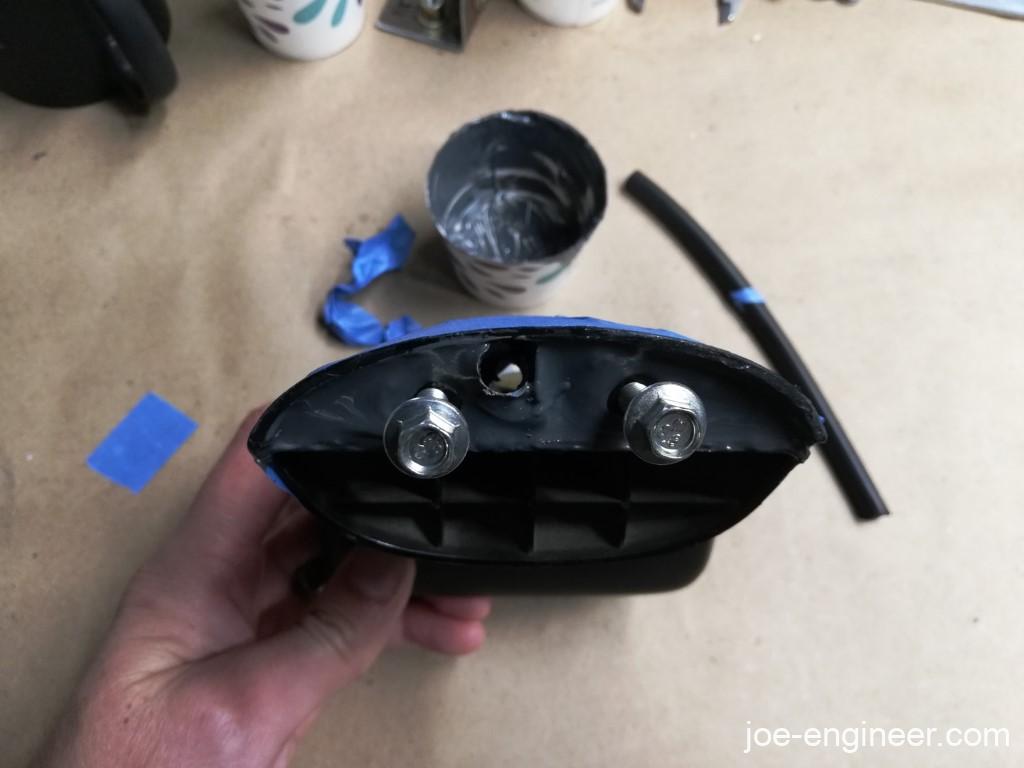
The next day, remove the bolts and the jig plate. You should have a pair of new threads at the bottom of your light housing that look like this.
Pull out the vacuum line and re-insert the bolts. Mine are not perfectly parallel but they are going through a thin sheetmetal decklid and a rubber gasket so any mismatch in the bolt axes shouldn’t be a big issue.
9. File & Sand As Needed
Observe that the wiring hole is clear. You can enlarge the hole with a bit of filing with a round file to allow the spade connectors to slip through. Also, with a Dremel and drum sanders or a flat file, flatten any high spots on the surface of the JB Weld that would prevent the light housing from sitting flat on the gasket and decklid.
10. Repeat Steps 1-9 On Upper Mounts
On my unit, a similar repair was required to one of the top mounts. The right side white plastic base cracked but the brass threaded insert was still there. If you have the same issue, make a dam with tape to isolate it from the main cavity where the light bulb and electrical contacts live and goop in the JB Weld. Take one of the screws that attach the top lid of the light housing, mask it with tape and use it to adjust the final position of the brass insert in the adhesive.

When finished, test fit the light housing cover and grind the JB Weld as needed. Here is how the repaired finished housing looked, ready to install.
If you have access to a 12 volt power supply, give it a quick bench test to make sure it still lights up after the repair. None of the JB weld should come in contact with any bare electrical contacts.
11. Reassemble
Reassemble everything with a new gasket and reconnect the wiring.

That’s it! If you were careful and protected the exterior surface from contamination, no one will ever know it was repaired, and it should now be rock solid for another couple of decades.
Next time we will see what we can do about our leaky 915 gearbox.