
DIY: Oxygen Sensor Replacement on a Classic Air-Cooled Porsche 911
If you are chasing emissions issues on your Porsche 911 you may find yourself needing to replace the oxygen sensor. Read on to find out how to do this quickly.
Note: The following information is for educational use only. Before proceeding please read my disclaimer page.
Disclosure: This post contains links to Amazon products and other trusted vendors. As an Amazon Associate I earn from qualifying purchases.
The 1980-1989 air-cooled Porsche 911 has a single oxygen sensor mounted upstream of the catalytic converter on the left side of the engine. Fortunately it is very easy to access and fairly inexpensive, so if you are dialing in a tune for more power, getting ready to pass an emissions test, or simply think it may be faulty, follow along below.
Model Years Applicable:
Porsche 911 cars 1980-1983 911SC and 1984-1989 3.2 Carreras. Turbos are not included as their exhaust systems are very different and require a different replacement procedure.
The photos and parts shown here are on a 1983 911SC but the general procedures apply to all years within this range.
Tools Needed:
- Jack stands
- 1 floor jack
- Jack pad (available at any European parts supplier)
- Safety glasses
- Penetrating oil
- Oxygen sensor socket
- 3/8” Ratchet
- Torque wrench
- Wire stripper/crimping tool
- Heat gun
- Thin plastic trim removal tool
- Service manual for your car’s model year
Parts Needed:
- Qty 1 oxygen sensor (this is literally the one I have)
- Because this procedure covers a model year range spanning 2 different engines and fuel systems, it is recommended that you search the Porsche PET or your favorite parts supplier’s catalog for your car’s specific oxygen sensor part number.
Replacement Procedure
Note: This is only a sensor replacement procedure that should be supplementary to the fuel system diagnostic procedures present in your factory service manual. Remember that if your car has a pre-existing problem that caused the original oxygen sensor to go bad, it could ruin your new sensor very quickly. Consult your factory service manual to address the remainder of your fuel system and oxygen sensor diagnosis, as it is beyond the scope of this procedure.
Step 1: Raise Rear of the Car
Raise the rear of the car on jack stands using this procedure. Remove the left rear wheel for better access.
Note: Let the car cool down overnight. Catalytic converters get extremely hot.
Step 2: Remove Catalytic Converter Splash Shield
All cars of this year range came from the factory with a metal splash shield that bolts to the bottom of the catalytic converter with a few bolts. If yours is still present, remove it at this time for better access to the sensor. On many cars such as mine, the shield is long gone.
Step 3: Loosen Sensor and Identify Sensor Type
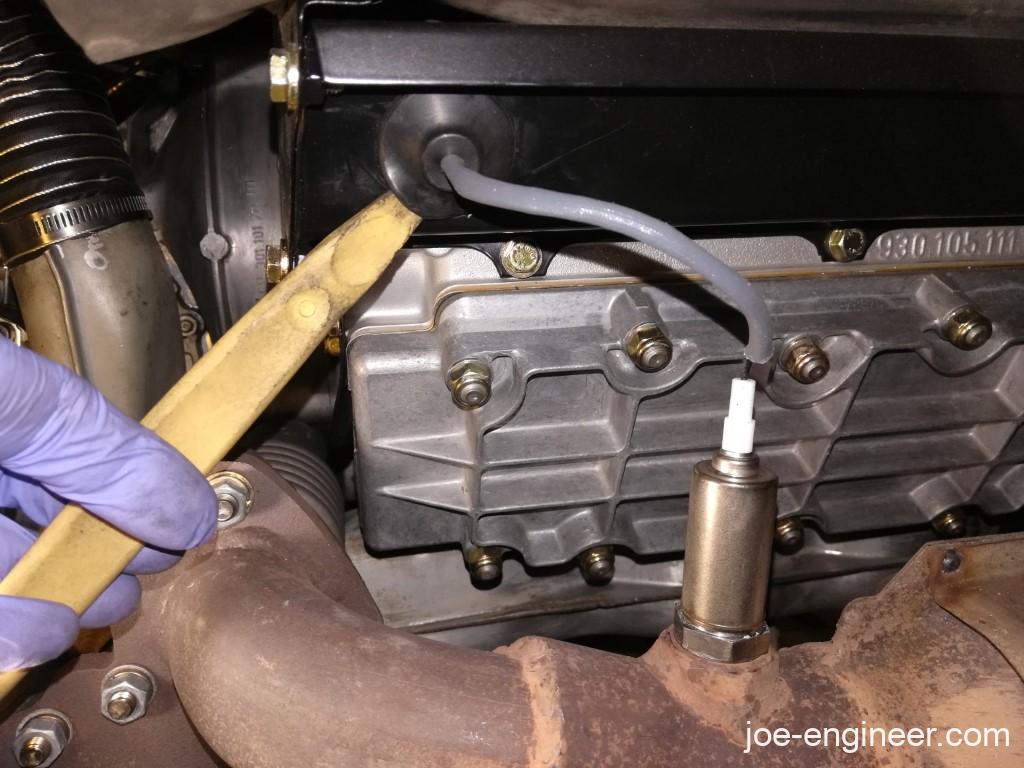
Locate the oxygen sensor screwed into the top of the catalytic converter inlet. On cars 1983 and later, there is an additional clip-on shield over the exposed body of the oxygen sensor itself. Pull this sensor shield off at this time. Most cars will have this shield missing by now.
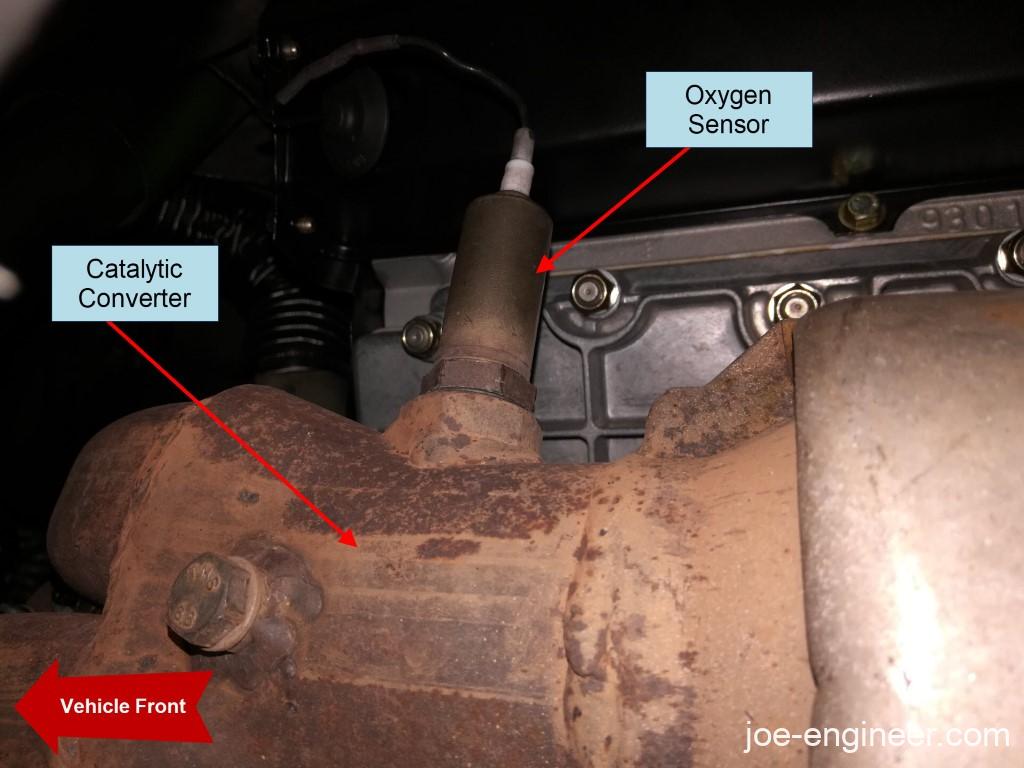
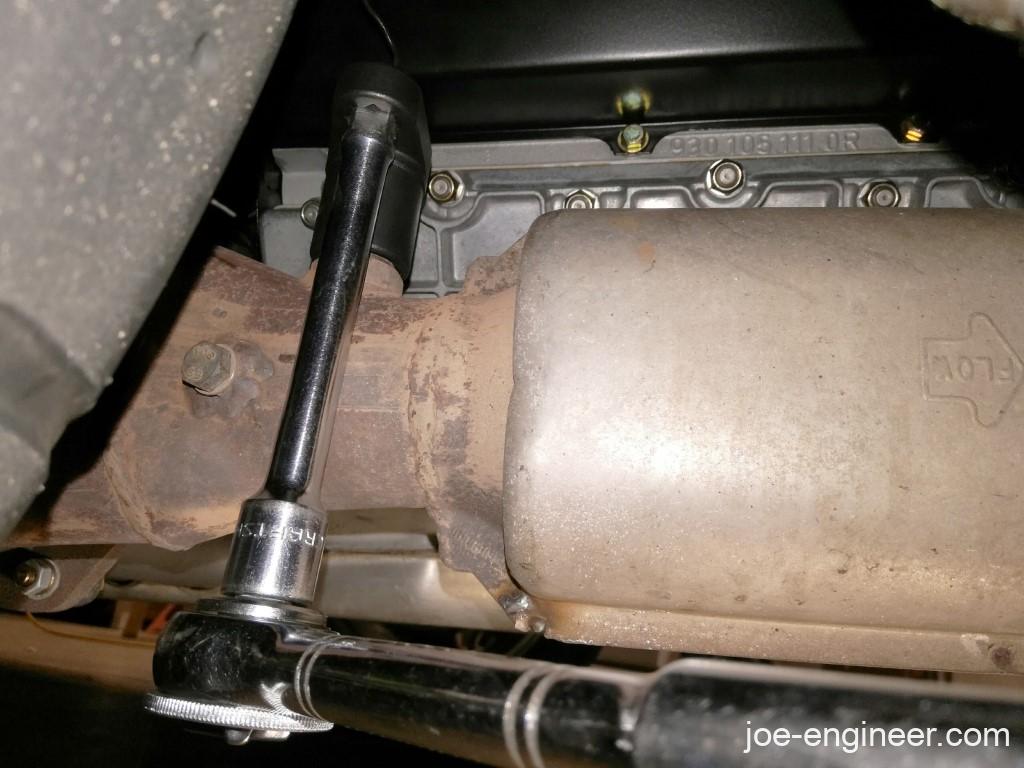
You will now need an oxygen sensor socket, which is simply a crow’s-foot deep-socket with a slot cut out of the wall so you can slip it over the sensor wire and sensor body to the hex fitting.
You may need to get creative with the ratchet orientation due to clearance. Break the sensor threads loose and leave it in place for now.
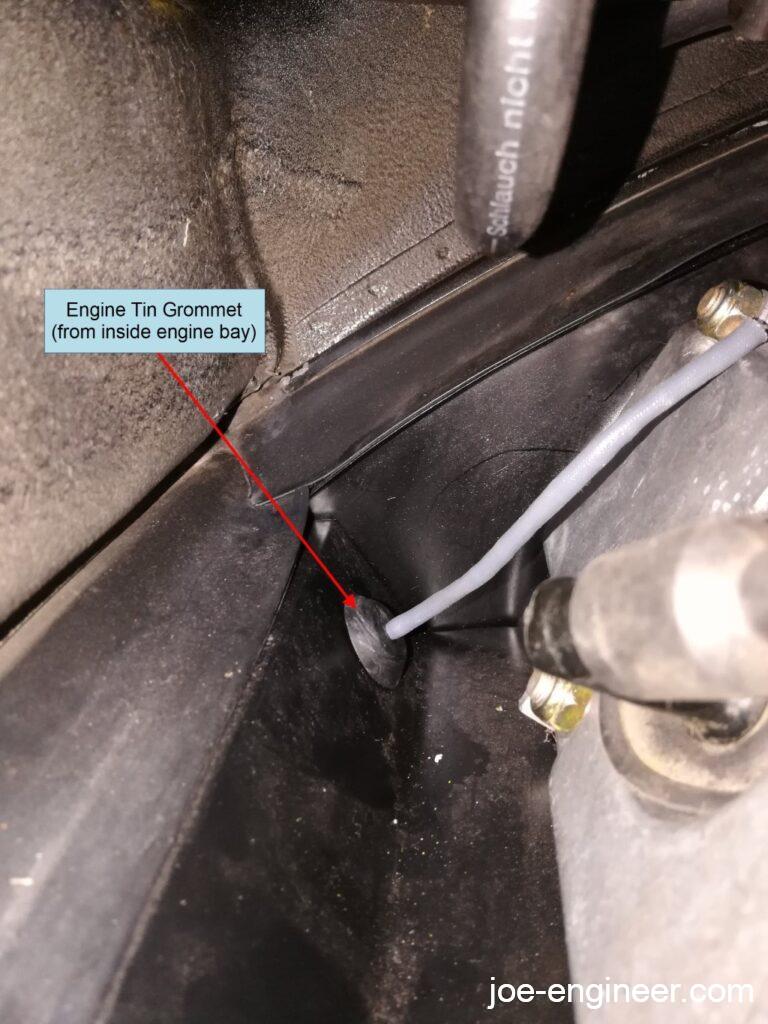
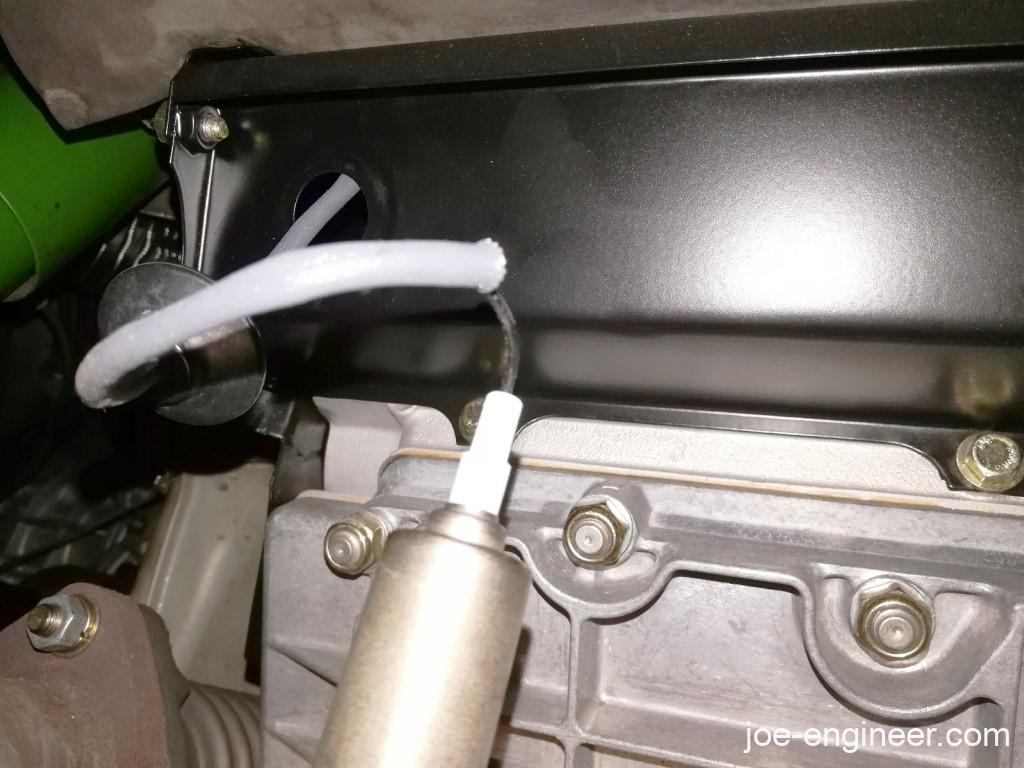
Notice how the sensor wire goes through a round grommet in the engine tin.
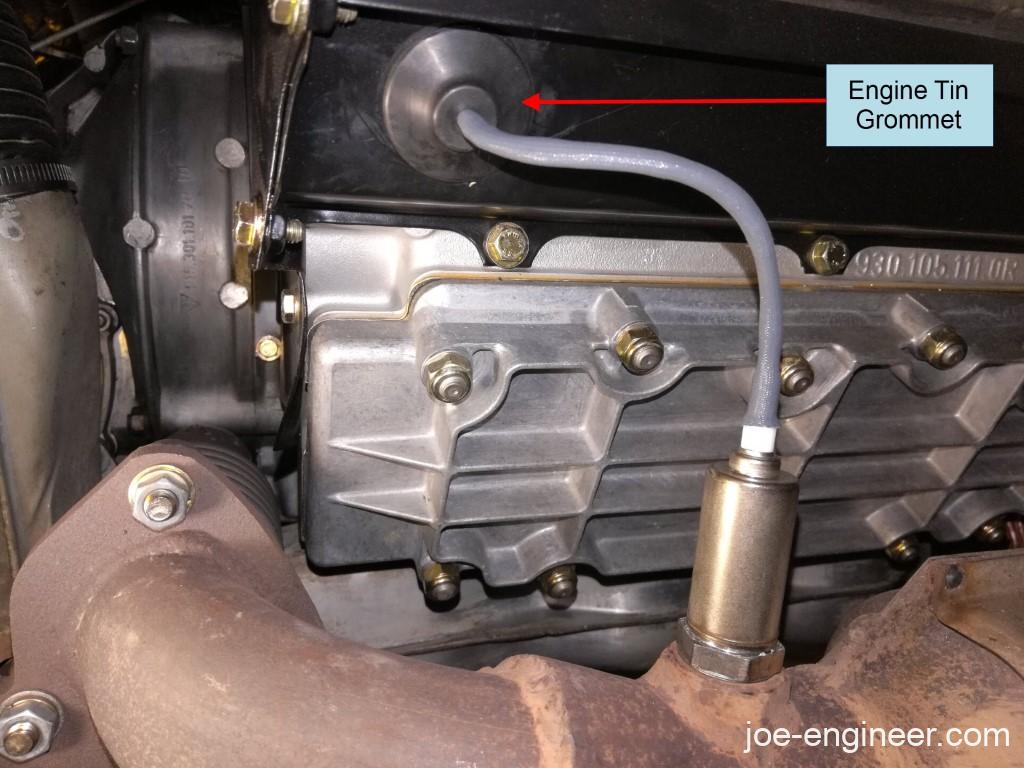
On the lower left side of the engine compartment, near the firewall, locate the oxygen sensor wire connection. If you search for the round grommet in the engine tin, you can follow the wire coming out of the center and follow it to the connection to the engine harness.
Sensor Connection Types
Note: Determine what kind of sensor connections to the engine wiring harness are present, that way you order the correct one and avoid having to hack any connections. For maximum reliability it is strongly recommended you keep the engine harness connections as they came from the factory.
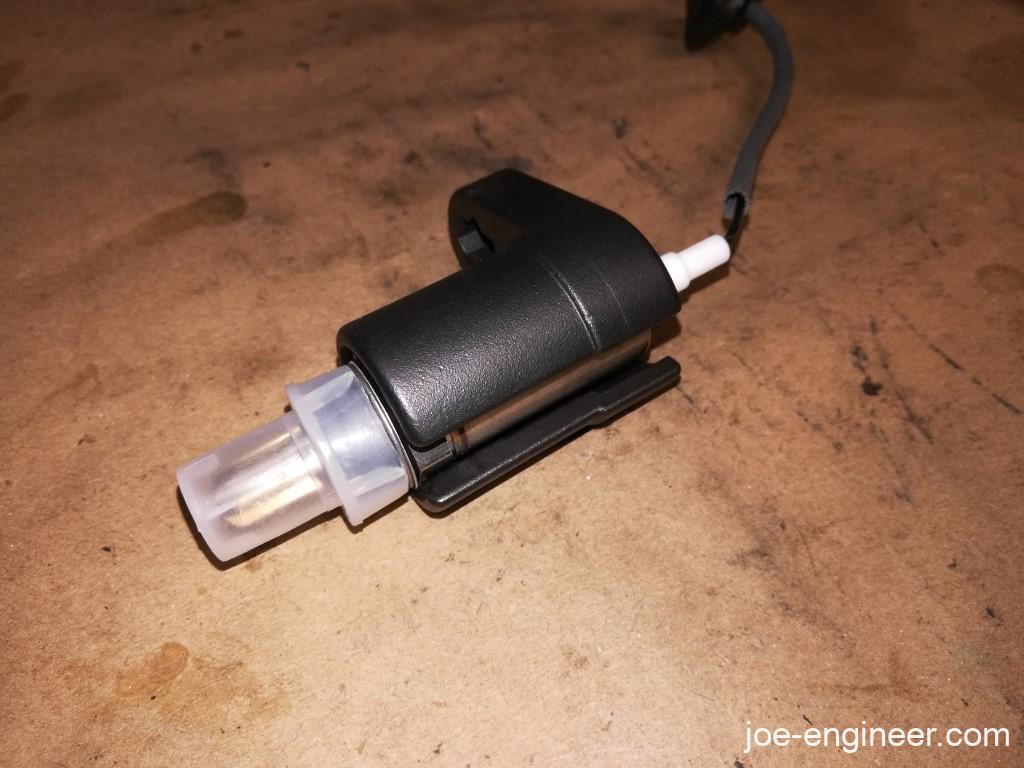
There are 3 types of connectors you may encounter at the end of your oxygen sensor.
If you have an 1980-1983 911SC your oxygen sensor will only have this single-wire round connector. If you have an 84-85 Carrera it should have the same connector plus a 2 prong plastic connector for a sensor heating circuit. If you have a 1986-1989 Carrera you will have a single round connector with all 3 wire connections in it, one for the oxygen sensor wire and 2 for the heating circuit.
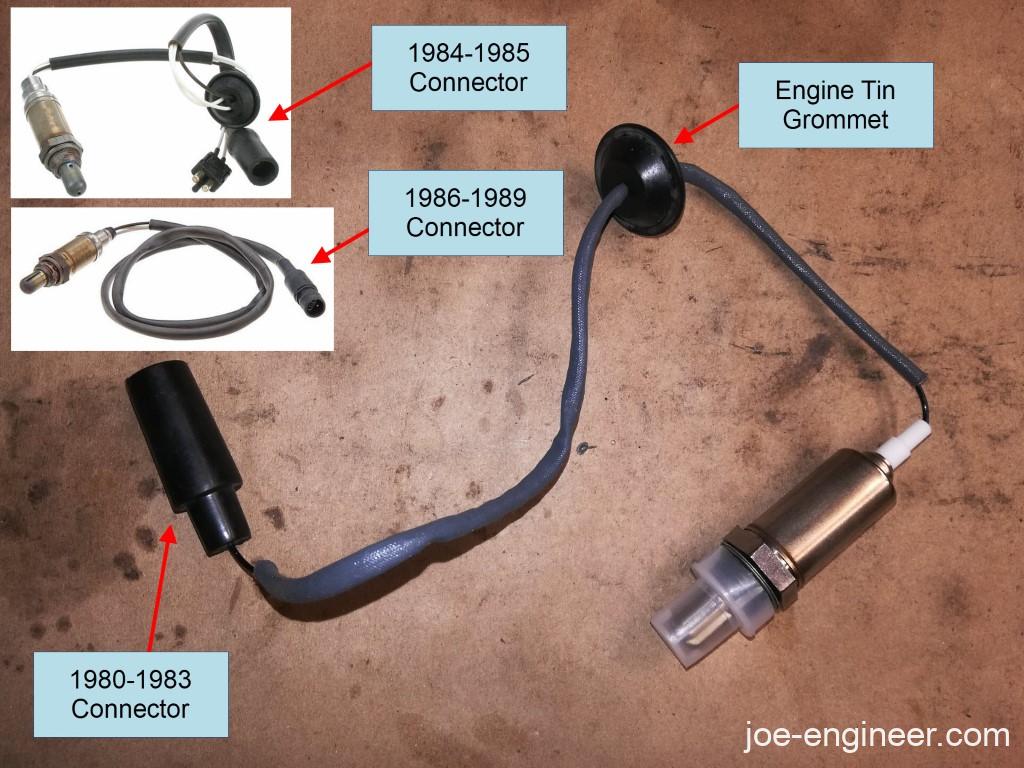
At the other end of these sensor connections will be the mating connectors to the engine wire harness.
If you have an 1980-1985 car and are lucky enough to still have the factory mating connector, it will look something like this. A cylindrical male plastic fitting with a metal center pin clamped to a metal tab in the engine compartment.
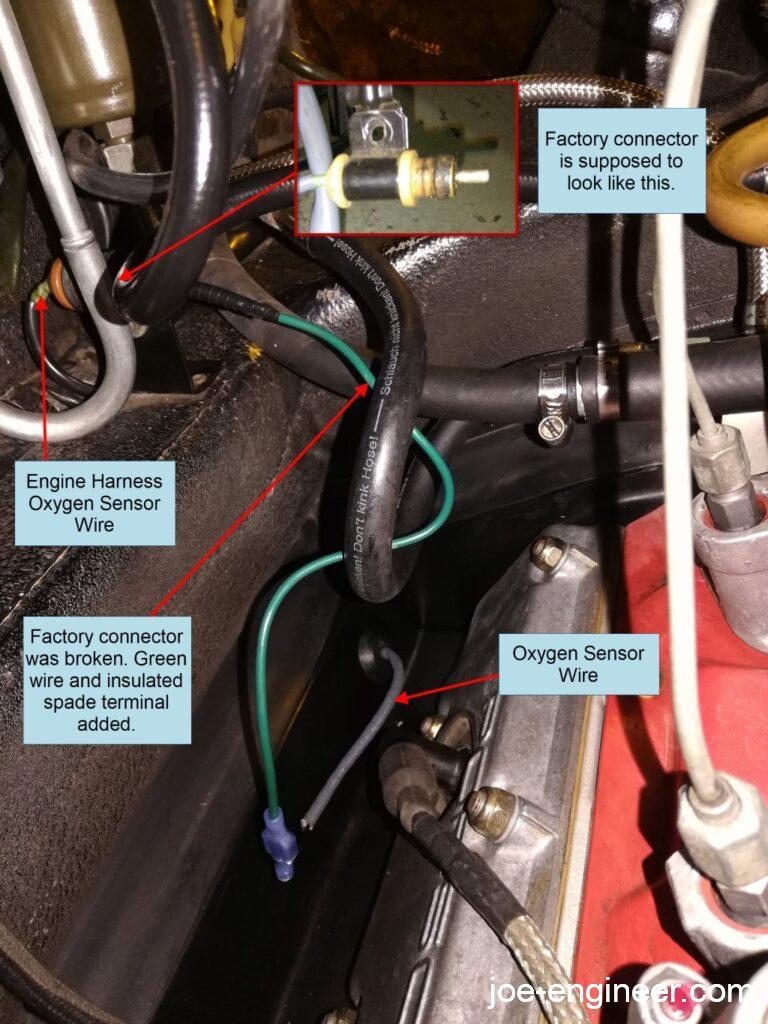
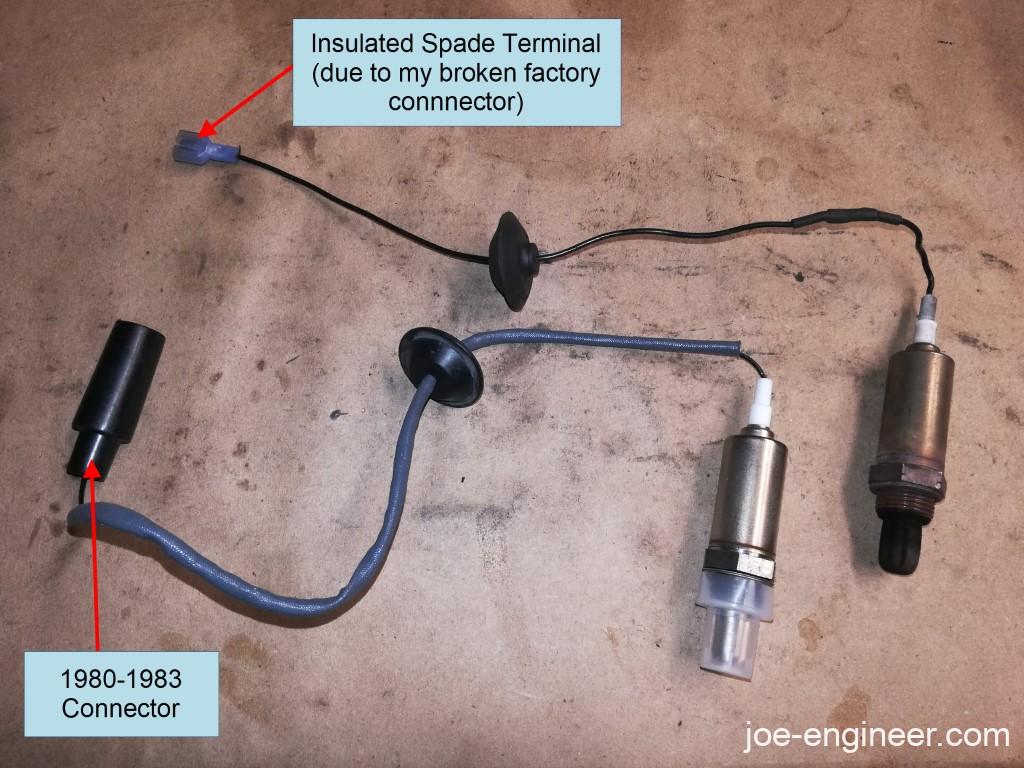
Most of these have crumbled into dust and new replacement connectors are not readily available. On my personal car, out of necessity I crimped on an additional length of green wire and an off-the-shelf insulated spade terminal to the engine harness connection, which forced me to replace the sensor connector with a matching spade terminal as well. I am in the process of sourcing a factory connector to return it to stock.
Step 4: Install New Oxygen Sensor
If your oxygen sensor connections are as they came from the factory disconnect the sensor from the factory harness from inside the engine compartment. Push out the engine tin rubber grommet towards the bottom of the engine using a plastic trim tool.
Unscrew the sensor from the catalytic converter and remove it along with its old grommet and wiring and connector(s).
Install the new sensor by feeding the new connectors through the hole in the engine tin from below. If you would like, apply a bit of anti-sieze on the sensor threads before screwing it in the catalytic converter. Screw the sensor and spin the wiring by hand so it doesnt get twisted. Use your oxygen sensor socket to tighten the sensor as much as you can by hand. Once the sensor is torqued in place, seat the rubber grommet in the engine tin hole. This may require significant manual effort to get the stiff rubber grommet seated correctly. Use the edge of the plastic trim tool to gradually work the grommet in place.
Once the grommet is seated correctly, connect the sensor to the engine harness connection(s) inside the engine compartment.
Universal-Type Sensors
In a pinch, you can use a universal-type oxygen sensor with pigtail connections. You just need to make sure it outputs the same voltage as the factory one.
On the 80-83 SC it is very easy to crimp on the new single-wire sensor to the existing factory connection to the engine harness. On the 1984 and later cars (using 3-wire sensors) you will have to identify each sensor wire going to the factory sensor connector to connect each pigtail correctly. These sensors will typically have a simple diagram identifying each wire.
If you are installing one of these universal-type oxygen sensors, make the crimp connection as far away from the catalytic converter as possible to keep the heat shrink tube away from the excessive heat. If the new sensor pigtails are long enough make the crimp connection inside the engine compartment.
Step 5: Replace Catalytic Converter Shield
If your oxygen sensor had the small shield in place you may clip it back on at this time. If you had a catalytic converter shield bolt it back underneath the catalytic converter.
Step 6: Put Car on Ground and Test Drive
Replace the rear left wheel, put the car on the ground, and take the car out for a test drive. If the rest of your fuel system and emissions components are in good order you should notice a smoother idle and improved performance and gas mileage over time.
Your oxygen sensor replacement is now complete.