
DIY: Ignition Components Tune-Up on an Air-Cooled Porsche 911
Refresh your ignition components for an easy fix to misfires, idling, and a poor-running engine.
Note: The following information is for educational use only. Before proceeding please read my disclaimer page.
Disclosure: This post contains links to Amazon products and other trusted vendors. As an Amazon Associate I earn from qualifying purchases.
Your air-cooled Porsche 911 has a tried-and-true distributor driven spark ignition system that is very likely overdue for service. The first step in a complete ignition tune up is replacing the typical items that wear out such as the distributor cap, rotor, spark plug wires, and plugs to eliminate those as sources of problems. If your engine is idling and running a bit rough, follow the procedures below to make some noticeable improvements quickly and inexpensively.
Model Years Applicable:
All Porsche 911 cars up to 1989 with factory ignition. This procedure does not apply to cars with twin-plug or aftermarket ignition systems. This particular installation is on a 1983 911SC.
Tools Needed:
- Safety glasses
- Factory tool kit swivel spark plug socket
- Factory tool kit hex wrench for spark plug socket
- Swivel spark plug socket (if your factory tool kit one is missing)
- Ratchet (if your factory tool kit hex wrench is missing)
- Spark plug gap tool
- Torque wrench
- Screwdriver set
- Masking tape
- Permanent marker
Parts Needed:
- Distributor Cap
- Distributor Rotor
- Spark Plug Wires (set of 6)
- 6 Spark Plugs
Distributor Cap and Rotor Replacement Procedure
Open the engine lid and locate the distributor to the left of the cooling fan.
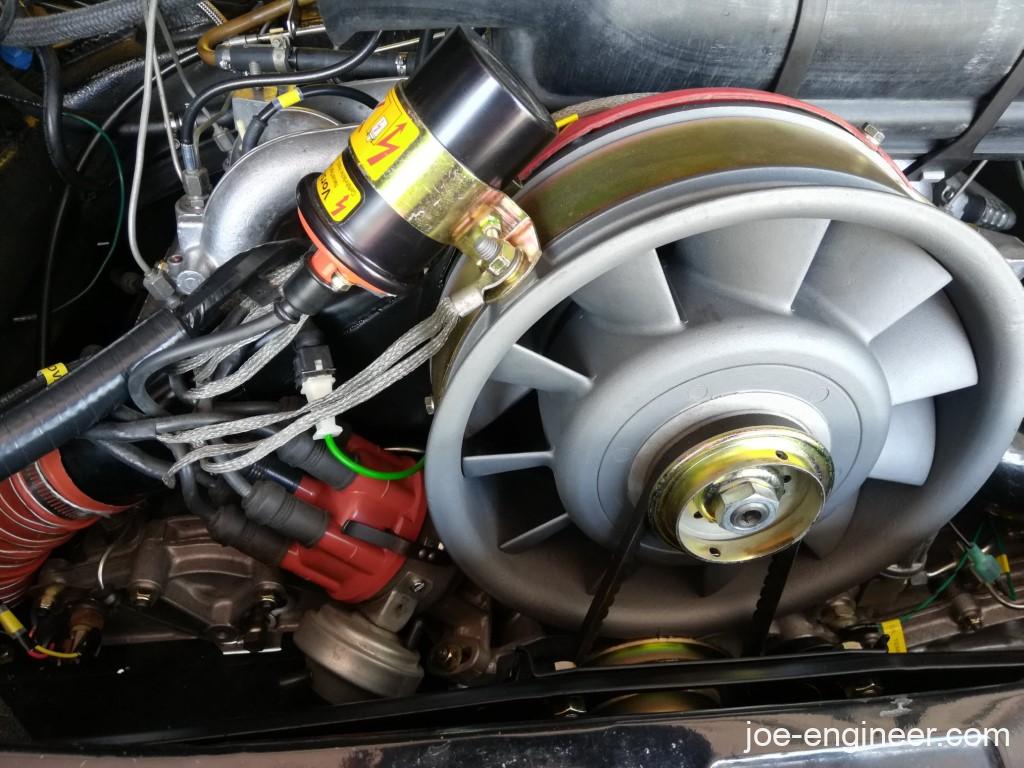
The heating and ventilation system of the 911 changed numerous times over the years and some cars may have a flexible air duct partially blocking access to the distributor. If this is the case with your car, disconnect any hose clamps necessary to move air ducting out of the way to get to the distributor.
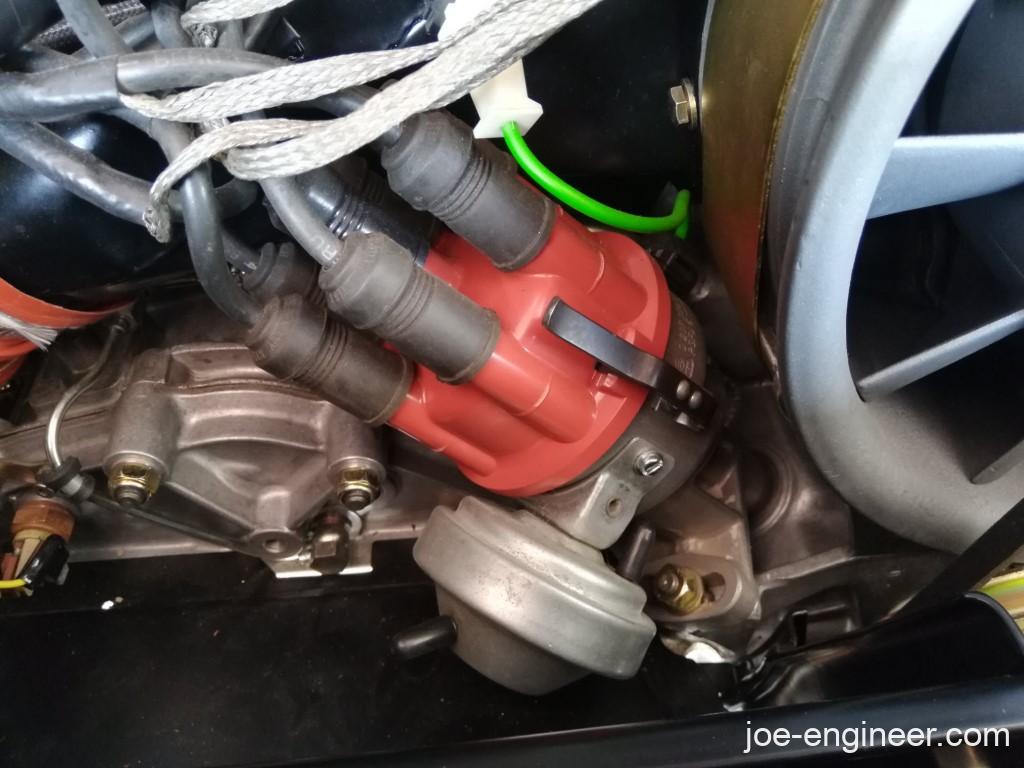
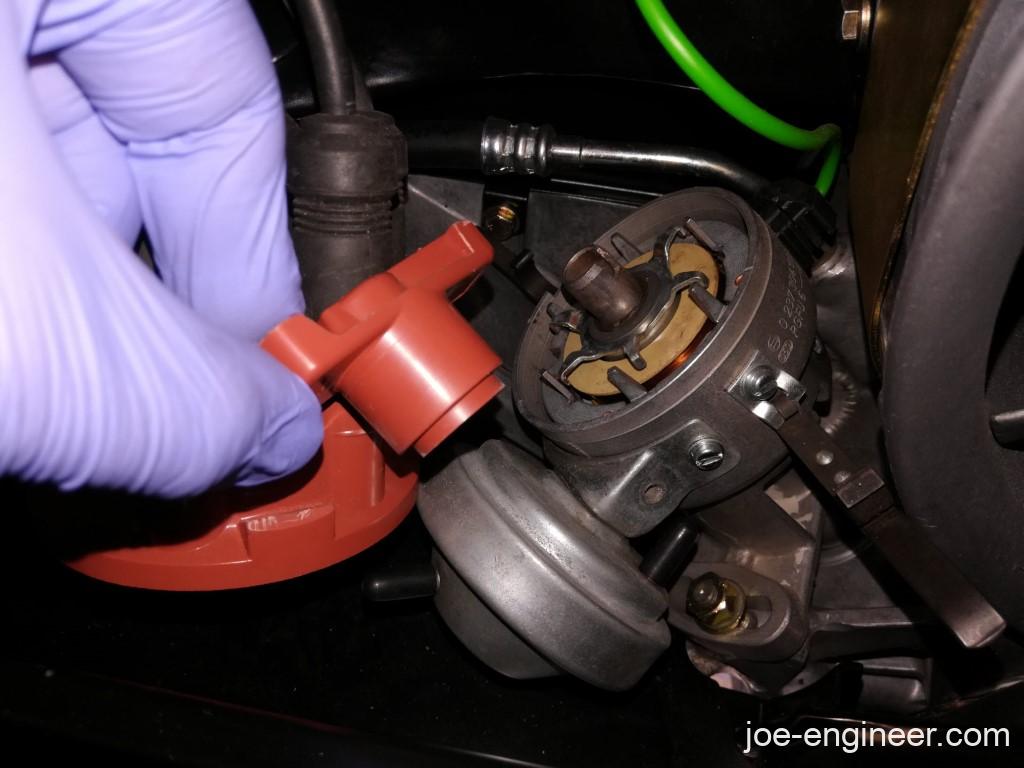
Unclip the distributor cap to release it from the distributor body and set it aside.
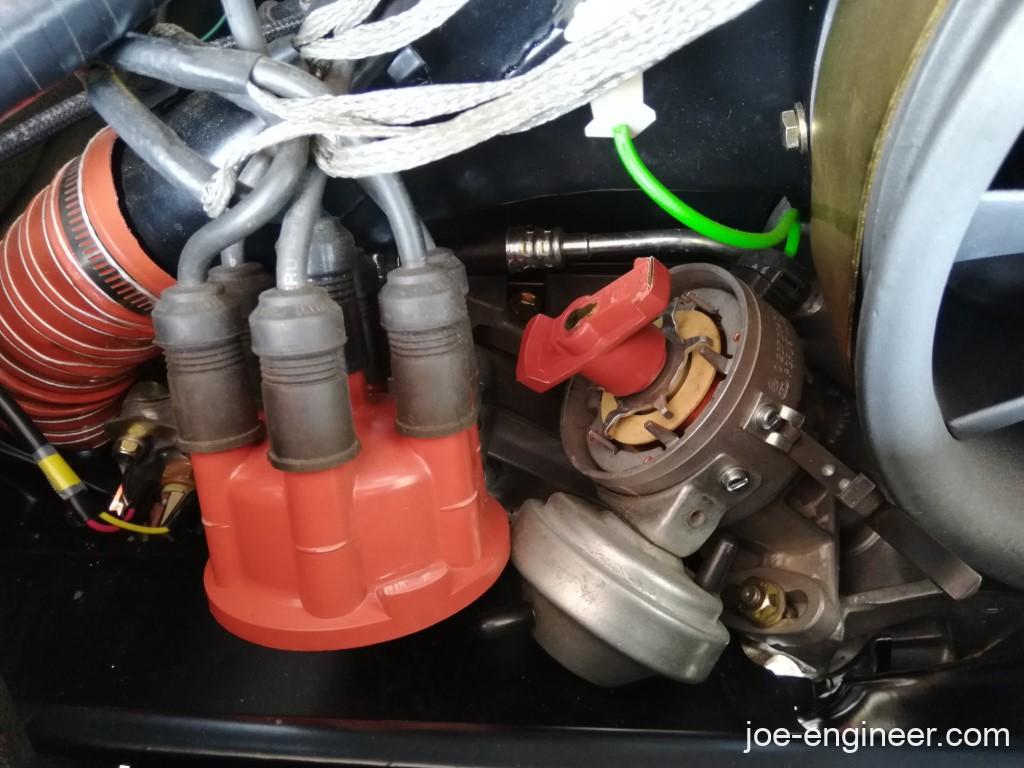
Pull out the rotor in the center of the distributor body. Push in the new rotor until it is fully seated.
On 1976 and earlier cars the distributor will contain contact breaker points under the rotor that wear out and need to be replaced occasionally. We will not cover this item as it requires setting a point gap and checking the dwell angle and timing which is beyond the scope of this article. Consult your owners’ manual for the contact breaker point settings for your particular car.
Before pulling spark plug wires off the old distributor cap, note the engine firing order listed on a decal at the base of the engine compartment opening as well as in the owners’ manual. It shows the location of each cylinder, the firing order, as well as the direction of rotation of the distributor.
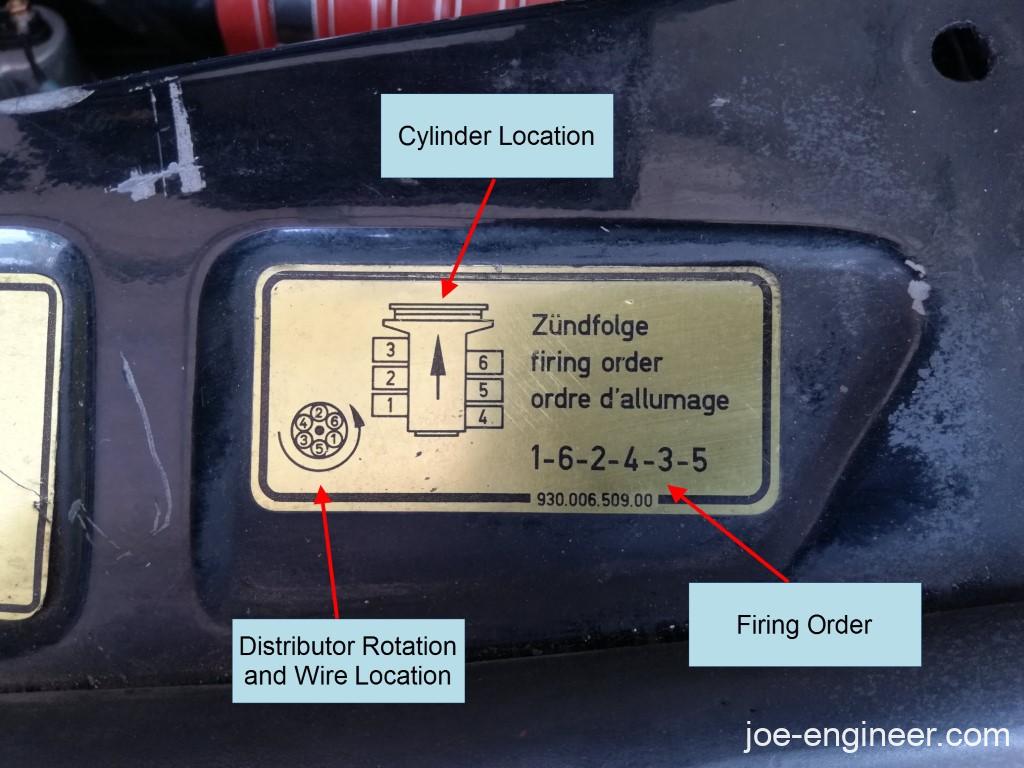
Using the firing order decal, check the plug wire installation in the cap by looking for the thin notch on the top edge of the distributor body. When the rotor points to this notch cylinder 1 is firing. The distributor rotor rotates counterclockwise through the firing order 1-6-2-4-3-5. Starting with the wire that sits directly above the cylinder 1 notch, follow the wires counterclockwise on the cap and they should match the firing order and cylinder location on the decal.
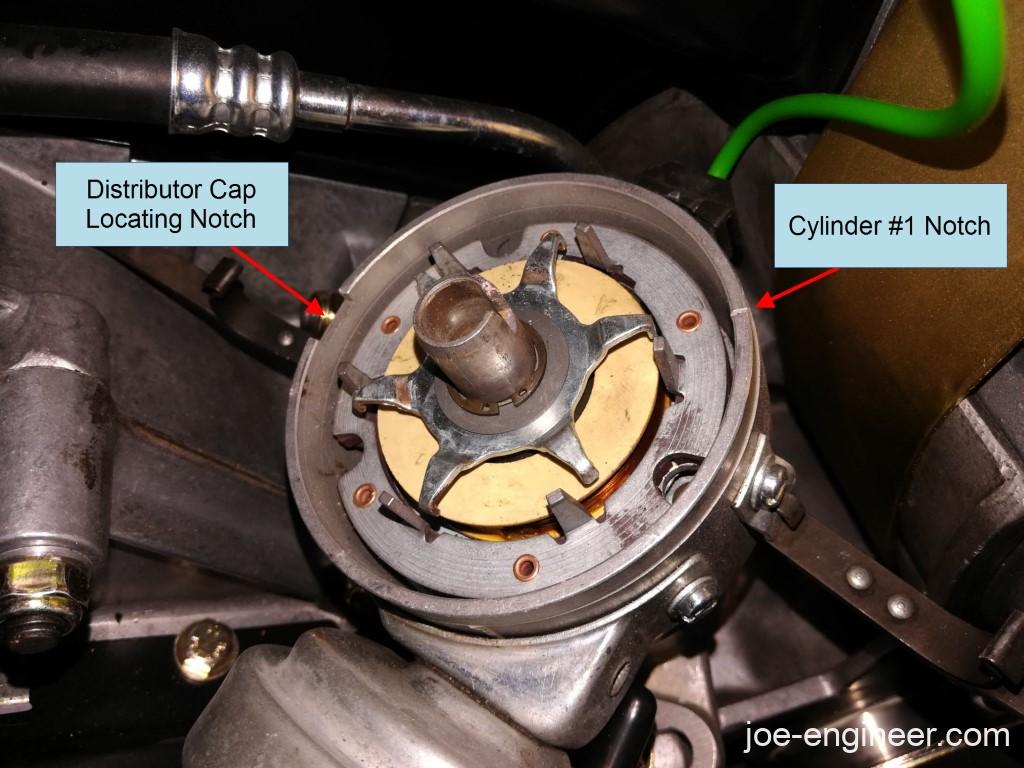
After becoming familiar with the firing order and cylinder locations, wrap a piece of masking tape over each wire and write the cylinder number on it. Turn the distributor cap over and look for the locating key feature that fits into the large notch of the distributor body. You will use this to keep the old and new distributor caps in the same orientation. You can also write the numbers inside the new distributor cap if that makes it easier to keep track of things.
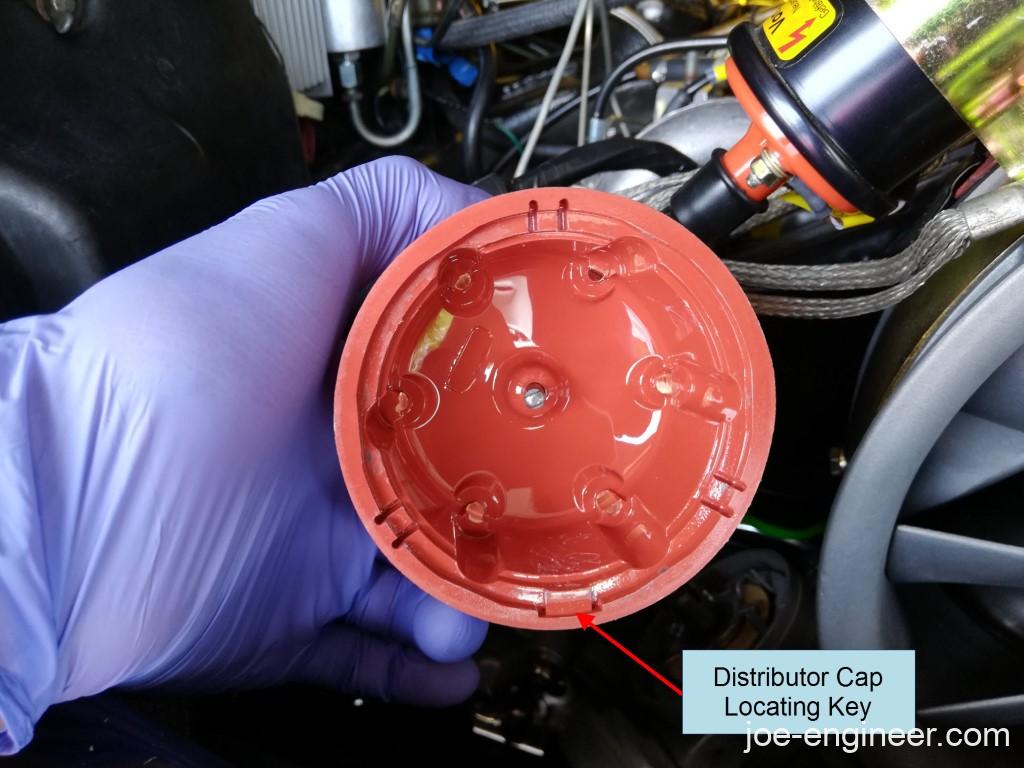
Use the distributor cap locating key and the labels on the wires to pull the wires off one-by-one and plug them into the new distributor cap in the same location as in the old cap. Make sure the wires are fully seated into the new cap.
Once all the wires are connected to the new distributor cap, place the cap on the distributor, making sure to seat the locating key into the large notch on the distributor body. Engage the inner distributor clip first then snap on the outer one. Reconnect any air ducting that was disconnected to access the distributor cap.
The distributor cap and rotor replacement is now complete.
Spark Plug Wires Replacement Procedure
Replacement of the spark plug wires is fairly straight-forward. On all cars except CIS K-Jetronic cars (1973-1983) you can pull a wire off the cap, pull the plug connector off the spark plug at the valve cover end, and swap in a new individual wire of the same length. Be gentle when removing and inserting plug wires into any of the plastic plug wire holders on the engine as they could be brittle and break. If you are replacing the spark plugs, drop the long plug connectors into each spark plug hole to remember where each one goes but don’t seat them until after you have changed the plugs. Read the next procedure below for the spark plug replacement procedure.
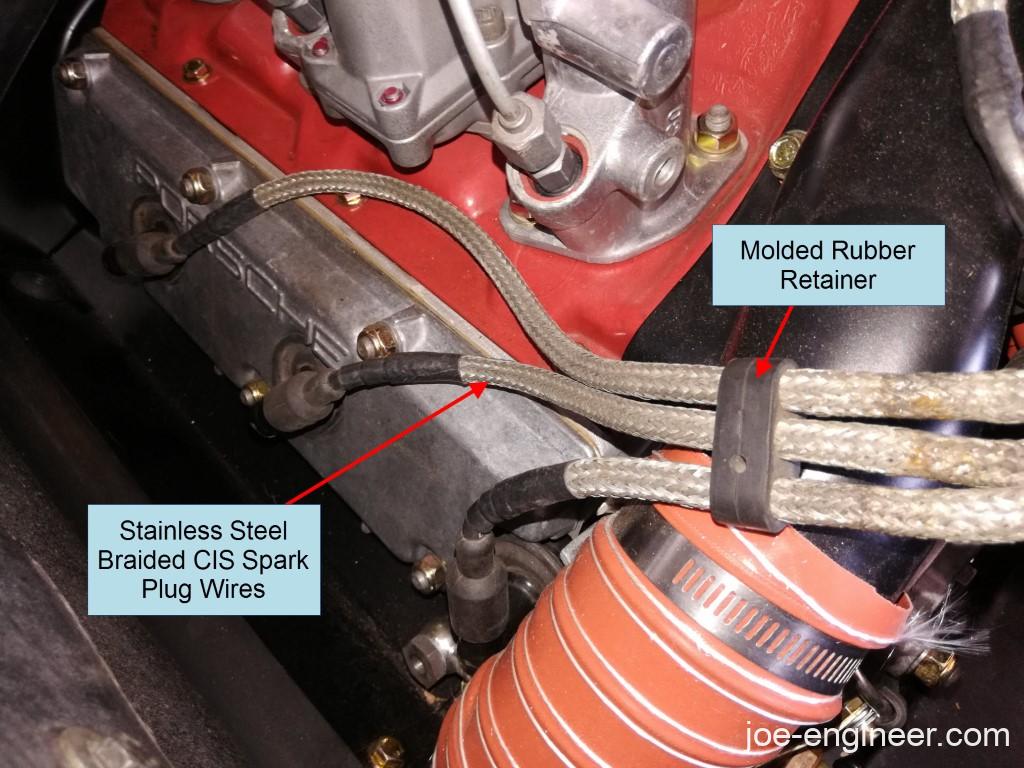
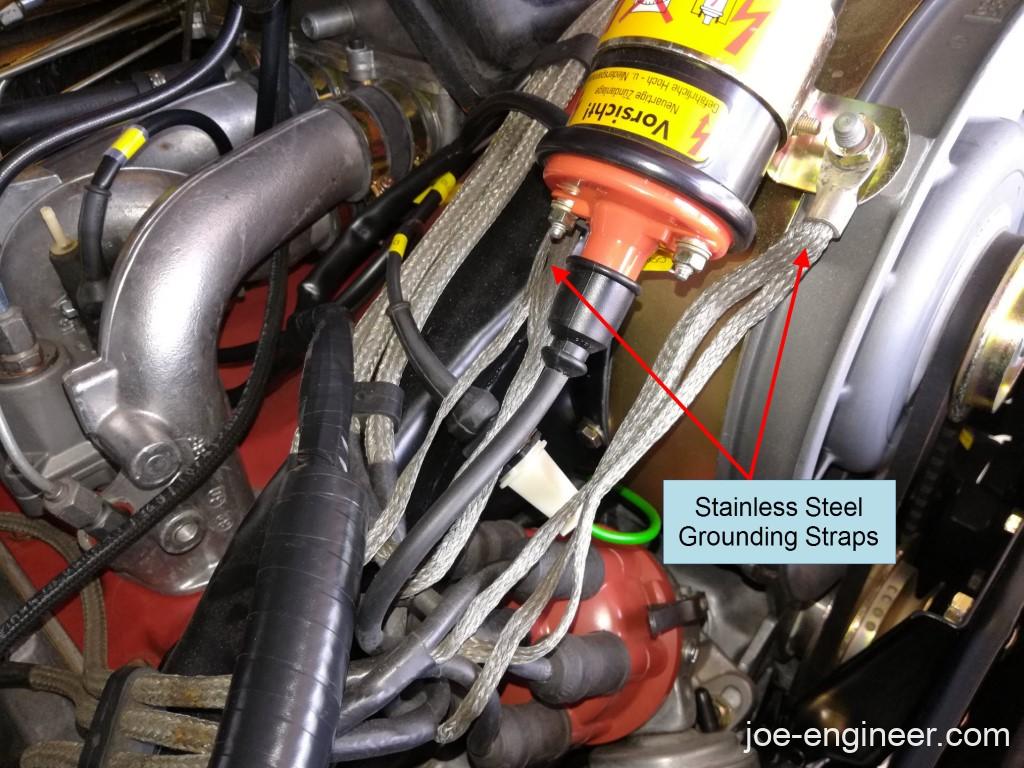
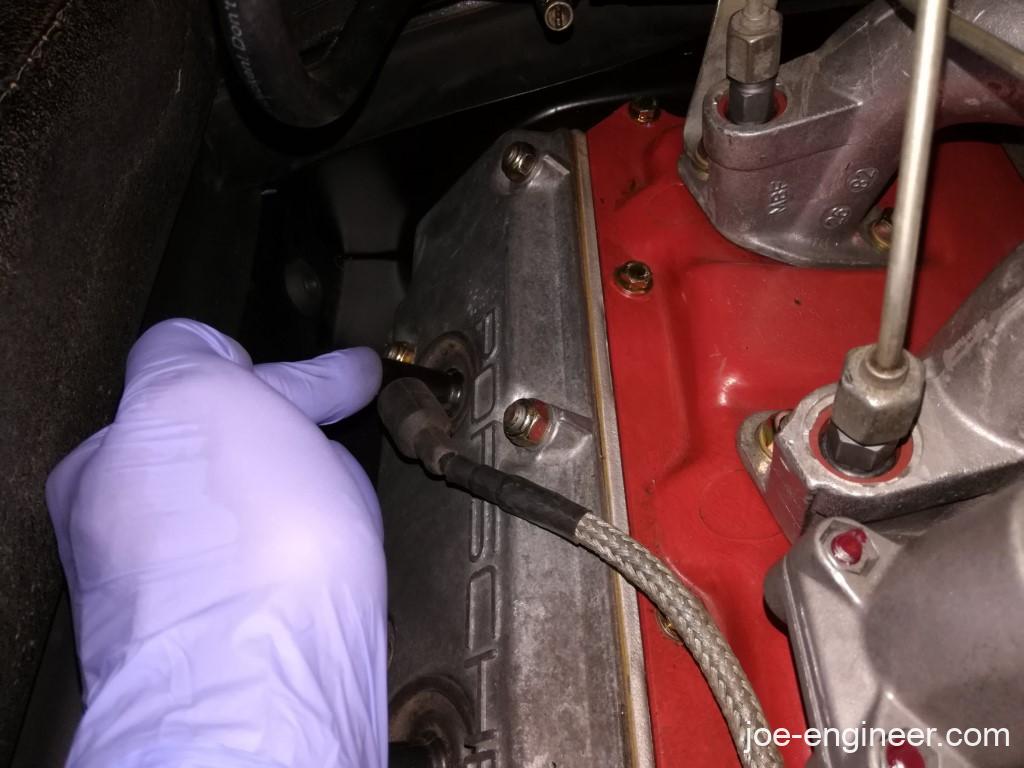
CIS cars had spark plug wires with a stainless steel braided outer covering and individual ground wires. If you are replacing these wires it is recommended you replace them with the same type and not the plain rubber covered ones. The steel braided covering shields the rest of the car from the ignition pulse running through each wire. Removing these can result in annoying interference through your audio system.
The CIS plug wires are usually bound together in groups of 3 wires by molded rubber wire holders that plug into holes in the fan shroud to keep them in place. One group of 3 wires goes to the left bank and the other to the right bank.
When replacing the plug wires be extra careful to make sure you put the wires in the correct cylinder and distributor locations. When in doubt refer to the rotor replacement procedure above to locate the #1 cylinder wire and follow the firing order to check each wire location.
Lastly, the CIS spark plug wires have 6 individual ground straps that are typically secured to an ignition coil mounting point on the cooling fan. Make sure to re-attach these after replacing the spark plug wires.
The spark plug wire replacement is now complete.
Spark Plugs Replacement Procedure
Note: Replace spark plugs on a cold engine to reduce the risk of any thread damage.
Replacing the spark plugs is similar to other overhead cam engines with the spark plug located deep beneath the valve cover surface.
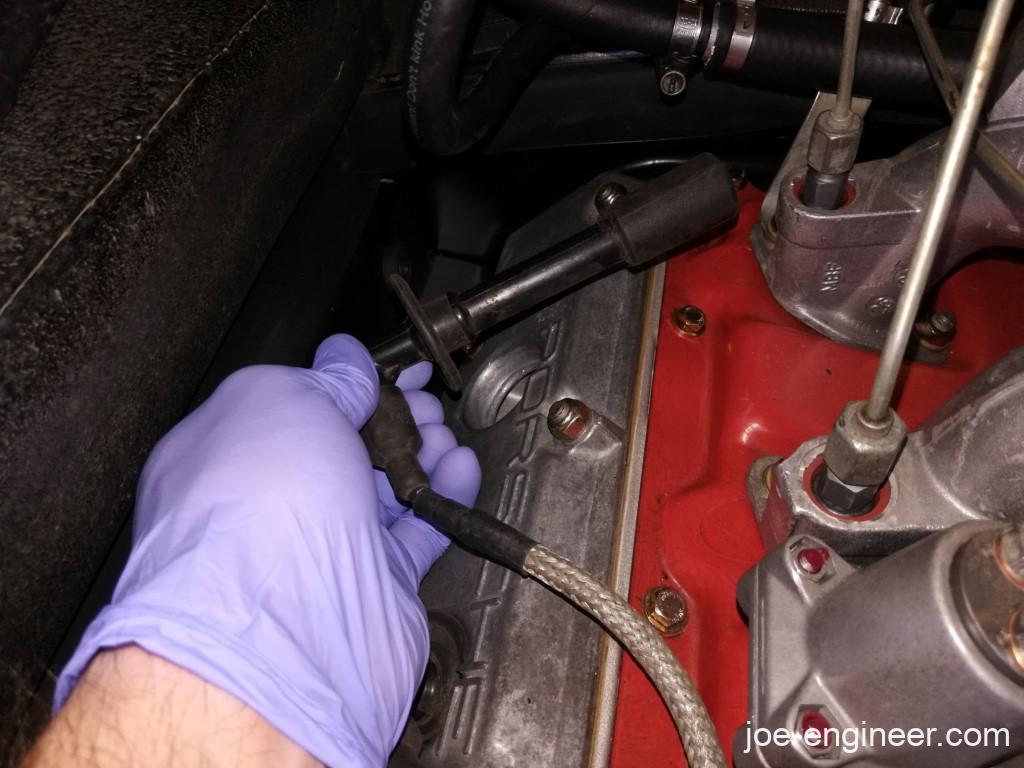
Pull each plug wire off by the rubber connector at the surface of the valve cover. Once the wire is free, set it aside to access the spark plug hole.

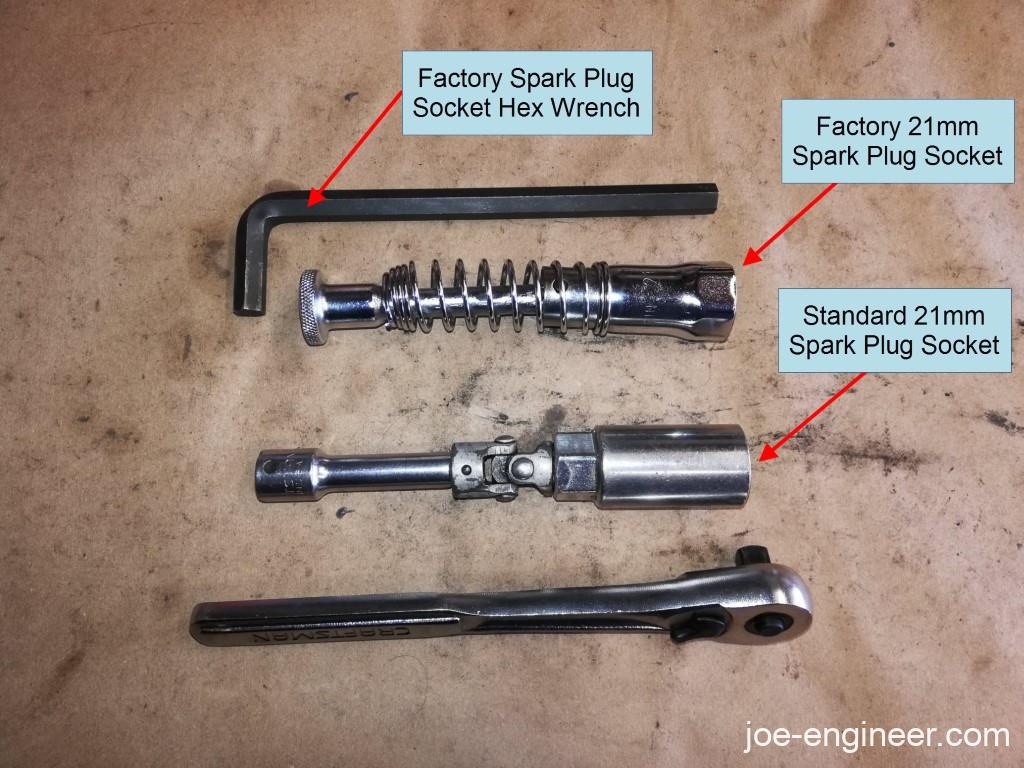
The best tool for this job truly is the factory spark plug socket and hex wrench included with the car’s original tool kit. They are 6-point hex, the correct length, and in the case of the later cars had pivots in the wrench with just enough articulation to allow you to loosen and tighten the spark plugs in the cramped engine compartment. Also the hex wrench is sized to minimize the chance of exceeding the spark plug torque specs when tightening by hand.
However it is rare for an old 911 to still have its factory tool kit. If yours is missing you can still get by with a swivel spark plug socket, an extension, and torque wrench although clearance can be tight and it might be a challenge to get the socket, u-joint, and extension out in one shot.
Slowly lower the spark plug socket into the valve cover hole until it contacts the spark plug. Firmly seat it over the plug and loosen with a ratchet or the factory hex wrench. Once you break it free it should be easy to spin out by hand.
Extract the plug and if desired, write the cylinder number on it so you can compare it with the other plugs later to evaluate the condition of your engine combustion. Consult any of the numerous sources online to analyze the old plugs and diagnose any issues that may be occurring due to air/fuel ratio, burning oil, etc.
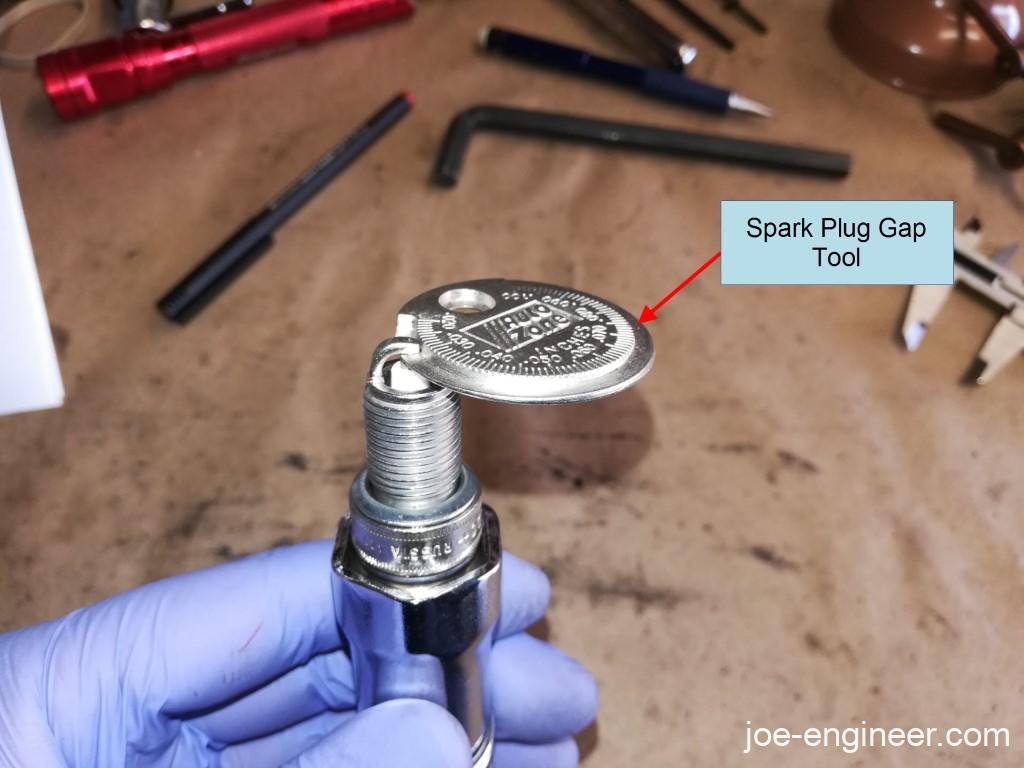
New plugs typically come pre-gapped but you can check the gap with spark plug gapper tool in case it needs to be adjusted. Consult your owner’s manual for the gap specs for your particular car.
Seat the new plug into the plug wrench and slowly lower it down the valve cover hole until it contacts the head. Carefully thread it by hand to ensure you don’t cross-thread it. Using the factory hex wrench firmly tighten it by hand. If you don’t have the factory plug socket and wrench use a torque wrench to tighten the plug to 25-30 N-m (18-22 ft-lb).
Seat the spark plug wire connector over the spark plug nipple and repeat the process for the remaining 5 spark plugs.
Spark plug installation is now complete.
Start the Engine and Test Drive
Once you are finished replacing the above ignition components, start the car and take it for a test drive. Note if there is any improvement in idling or engine performance.
Your basic ignition tune up is now complete and you can enjoy improved performance through all driving conditions.