
DIY: How To Replace The Fuse Blocks on a Classic Air-Cooled Porsche 911
If you are constantly chasing electrical gremlins on your 911, it may be time to replace the fuse blocks.
Note: The following information is for educational use only. Before proceeding please read my disclaimer page.
Disclosure: This post contains links to Amazon products and other trusted vendors. As an Amazon Associate I earn from qualifying purchases.
The air-cooled Porsche 911 has the very old school bullet or torpedo style fuses that have been used on Porsches since the 356. Old age, corrosion, or loose terminals often create electrical gremlins that are difficult to trace. Fortunately, replacing the fuse blocks is a very easy project that will likely yield an immediate improvement in the function of your car’s electrical items. Here’s a quick way to do this in a couple of hours.
Note: This process is for replacing OE fuse blocks with those of the same type. If originality is important for you, then follow this procedure. If you want to upgrade to newer blade-style fuses, I have an entire video series that you may be interested in.
Model Years Applicable:
All Porsche 911 cars up to 1989. 73 and earlier cars use different fuse blocks and covers but follow a very similar installation. The procedure shown here is on a US-spec 1983 911SC.
Tools Needed:
- Small flat screwdriver
- Flashlight
- Needle nose pliers
- Wire Strippers
- Side cutting pliers
- Electrical contact cleaner
- Small zip ties
- Masking tape
- Fine-tip permanent marker
Parts Needed:
- Fuse blocks
- Bullet/torpedo fuses
- Round relay sockets (if any of yours are damaged)
- Service manual with wiring and fuse block diagrams for your car’s model year
Warning: Do not perform this procedure if you cannot read automotive wiring diagrams or are not comfortable with basic automotive electrical work. You may discover wiring damage or modifications that you will need to repair at that moment using the factory wiring diagrams as a reference.
Front Trunk Fuse Block Installation Procedure:
Step 1: Disconnect Battery
Empty your trunk and remove the carpet. Disconnect the negative battery terminal.
Step 2: Remove Trunk Fuse Panel Cover
Find the fuse panel cover on the left side of the trunk and remove it.
Underneath the cover should be a table with all the fuse locations, their functions, and their amperage ratings. Using this and your service manual, get familiar with the fuses and how everything is connected.
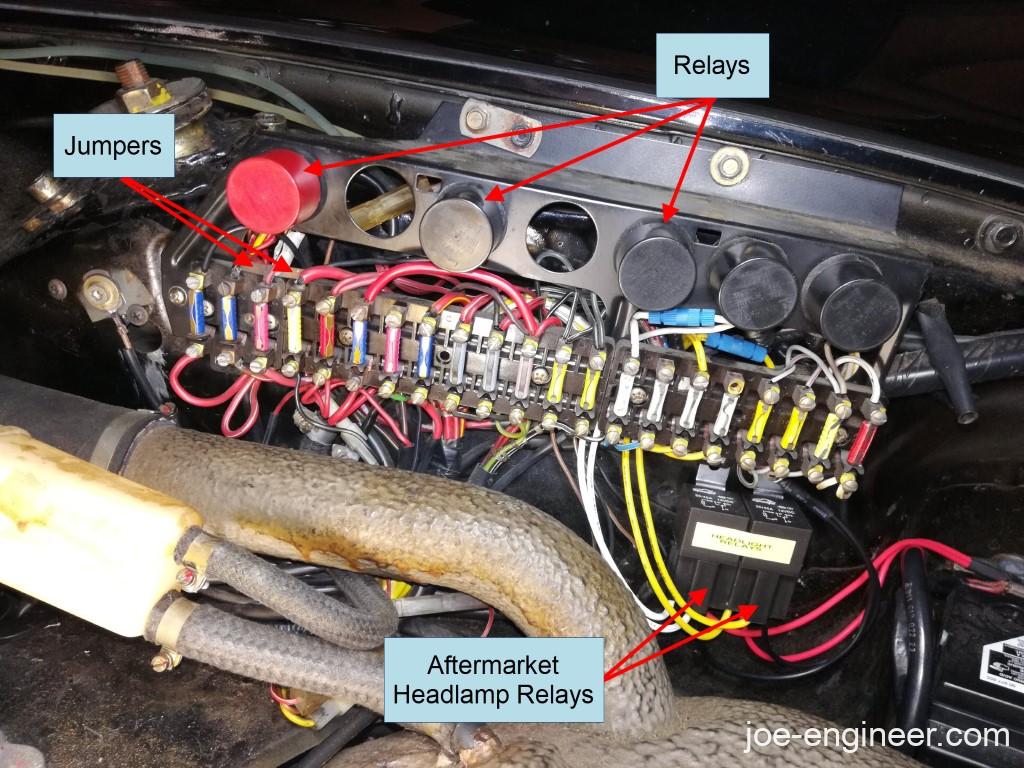
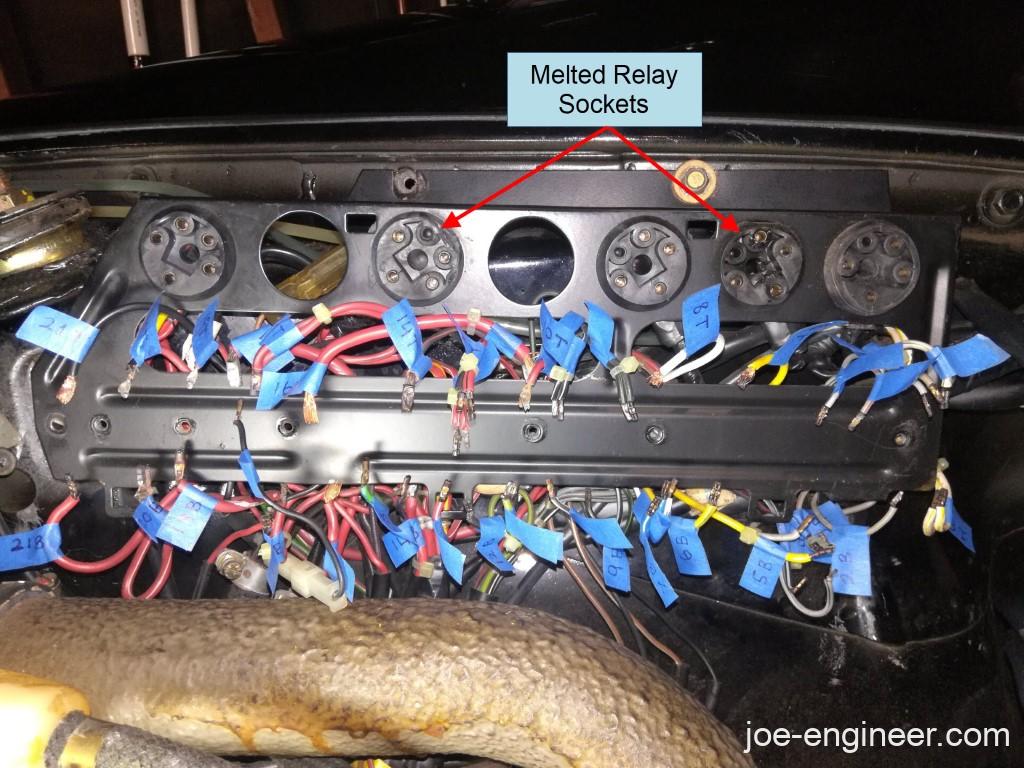
Take photos of all the wiring above and below the fuse blocks, any jumpers, the fuses themselves, and the round relays above them. On a sheet of paper write down all the fuse locations and the value of each fuse currently installed. This is especially important if you have any common aftermarket changes such as the headlamp relay kit shown here.
Depending on the year of your car you will have 1 or more individual fuse blocks. As the years went on and more electrical accessories were added, more fuse blocks were added. This car has 3 individual blocks in the front trunk and 1 small block in the engine compartment.
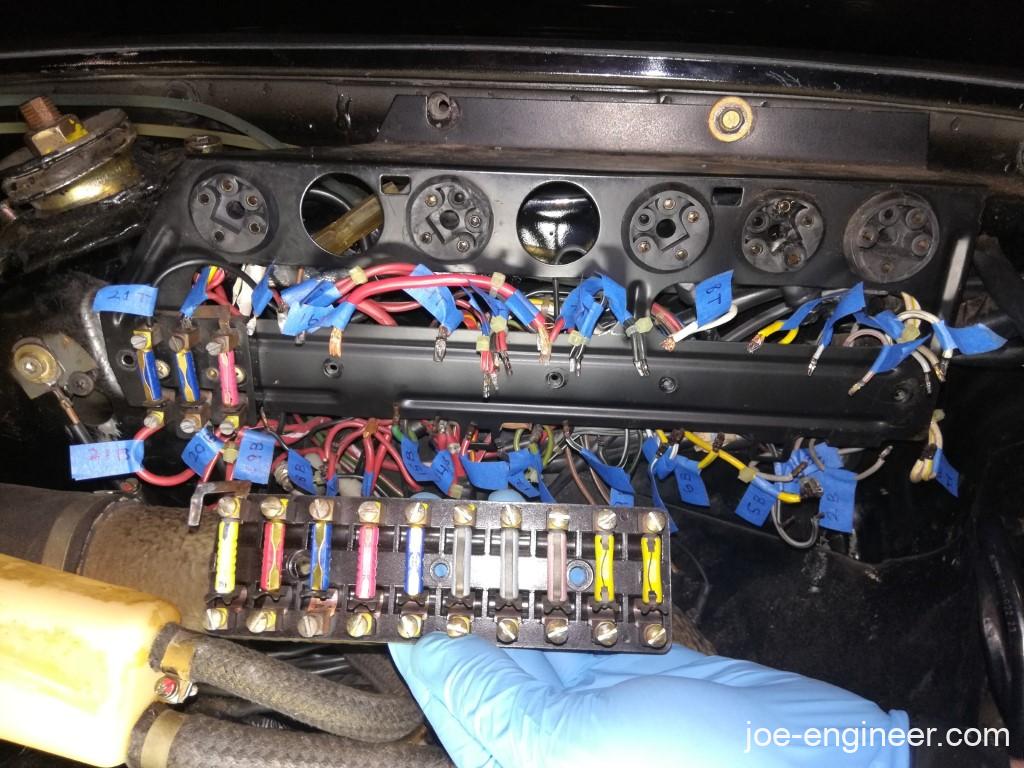
Step 3: Remove Relays
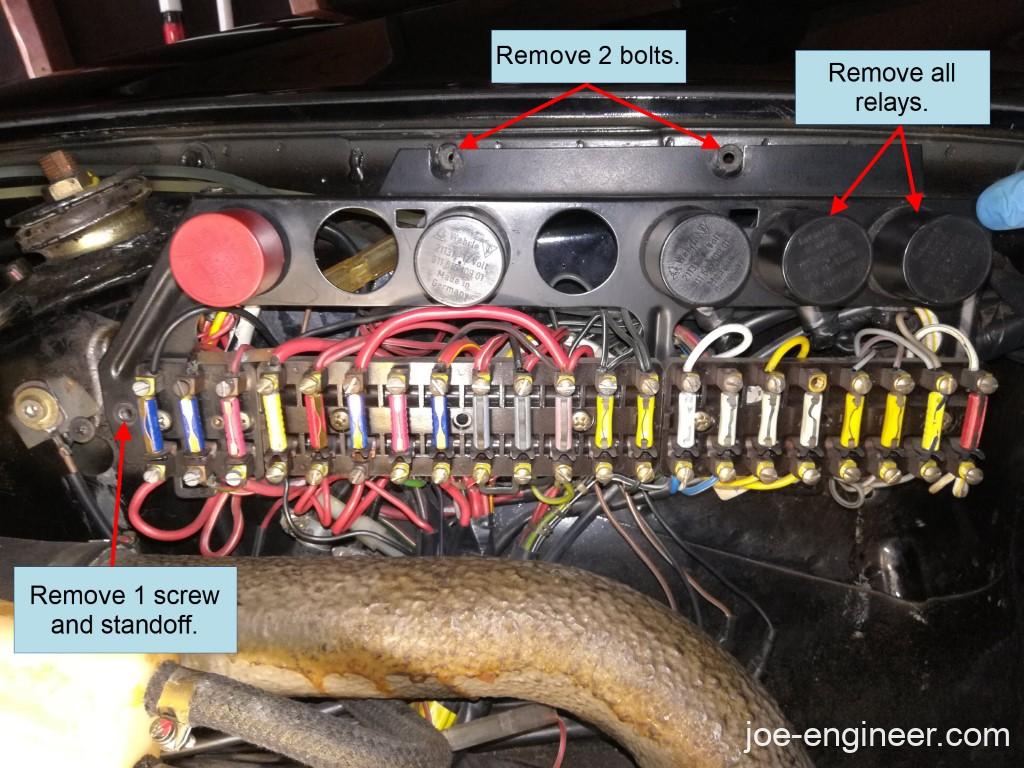
Remove all the round relays above the fuse panel so you have more clearance to the wiring above the fuses. Set the relays aside to be reinstalled later. Unbolt the metal fuse and relay panel from the trunk so you have access to the wiring behind the panel. On the 1983 SC there are 2 bolts at the top of the panel and 1 small screw at the end of the panel closest to the cabin. Be careful removing this screw as it has a plastic standoff behind it that could easily get lost.
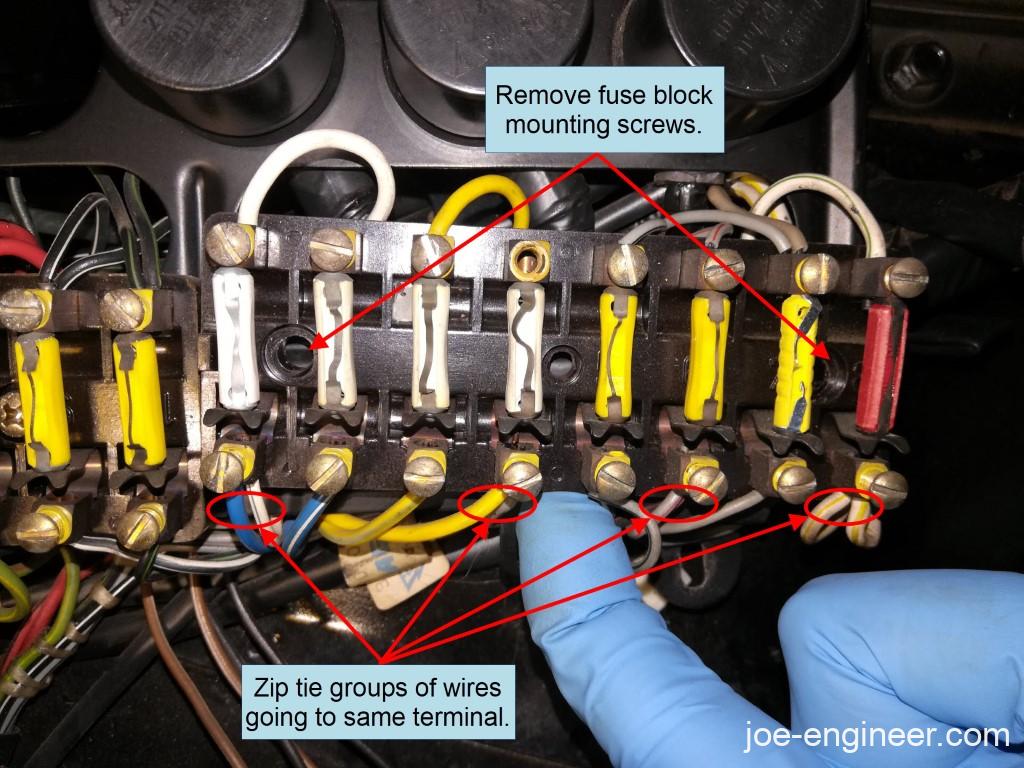
Step 4: Zip Tie Wiring Together
You will notice some fuse locations have more than 1 wire attached to the same screw terminal. Using small zip ties, bind these groups of wires together so that none of them accidentally end up in the wrong fuse terminal later. Because the wires are so short, it may help to remove the two screws holding the individual fuse block to the metal panel and let the block hang by the wires.
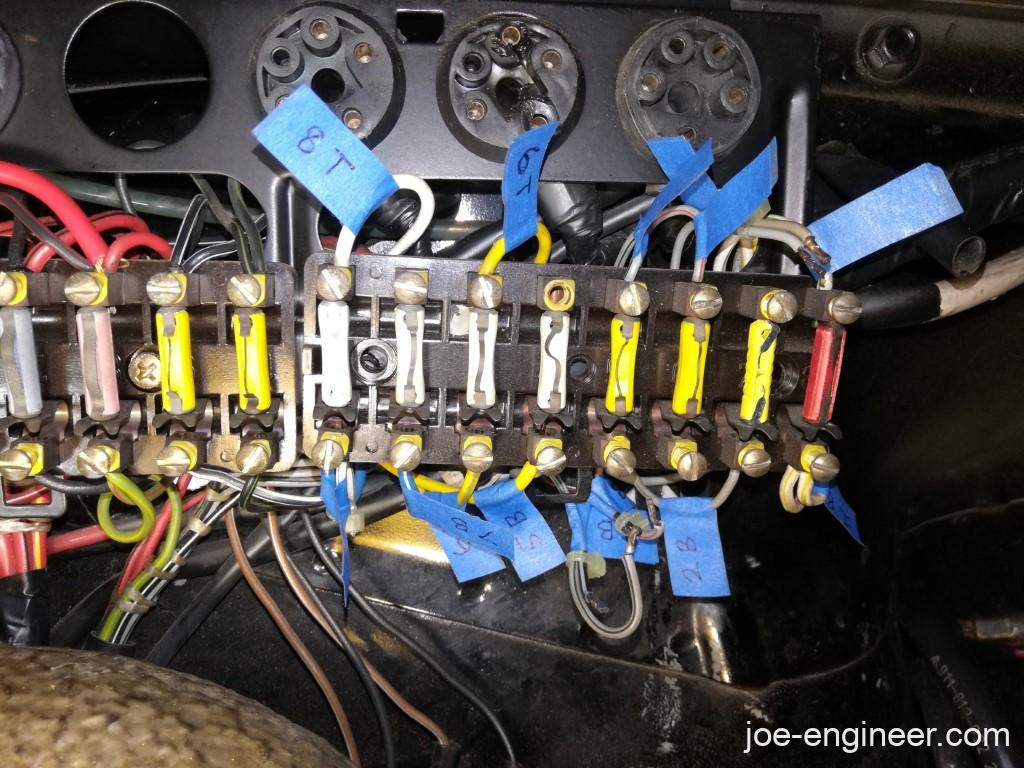
Step 5: Label Wires
With small tape flags, label each wire or group of wires with the fuse location number and whether it goes to the upper or lower fuse terminal. On the US Market 1983 SC there are 21 fuse locations, so as an example, I labeled mine numbers 1 through 21 and T for top and B for bottom. This can be a bit tedious but with the groups of wires bundled together and everything identified you will reduce your chances of reconnecting something incorrectly and permanently damaging a vehicle circuit or causing a fire. If you are only going to replace 1 fuse block then only label the wires for that block, otherwise identify them all now before replacing any fuse blocks.
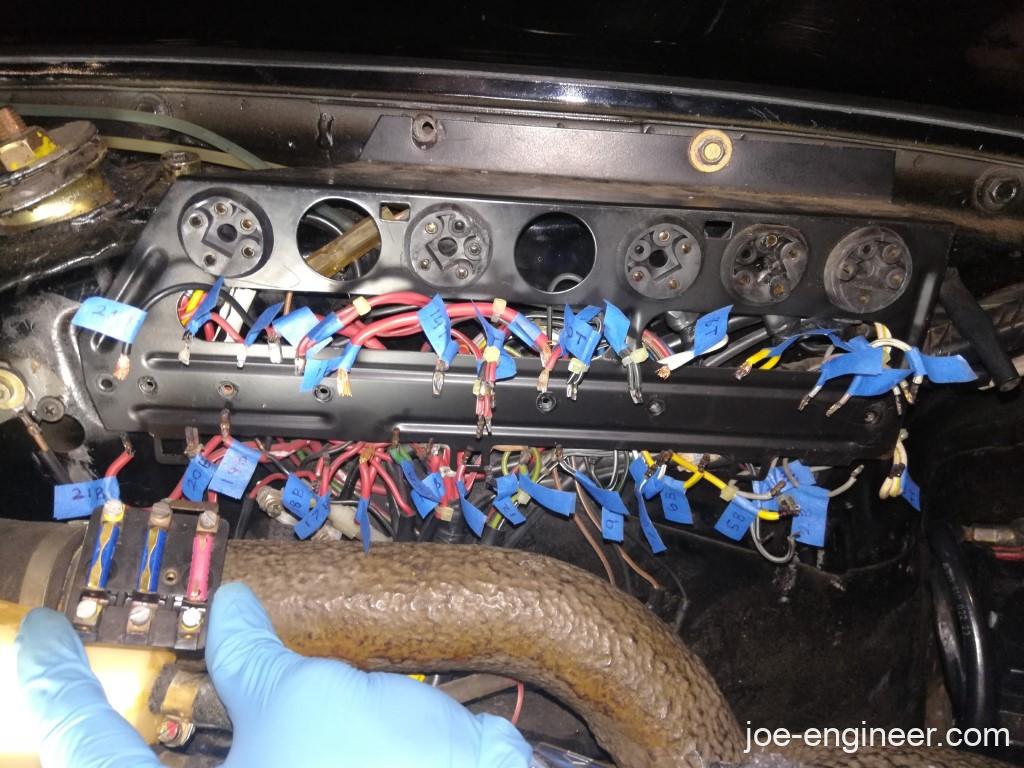
Step 6: Disconnect Wires
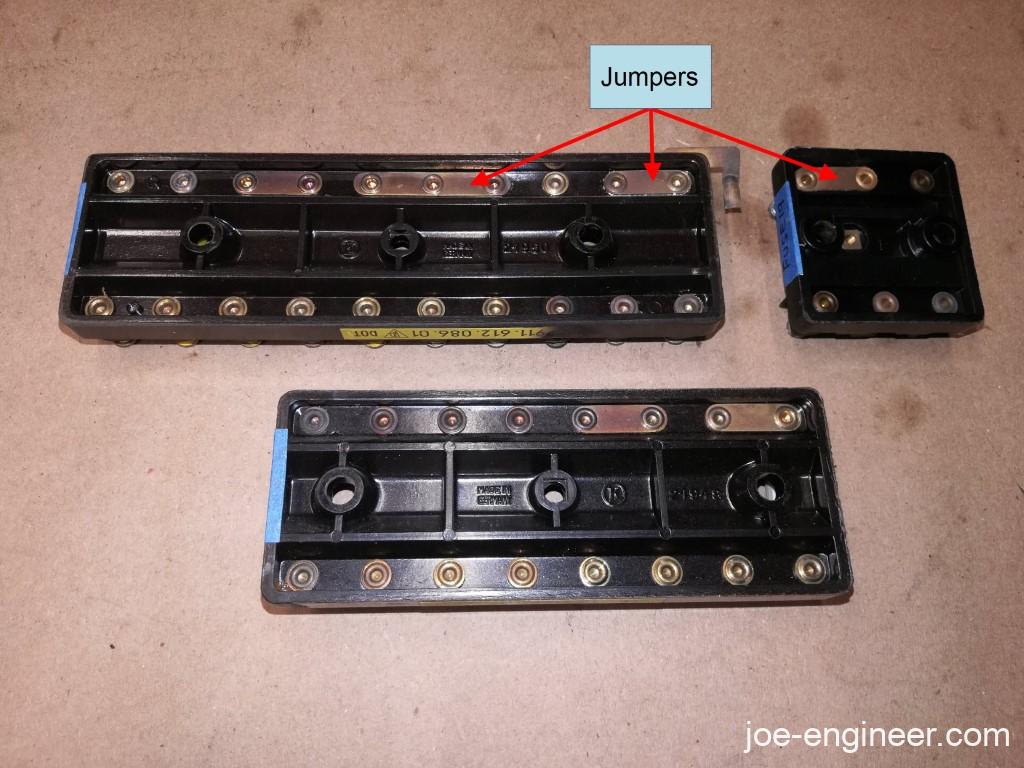
Begin to disconnect wires by loosening the screw terminals above and below each fuse. Carefully pull out the wiring and let them hang. Make sure any wire bundles don’t have individual wires falling out as they could be reconnected incorrectly later. If your panels have any solid copper jumpers, keep them with the fuse blocks in the same locations.
Step 7: Remove Old Fuse Blocks
Each fuse block is attached to the metal fuse panel behind it with 2 slotted screws. Remove the two screws on each panel and it should come off. Make sure you don’t drop any screws into the numerous crevices in the trunk.
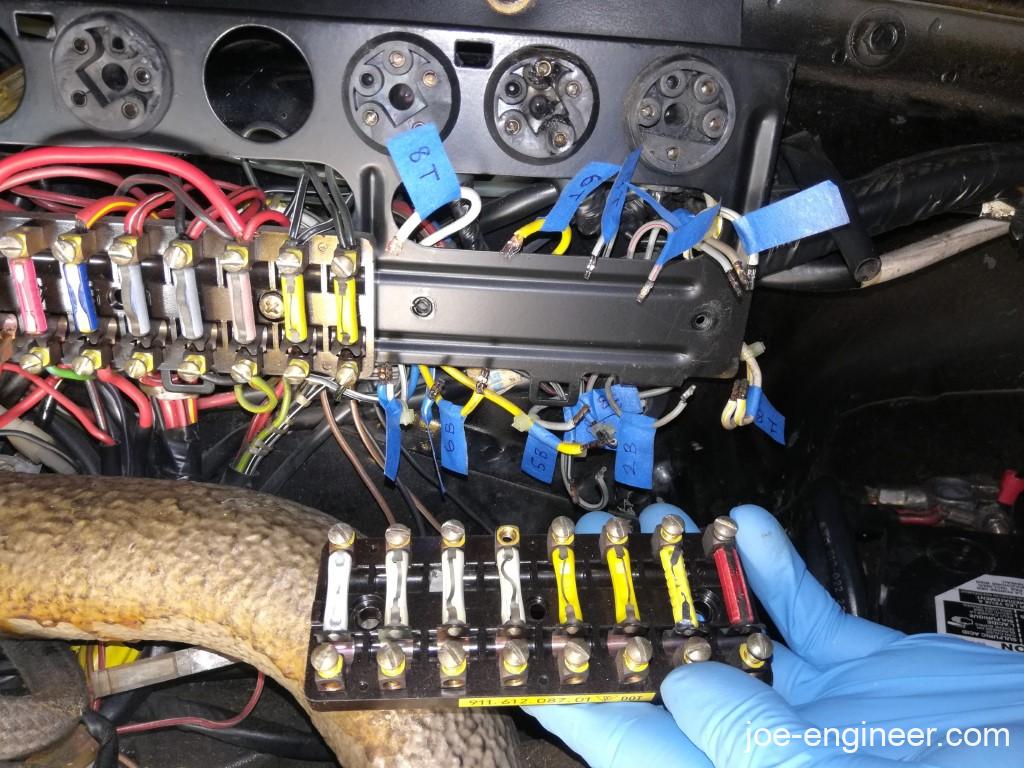
Step 8: Inspect and Repair Wiring
With the fuse blocks out of the way this is the best access you will ever have to the fuse panel wiring. It is a perfect time to inspect and repair any poor wiring connections to the fuse terminals and round relay sockets. If you have any burned or corroded ends and enough extra wire length, clip off the damaged ends and re-strip new clean copper to reconnect to the fuse terminal. If your car ever had an aftermarket stereo or alarm, be especially vigilant and look for bad splices and connections all around and behind the metal panel. If you found any fuses missing or of incorrect values installed in any fuse location this is a red flag that there might be a problem. Sometimes people remove or install different fuses to mask a problem rather than fixing the wiring itself. Melted relay sockets also should be investigated and replaced if necessary.
Repair any bad connections using the correct rating crimp connectors, heat shrink, and wiring best practices. If you see any suspicious connections don’t hesitate to double check them with the wiring diagrams in the service manual.
Step 9. Reinstall New Fuse Blocks
Take your new and old fuse blocks and flip them upside down. Double check that the jumpers on the back of the old and new fuse blocks are the same. If they are, reinstall each fuse block in the correct location back on the metal panel with two screws each.
Step 10: Reconnect Wiring
One by one, reconnect each wire or wire bundle back into each fuse terminal. Start on one end of the fuse block and continue in order towards the other end. Tighten each screw terminal firmly and give the wires a gentle pull to make sure they are firmly attached. Carefully clip off the zip ties as you reconnect each fuse terminal. Leave the tape identification flags on for now.
Step 11: Reinstall Fuses and Relays
Using the fuse diagram in the service manual or the back of the fuse panel cover, reinstall the correct fuses back in each fuse location. It is recommended you install brand new fuses as old bullet fuses can sometimes go bad without appearing blown. Reinstall all the round relays back in their original locations.
Step 12: Test Electrical Items and Start Engine
After all wiring is reconnected on the fuse blocks, temporarily reconnect the negative terminal on the battery, open the key to the ON position with the ignition off and test all the electrical items to verify they still work. If everything checks out ok, crank the ignition and verify that the engine will start. You may notice immediate improvements such as power windows that roll up and down faster, brighter lights, or even an engine that starts up easier or idles smoother.
Turn the car off and remove the key from the ignition. If you discovered any new non-functional electrical items or blown fuses, disconnect the negative battery terminal again and consult the service manual to troubleshoot those individual circuits. Once everything checks out ok, make sure the negative terminal is securely connected, carefully remove all the tape identification flags on all the wiring, and replace the fuse panel cover.
Your front trunk electrical panel installation is now complete.
Engine Bay Fuse Block Installation Procedure:
If you need to replace the fuse block in the engine bay you will follow a very similar and much shorter procedure as the front panel. Make sure the negative battery terminal is disconnected again.
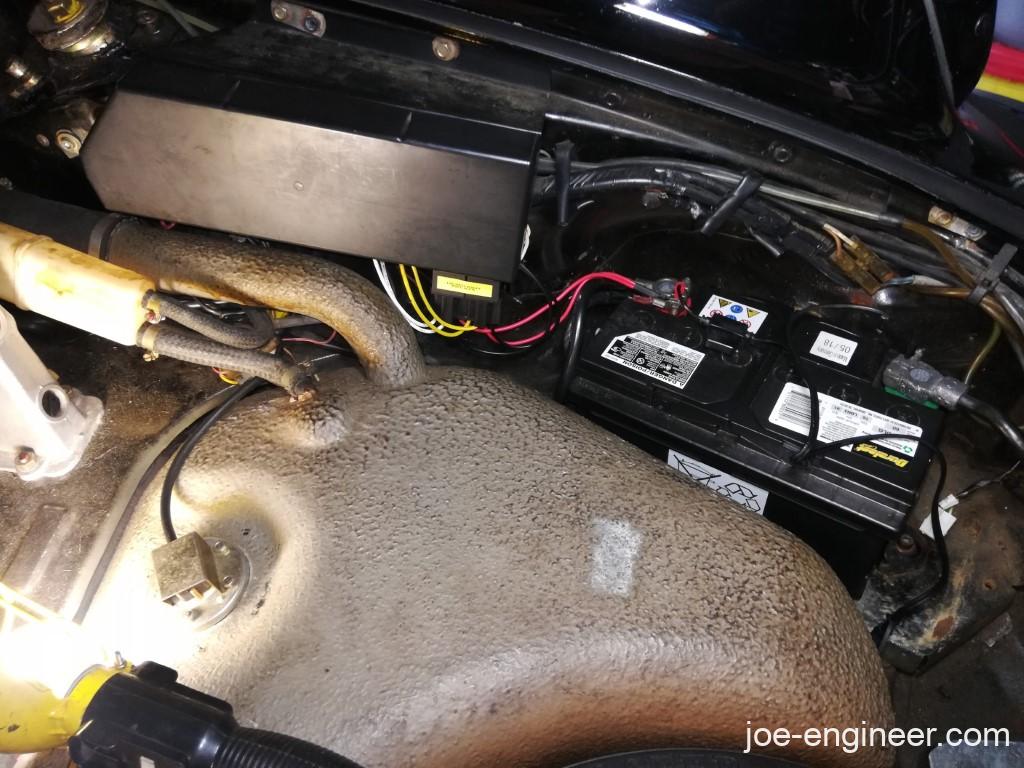
Step 13: Remove Fuse Panel Cover
On the left side of the engine, remove the plastic cover for the engine bay electrical panel. On the 1983 SC there is a wingnut and a bolt that hold the cover on.
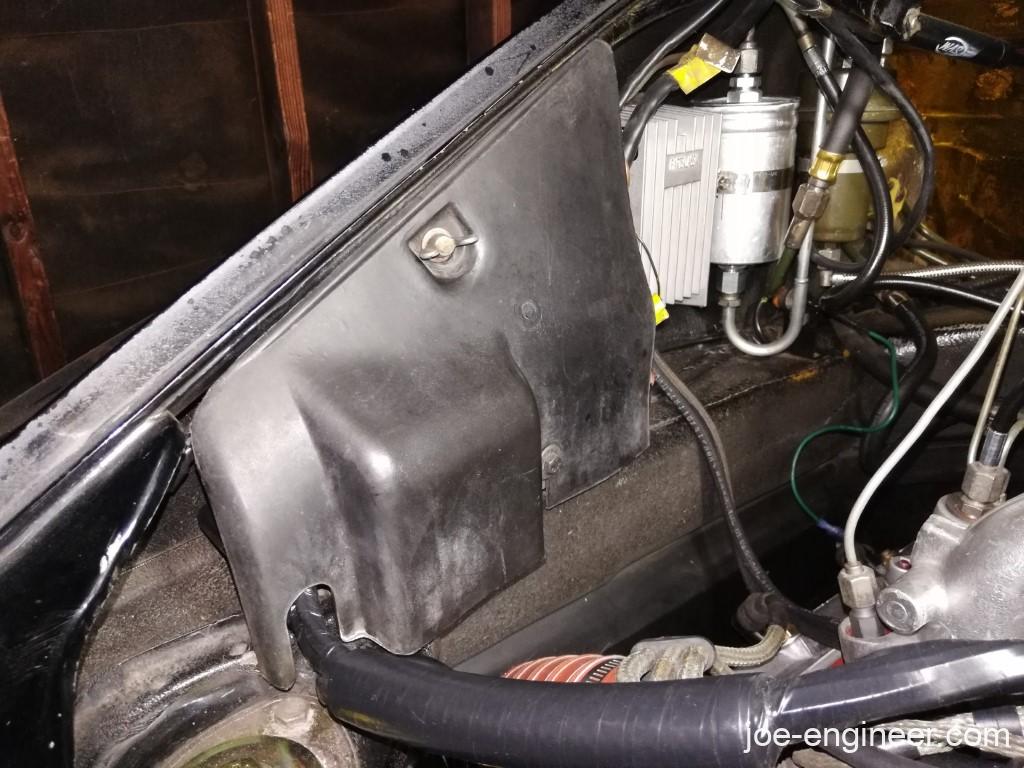
Underneath you will see a tiny 3-fuse block held on by two screws.
Step 14. Label and Disconnect Wires
Follow steps 4-6 above to label and disconnect all the wires.
Step 15: Loosen Electrical Panel
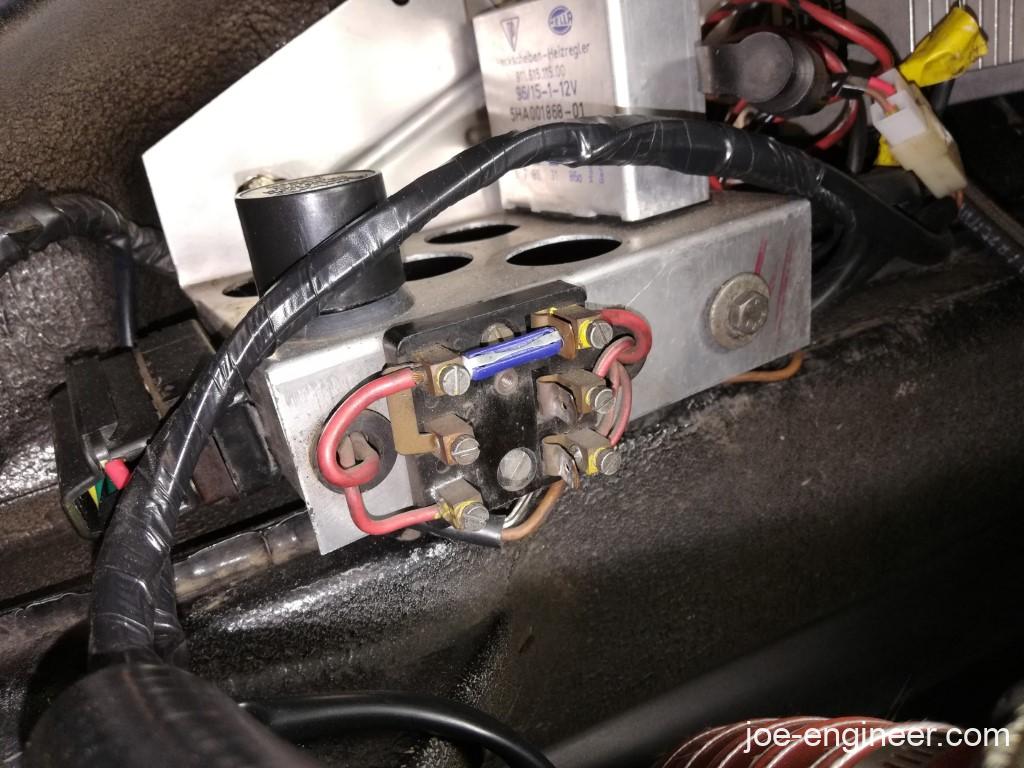
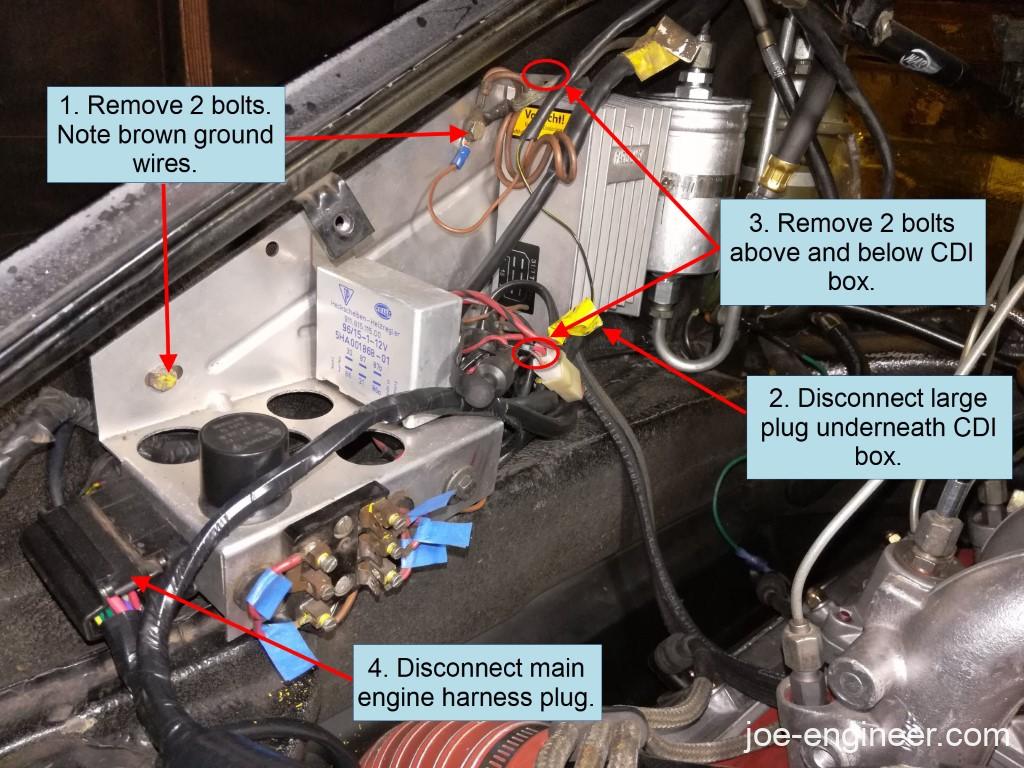
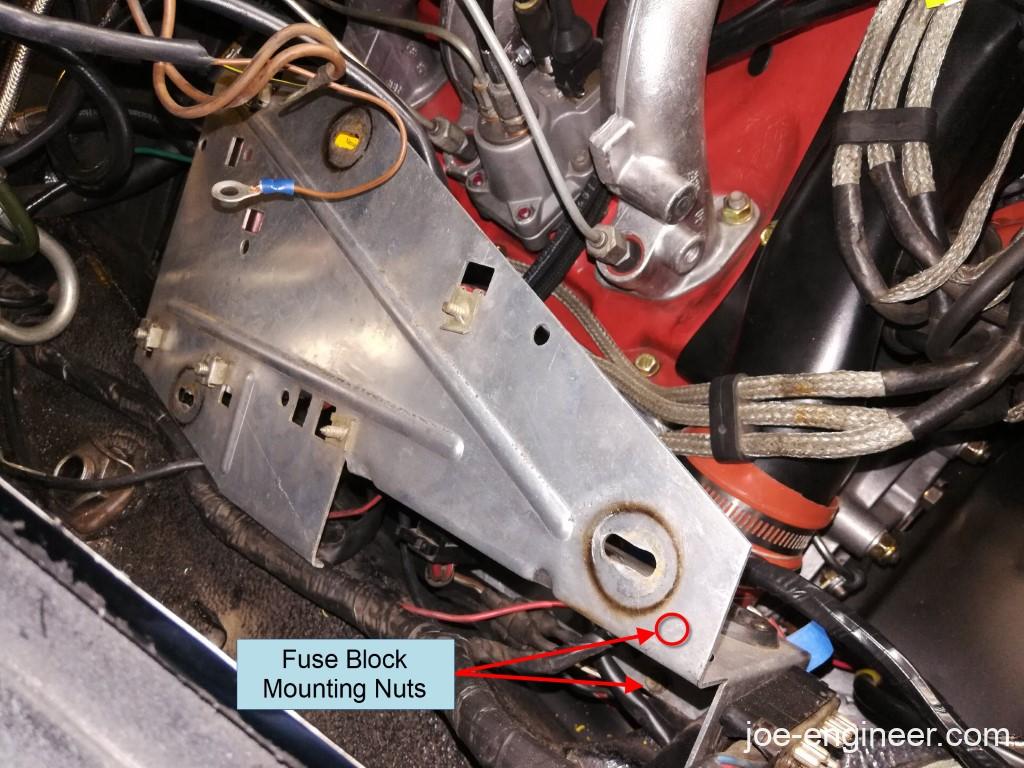
To get the fuse block off you need to access to some small hex nuts behind the electrical panel. Remove the several bolts holding the panel on and tilt it towards the engine. On the 1983 SC there are a total of 4 bolts. One above and one below the CDI box. You will need to disconnect the large plug at the bottom of the CDI box to get to the lower CDI bolt. There is a third bolt halfway down the panel at the top with several brown ground wires connected to it. Remove the fourth bolt at the rear corner of the panel and disconnect the large engine harness plug at the rear to allow the whole panel to detach from the engine bay wall.
Step 16: Replace Fuse Block
Remove the two screws on the fuse block from the front, while holding the small hex nuts behind the electrical panel stationary.
Repeat steps 8-10 to reinstall the new fuse block, making sure it is in the correct orientation.
Step 17: Reinstall Electrical Panel
Reinstall the electrical panel to the engine bay wall with the 4 screws originally removed and reconnect the CDI and engine harness plugs. Make sure all the brown ground wires are installed back under the bolt as before.
Step 18: Test Electrical Items and Start Engine
Repeat step 12 to test the affected electrical items and verify that the engine will start. If everything checks out ok, remove the identification flags and reinstall the plastic electrical panel cover.
Your engine bay fuse panel installation is now complete.
You should have improved electrical performance and increased reliability for many many years.