
DIY: How To Replace the CIS Intake Boot on a Classic Air-Cooled Porsche 911
If you are tuning your CIS K-Jetronic equipped Porsche 911 you will likely need to replace your old rubber intake boot to eliminate troublesome vacuum leaks. This is a very quick procedure that will make your fuel system more robust.
Note: The following information is for educational use only. Before proceeding please read my disclaimer page.
Disclosure: This post contains links to Amazon products and other trusted vendors. As an Amazon Associate I earn from qualifying purchases.
Starting in 1973, the air-cooled Porsche 911 was equipped with the Bosch CIS (continuous injection system) K-Jetronic fuel system to address growing fuel efficiency and environmental emissions concerns. While the system was great at those two things, it became known for being finicky, especially as these cars fell into the hands of owners who didn’t keep up on regular maintenance. One of the biggest weaknesses of Bosch CIS is its sensitivity to vacuum leaks. All the rubber parts in the intake system that operate under vacuum are prone to cracking and leaking air over time.
A major rubber component in the system is the large rubber boot at the top of the assembly. This boot connects the air metering valve to the throttle body and must be free of vacuum leaks to correctly measure the amount of air entering the engine to deliver the corresponding amount of fuel correctly. This is an easy to replace part and essential to a well-sorted CIS injection system.
Model Years Applicable:
Porsche 911 cars 1973-1983 911 equipped with Bosch CIS K-Jetronic. Turbos are not included as their intake systems require a different replacement procedure.
The photos and parts shown here are on a 1983 911SC but the general procedures apply to all years within this range.
Tools Needed:
- Safety glasses
- Small screwdrivers of various sizes
- Thin plastic trim removal tool
- Throttle body cleaner
- Service manual for your car’s model year
Parts Needed:
- One CIS intake boot
- One air filter element (if yours is dirty)
- Two air box rubber straps (if yours are damaged or stretched)
- Because this procedure covers an extensive model year range it is recommended that you search the Porsche PET or your favorite parts supplier’s catalog for your car’s specific parts.
Replacement Procedure
Note: This is only a part replacement procedure that should be supplemental to the CIS fuel system diagnostic procedures present in your factory service manual. Those are beyond the scope of this procedure.
Step 1: Remove Air Filter Cover and Filter
Let the car sit overnight so the engine compartment is cool. Locate the air filter cover and unhook the two rubber straps at the top.
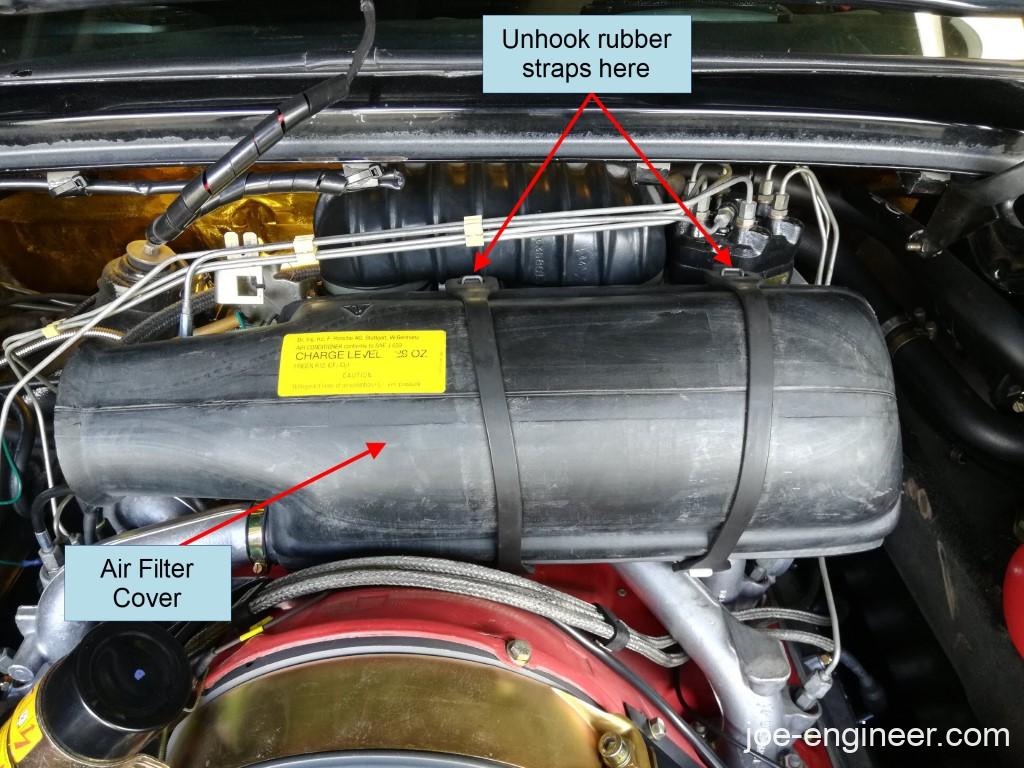
Remove the air filter cover and the air filter located directly below it to expose the intake airbox beneath it. This air box is aluminum but the factory ones will be black plastic.
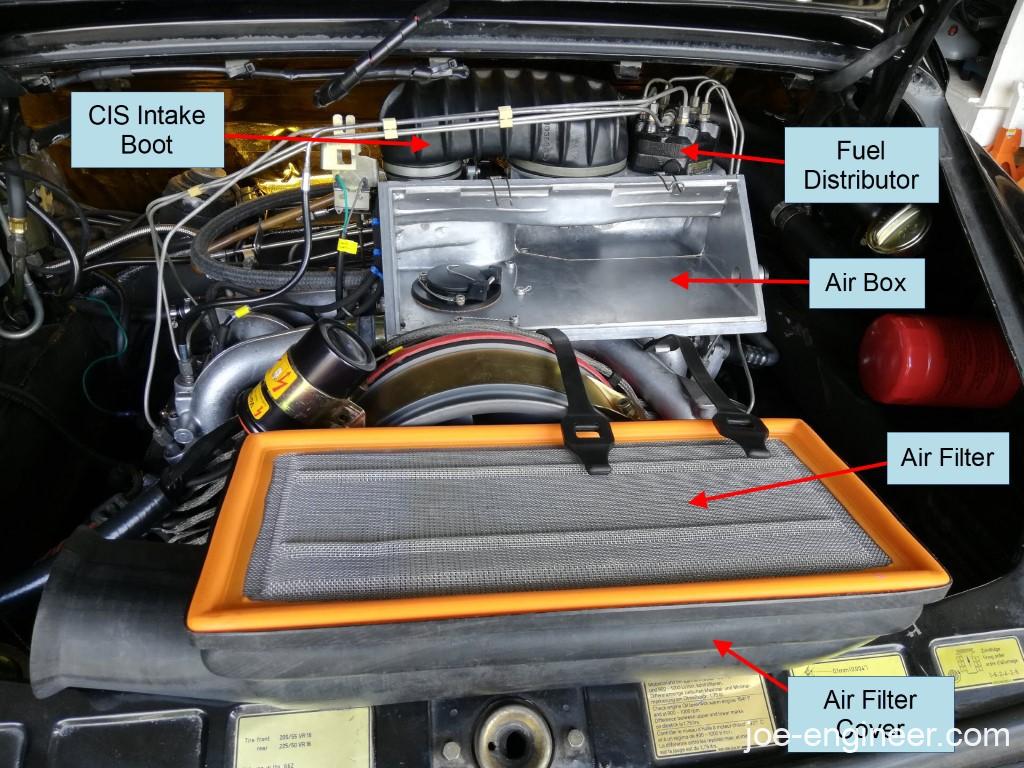
You now have better access to the CIS intake boot directly above the air box.
Step 2: Loosen Large Intake Boot Clamps
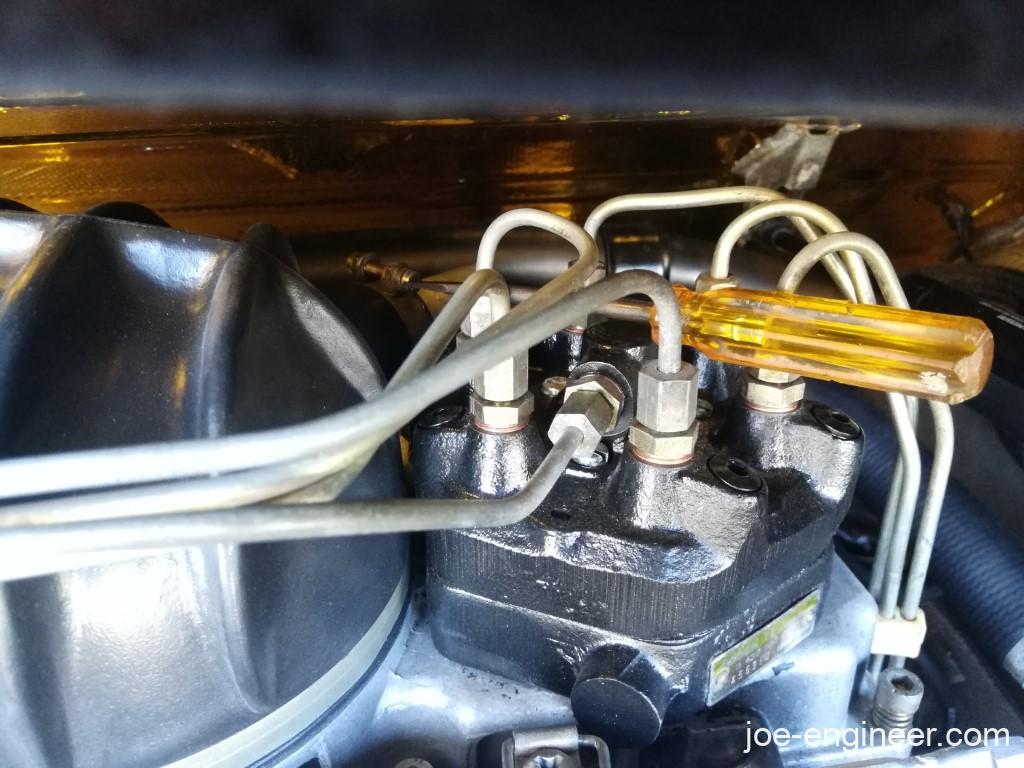
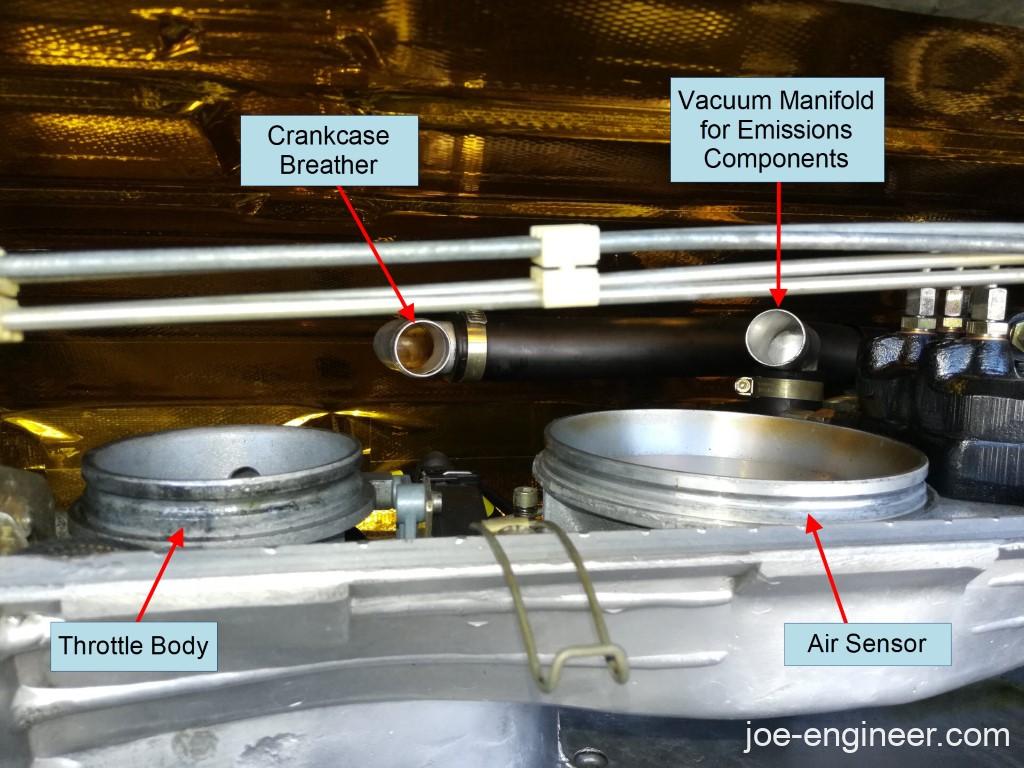
Now we need to loosen all the hose clamps on the intake boot in order to remove it. Here is a bottom view of the 1983 911SC version with the two large air sensor and throttle body clamps as well as two smaller vacuum hose ones facing the firewall. The very early cars did not have the two smaller connections at the firewall and some cars have only one of them, depending on the emissions equipment present. Feel around behind the boot with your hand to see how many yours has.
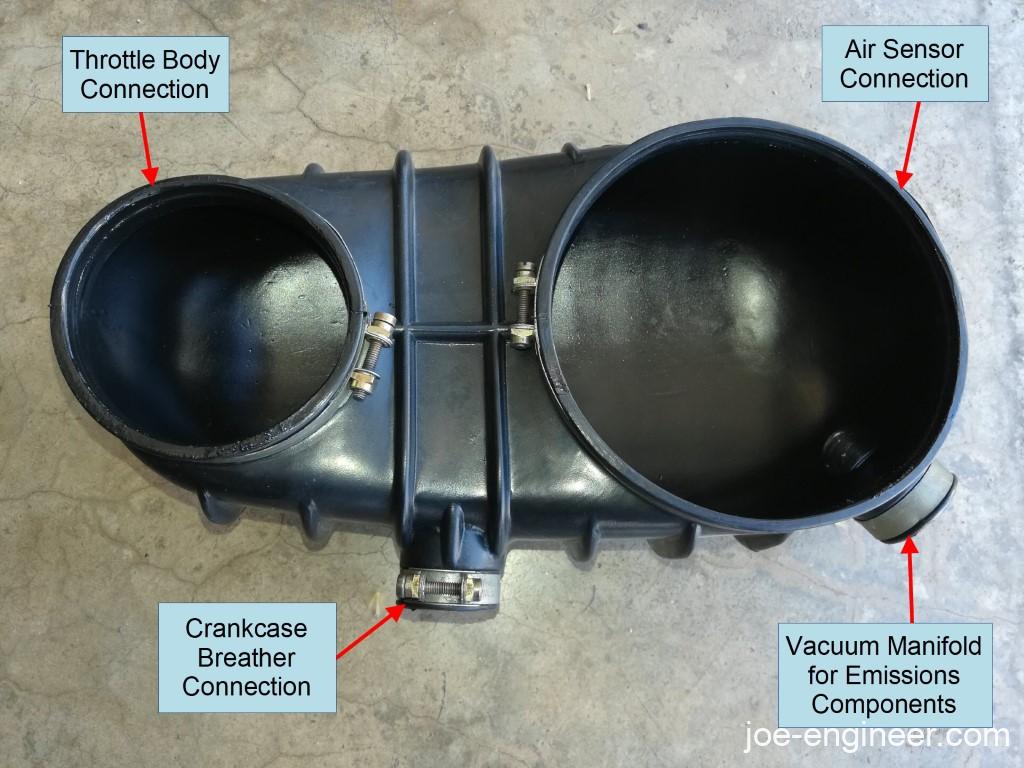
Late 911SCs had hard fuel lines as shown here but early SCs and older cars had flexible plastic lines that should make access much easier. Loosen the two large hose clamps at the throttle body and air sensor flanges. Hopefully they are in the center and easy to access but really they could be rotated anywhere on the circumference.

After loosening each of the large clamps, gently pry upwards with a plastic trim tool to release the boot from each flange.
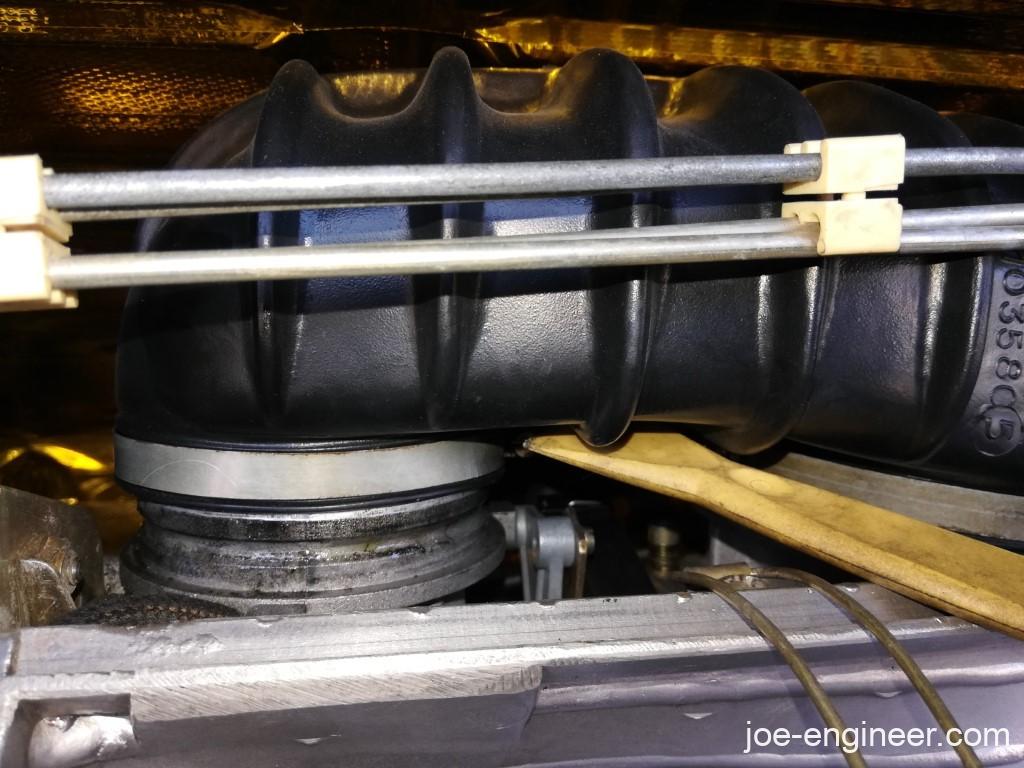
When the two large clamps are loose and both boot connections are loose, you should be able to slide it out of the way if you have an early car. If you have a later car you will still have some connections at the rear to loosen before the boot can come out.
Step 3: Loosen Smaller Clamps Behind Boot
If your intake boot has smaller connections against the firewall, you will need to exercise some creativity to loosen the clamps. You may need to reach in from the left and turn the clamp screw blind, then pull the metal tube out of the boot with your fingers.

On the right you may need to find a thin screwdriver that fits between the fuel lines on top of the fuel distributor to get to a different clamp.
Once you release the tubes that insert in the boot, it should be completely free and can be removed from between the fuel lines and the firewall.
If your existing boot has been there a long time you may see lots of tiny cracks, each of which is a potential vacuum leak.
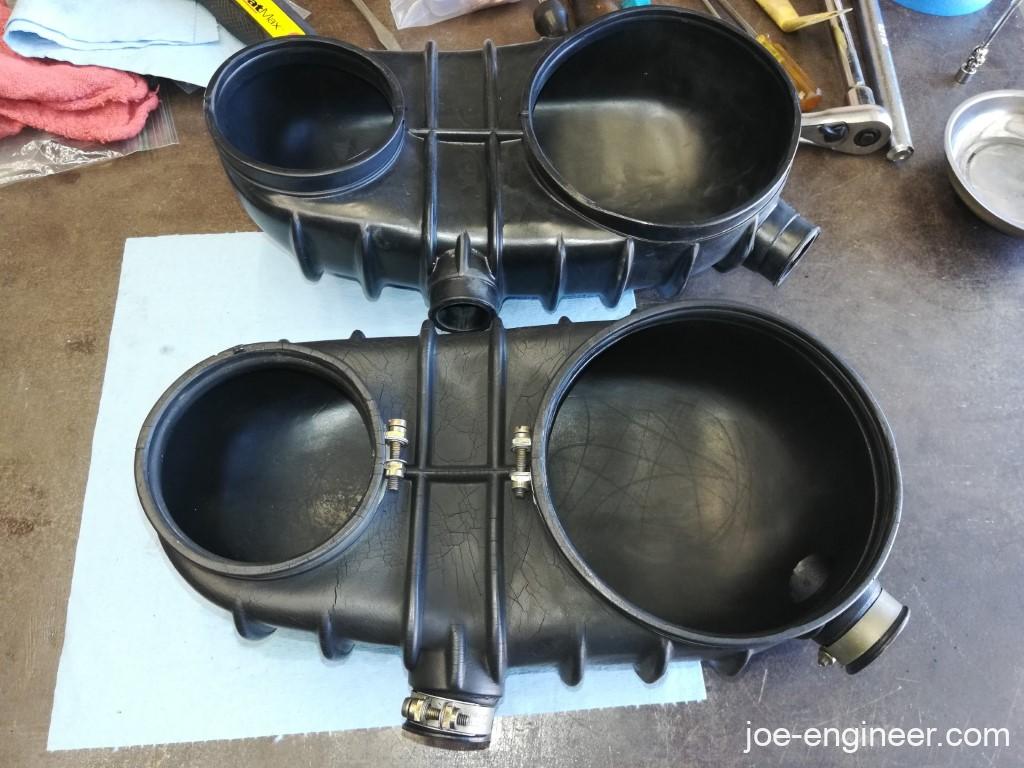
If your new boot doesn’t have hose clamps on it, clean them and transfer them over to the new boot.
Step 4: Clean Throttle Body and Air Sensor Plate
If the intake boot has not been off in some time, there will likely be a lot of oily crud in the boot and on the bores of the throttle body and air sensor plate.It is common for them to look like this:
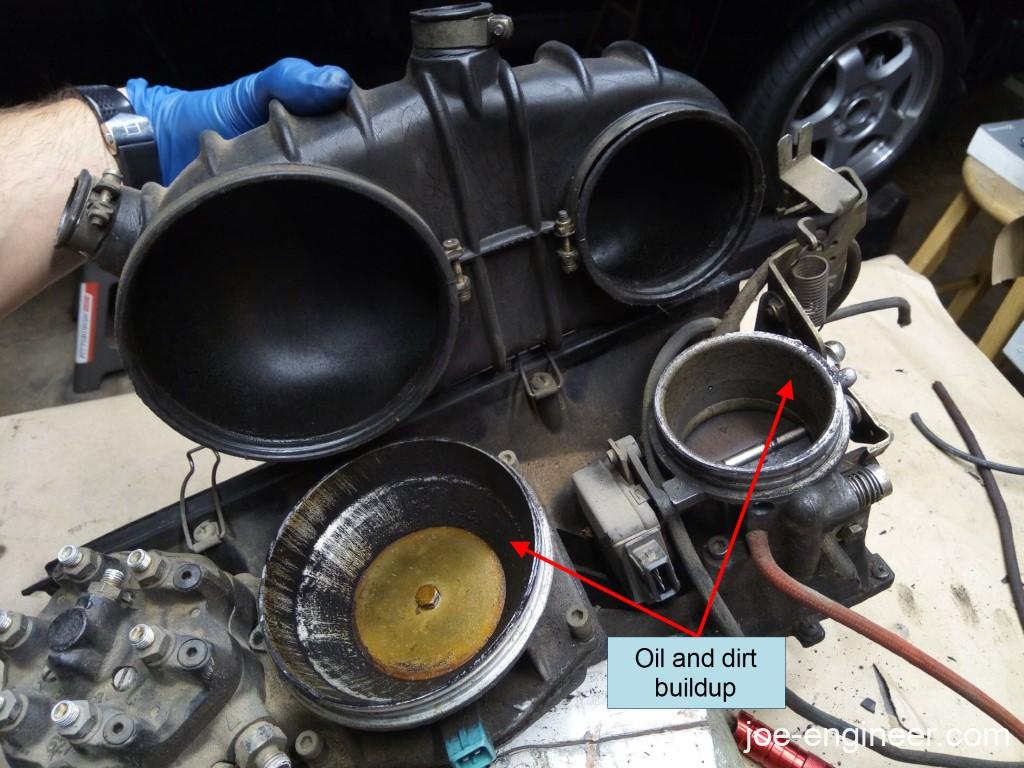
Spray a little throttle body cleaner in the top of the throttle body and air sensor plate and gently wipe off as much grime as you can with a clean rag or paper towel. Be especially gentle on the air sensor plate as it is very thin and can be easily damaged. If the interior of the airbox (below the sensor plate) is dirty, clean that as much as possible. Any dirt in that area is already downstream of the air filter and will get inhaled into the combustion chambers.
Step 5: Install New Intake Boot
Installation of the new intake boot is the literal reverse of removal, although now is a good time to make sure you position all the hose clamps in a way that makes them easy to access in the future. A good position is leaving the screw heads pointing towards the rear of the car at the center of the boot. Leave the clamps as loose as possible so you can slip the two large bores over the throttle body and air sensor plate. Once the boot is fully seated on each large bore, tighten the hose clamps snug to secure it in place.
Then reach between the boot and firewall and insert each tube back into the smaller boot connections, then snug each hose clamp to secure and seal each hose. Gently pull on each small hose to make sure they are secure.
Step 6: Re-install Air Filter and Cover
If your air filter was dirty or if your air box rubber straps damaged or stretched, this is a good time to replace those with new parts. Replace the air filter and cover as a unit on the air box, making sure the filter is centered over the flange on the air box mounting surface. Reattach the rubber straps over the air filter cover to secure it in place. If your old intake boot had vacuum leaks which are now gone, you may need to re-adjust your fuel mixture per the instructions in your factory service manual. CIS has limited capability to adjust itself as modern electronic fuel injection systems can.
Your CIS intake boot replacement is now complete.